Editing advice/portrait photos
Aug 12, 2013 08:07:00 #

Vhopkins25 wrote:
Hello everyone, br br I am terrible at editing an... (show quote)
Good morning V,
Can you post some photos of your images? and what equipment are you using? Camera, lenses, flash????
Aug 12, 2013 08:29:10 #
rpavich wrote:
ONE LAST VERY IMPORTANT THING: you shot these at f/16 aperture...that's not the sharpest aperture that most camera's will do...try and shoot them at 3 stops above your lens' smallest aperture number (which is largest aperture)
Example; Pretend your lens is a f/2.8 lens...then go up to f/4 (one stop) up to f/5.6 (two stops) then shoot at f/8 (three stops above largest stop)
That should yield sharper shots.
Example; Pretend your lens is a f/2.8 lens...then go up to f/4 (one stop) up to f/5.6 (two stops) then shoot at f/8 (three stops above largest stop)
That should yield sharper shots.
Huh....Now that's an interesting and good to know tip.
Aug 12, 2013 08:46:35 #

Aug 12, 2013 09:47:01 #
Vhopkins25
Loc: Michigan
deej wrote:
Really cute shots by the way!!!
Thanks! The first photo is my two year old ;-)
Aug 12, 2013 09:48:12 #
Vhopkins25
Loc: Michigan
sportyman140 wrote:
Good morning V,
Can you post some photos of your images? and what equipment are you using? Camera, lenses, flash????
Can you post some photos of your images? and what equipment are you using? Camera, lenses, flash????
You would think I would know to do this already ;-)
I have a Sony a230.... used the kit lens..... no flash, so used to not using it that I almost forget it's there! I will definitely be working on that
Aug 12, 2013 09:56:28 #
Vhopkins25
Loc: Michigan
I have shot in RAW before but gave up on that for a bit....
Thank you for the focusing comment! I ALWAYS forget that, yet you'd think that would be absolute common sense. I think I get so caught up trying to make the kiddos laugh that I pay less attention to where my focus is.
as for the f/16.... I will check it out! thank you SO much!!!
Thank you for the focusing comment! I ALWAYS forget that, yet you'd think that would be absolute common sense. I think I get so caught up trying to make the kiddos laugh that I pay less attention to where my focus is.
as for the f/16.... I will check it out! thank you SO much!!!
rpavich wrote:
It's because the size of the file. Do you shoot in... (show quote)
Aug 12, 2013 10:20:54 #


Aug 12, 2013 11:12:39 #
Vhopkins25
Loc: Michigan
the Scottsman wrote:
Is this the look your going for?
YES! the face is a little brighter and less "tired" looking... maybe I just need to spend a little more time in editing. I am so impatient with it! Perhaps as I learn more about it, I will want to spend more time in it.
Aug 12, 2013 11:18:53 #

The images are both quite contrasty. Focus seems to have missed the mark in both as well. A couple of tools in Photoshop or Elements work quite well to improve these images. The first is the Shadow/highlight tool to bring down the washed out looking highlights in the white areas. Second is the Levels tool. Since you are new to editing I would learn how to use levels first and later get into Curves, which are more complex to use. I did some dodging on the face of the girl with the teacup. New Layer, Overlay mode, Fill with neutral gray, softest possible brush, brush opacity set to about 10% and size the brush to fit part of the face using the [ key to make the brush smaller and ] to make it larger.
If you have Elements, go on line and search for Elements tutorials.
Lastly I used the unsharp mask for sharpening. It is perhaps a bit extra to learn but it is very flexible. Little can be done with the squinty eyes other than to find a spot for the shot that has less direct light, i.e. an overcast day.


Aug 12, 2013 11:38:48 #
Vhopkins25
Loc: Michigan
Considering I don't know most of what you just said (in regards to editing terms) shows I have a LOT to learn. I have heard of it all, just not sure how it all works. Looks like I have a few goals set for this week!
Thank you for the help!
Thank you for the help!
ronwande wrote:
The images are both quite contrasty. Focus seems ... (show quote)
Aug 12, 2013 11:50:45 #


Aug 12, 2013 11:51:51 #

First, the image out of the camera has underexposed skin tones. This effect happens here very likely because you have your camera set to Auto Exposure. In this mode, the camera metering system generalizes the overall exposure to balance lights and darks.
Notice that in the first image, of the girl's face and arm, a major part of the image contains brights. The metering system automatically adjusts the exposure to avoid blowing out the highlights in the bright areas. In turn, the darks (face and arms) become underexposed.
You may overcome this effect by several means for a good exposure in the camera. One, you could use a reflector to bounce some sunlight onto the face of your subject -- this technique is called fill light. It reduces shadows.
Two, you could use a pop of fill flash from your camera to reduce the shadows. Newer point-and-shoot cameras have a preset for Portraits on the Mode dial on the camera. Try it. This mode should automatically adds some fill flash.
Further, this mode will likely use the camera metering system to consider the background and the main subject exposures separately, for the best exposure.
Your point-and-shoot may also have an adjustment for the flash lighting quantity so you could back off its power for a flattering lighting on your main subject.
In the software, you can adjust shadows usually enough to produce a flattering lighting on the main subject.
But for the best overall result, you really should try to get the best exposure possible in the camera.
Here, though, the ambient lighting looks flat due to an overcast sky. An overcast sky softens the ambient light by diffusing it. This effect reduces image contrast. Your image has low contrast in the shadows as a result. Brightening the shadows will still leave the face area with low contrast, giving it a flat appearance.
Using a fill light via a reflector from one side will introduce some contrast by producing shadows that model the face.
I could go on, but let me recommend a good book on the subject of lighting in the digital photography era:
Lighting for Digital Photography, by Syl Arena.
His book uses plenty of illustrations and photographs along with plainly worded comments and instructions for achieving good lighting of subjects.
His book skips the history and the philosophy of photography in favor of explaining and showing how to gain a good exposure using digital cameras using both ambient and artificial lighting.
I believe this fine book will teach you the methods and techniques for properly lighting your subjects for a flattering look.
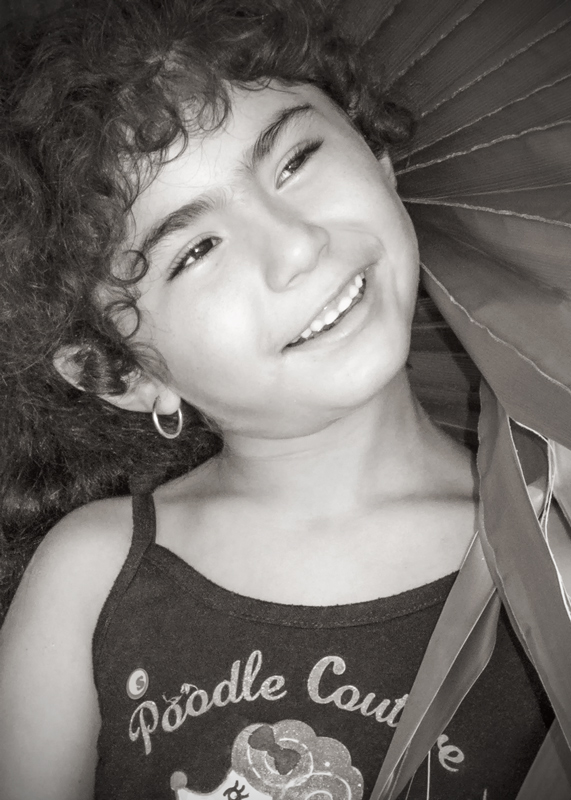
For my photograph below, I used open shade as the only lighting for it. Syl Arena discusses this kind of lighting, too.
Note that I did edit this photograph in Photoshop to enhance the high key lighting effect. So you see minimal contrast in the facial areas. This effect can work depending on the subject and the setting.
Notice that in the first image, of the girl's face and arm, a major part of the image contains brights. The metering system automatically adjusts the exposure to avoid blowing out the highlights in the bright areas. In turn, the darks (face and arms) become underexposed.
You may overcome this effect by several means for a good exposure in the camera. One, you could use a reflector to bounce some sunlight onto the face of your subject -- this technique is called fill light. It reduces shadows.
Two, you could use a pop of fill flash from your camera to reduce the shadows. Newer point-and-shoot cameras have a preset for Portraits on the Mode dial on the camera. Try it. This mode should automatically adds some fill flash.
Further, this mode will likely use the camera metering system to consider the background and the main subject exposures separately, for the best exposure.
Your point-and-shoot may also have an adjustment for the flash lighting quantity so you could back off its power for a flattering lighting on your main subject.
In the software, you can adjust shadows usually enough to produce a flattering lighting on the main subject.
But for the best overall result, you really should try to get the best exposure possible in the camera.
Here, though, the ambient lighting looks flat due to an overcast sky. An overcast sky softens the ambient light by diffusing it. This effect reduces image contrast. Your image has low contrast in the shadows as a result. Brightening the shadows will still leave the face area with low contrast, giving it a flat appearance.
Using a fill light via a reflector from one side will introduce some contrast by producing shadows that model the face.
I could go on, but let me recommend a good book on the subject of lighting in the digital photography era:
Lighting for Digital Photography, by Syl Arena.
His book uses plenty of illustrations and photographs along with plainly worded comments and instructions for achieving good lighting of subjects.
His book skips the history and the philosophy of photography in favor of explaining and showing how to gain a good exposure using digital cameras using both ambient and artificial lighting.
I believe this fine book will teach you the methods and techniques for properly lighting your subjects for a flattering look.
For my photograph below, I used open shade as the only lighting for it. Syl Arena discusses this kind of lighting, too.
Note that I did edit this photograph in Photoshop to enhance the high key lighting effect. So you see minimal contrast in the facial areas. This effect can work depending on the subject and the setting.
Young Girl with Palm Leaft
Aug 12, 2013 11:55:05 #

Hi, if you were to shoot in RAW you would have a lot more control in editing of all your photographs.
Aug 12, 2013 12:06:26 #
Vhopkins25
Loc: Michigan
It's official, everyone is better at editing than I am! I love it!
barry.lapoint wrote:
I gave it a shot...
Aug 12, 2013 12:12:34 #
Vhopkins25
Loc: Michigan
Thanks so much for all of that! Thank you for the detailed notes. I will work on that. I was actually considering making my own reflector just to kind of practice with light. Would that be a good start?
anotherview wrote:
First, the image out of the camera has underexpose... (show quote)
If you want to reply, then register here. Registration is free and your account is created instantly, so you can post right away.