Posts for: phkowalchuk
May 31, 2017 14:15:56 #
Photographer Jim's experience has been my experience as well. I have Epson printers, though. I have found that doing 13x19 works well for me and that if I need anything larger than 24 on the short side, I can have a local printer I used before getting my 24-inch wide-format printer print for me. I save a bunch of money, even with high priced Epson inks. And the quality is great. I agree that roll paper printers don't handle sheet feeds well at all. I tried late last year and found it so frustrating that I don't do it any more (for that particular job, I was trying to speed a two-sided print by using two machines). After some foul-language inducing problems with the wide printer, I went to the sheet feed on the smaller printer. A frustration with roll printers is the roll you have to deal with in the finished print. A pain, but there are ways to deal with it.
My 24-inch printer is the Epson SureColor P6000. I've had problems over the years, as have many Epson owners, with ink drying and blocking the print heads. Epson has improved their inks for their new wide printer series and I've gone long periods without so much as a miss on a nozzle check. I love it! Not so much with my older R3000, but I have learned how to deal with it.
I hope this is a help.
Photographer Jim wrote:
If you enjoy making your own prints and want to ma... (show quote)
May 24, 2017 12:08:51 #
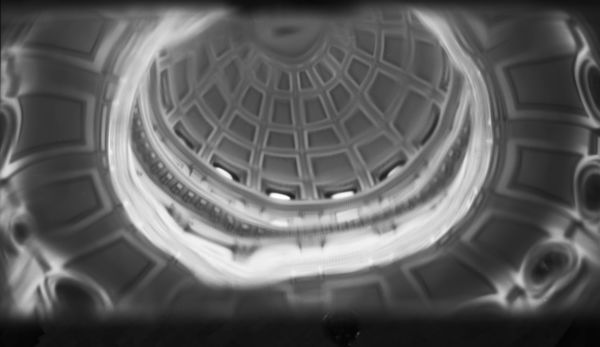
Thanx, chasgroh! And the story behind that one is kind of neat. I made this photo shortly after the interior dome of the Colorado State Capitol Building had been refurbished. While all the photos I'd seen were taken with an upward-looking point of view, I decided on a different approach. I was using an 8x10 view camera with 4x10 cut film back then. I set up my camera on a fully extended large wooden tripod, pointing down on a section of wide brass rail for this photo. I had to take a step ladder so I could get high enough to view the ground glass to focus. Fortunately, the Capitol Police let me in when no one else was in the building so I could take all the time and have all the space I needed to make the photo. I had fun!
May 24, 2017 11:54:45 #
A couple of Optical Delusions...
Apr 25, 2017 10:00:42 #
Was the stitching difficult? Did you have to place the photos by hand or was the stitching program able to do it without "human intervention?" I do a lot of stitching, but with images where the overlap is such that the program is able to do it.
littlebiddle wrote:
Thanks! This is 8 shots stitched together!
Apr 19, 2017 15:39:45 #
What I see is the bridge with the ends cut off. On the main message and on the download. If the phrase "that pic was also sent" is supposed to mean something to me, I'm at a loss. The ends of the bridge are not in the photo I can see. What am I looking for?
will47 wrote:
That pic was also sent. Look.
Apr 19, 2017 11:33:17 #
Too tight. I don't see the bridge, just a section of it. Maybe try again from a greater distance?
Apr 19, 2017 11:30:57 #
I like the depth you created in the second with the crisp focus on the subject and the out of focus in the back. I felt I could reach in past the bride and touch the fence!
Apr 19, 2017 10:14:35 #
I've had this happen to me when my computer died. Something about a power controller or something like that. When it died, it spiked and crashed the drives I had on the computer at the time. There's a Micro Center off 225 and I-25. Are you familiar with them> It's a huge computer store; they have everything. They even have a walk-in help desk. I went there for help...they've always been very helpful. The rep confirmed my worst fear...that the drive was bad. They referred to a recovery business next door to them in the strip center, but told me it would likely run me more than a thousand to get the work done. I did try someone who had some level of expertise; he wasn't able to get anything back for me and told me I could well spend the big money on "the pros" with the same result. Since I had most of my images on other externals, I decided to just say goodbye to the images I'd not recently backed up.
This was more than 4 years ago...I don't know if things have gotten less expensive. If not, you might have to be prepared for a sizeable bill. That's why I now have 4 externals that I back up to my main work drive and each other religiously. My desk looks like an external drive city!
Good luck.
This was more than 4 years ago...I don't know if things have gotten less expensive. If not, you might have to be prepared for a sizeable bill. That's why I now have 4 externals that I back up to my main work drive and each other religiously. My desk looks like an external drive city!
Good luck.
Apr 16, 2017 14:56:44 #
Szalajj wrote:
My question to members is which takes more skill and expertise to shoot without any special equipment, especially filters, getting the settings correct in the camera?
My question to members is which takes more skill and expertise to shoot without any special equipment, especially filters, getting the settings correct in the camera?
I agree with a couple of posters: In a couple of the photos, the water (the highlights) seem lost...blown. If you don't want blown highlights, you might need ND filters or to make several photos at different exposures and do an HDR stack.
Apr 16, 2017 14:50:19 #
Mirrors on the ceiling? Pink champagne on ice? Was it all there?
Apr 16, 2017 14:23:33 #
Walt B wrote:
...My question is do I need anything wider than 24mm.
I really think you do. I've been to all those absolutely astounding places several times. If you're not a photo stitcher, I'm pretty sure you'll end up missing something wider. The vistas in Canyon Lands and Bryce are just too wide...and deep. Zion is other-worldly and needs wider than 24...for both width and depth. I had 24mm...not wide enough. I'm a stitcher, so I was able to get what I wanted and in a format...very wide...that I really work for.
A word about these places. Starting now, Canyon Lands and Arches are just crammed with people at all the obvious places. I urge you to get out early...very early. If you want something that's different than probably 99% of the people are going to get (and that you can buy at the park visitor station curio shop), don't even go to those places, except to park. Then walk to a spot where you're alone...probably using your longer lens to get your photos. There are just too many people at these "photo stops" once the sun comes up...even before; I learned this the hard way. At Canyon Lands, go into the canyon. It's all the same from the top...a big hole in the ground that has an exposure range too great for good exposures and not nearly as interesting.
If you haven't been there, you really should do everything possible to make it to Bryce and Zion. They are unbelievable. You can go into Bryce and should. Zion's drive through has lots of pull offs. I did Zion myself. I was on my motorcycle, so didn't pay attention if there were tours, but it was really easy for me to pull of to the side of the road where others couldn't and make photos...again, I had to stitch. Wide (24mm) just wasn't wide enough for what I wanted. I got some really wide panoramic photos out of it, too.
Utah is very hot. I rode out from the Denver, Colorado, area and it seemed that when I crossed over into Utah, the temperature rose about 20 degrees! Very hot. Very bright...you might want to take a ND filter or shoot to exposure stack.
Warning: These are jaw-dropping places. Take care not to break any teeth or step on your tongue! And come back with lots of great photos.
Safe travels!
Apr 11, 2017 11:55:37 #
You don't say how much experience you have as a photographer and where your interest lies. You've been a member for two and a quarter years. I did weddings many many years ago. Simpler times. I agree with most of what everyone has said. My council mirrors those who have advised you to offer to make informal/casual photographs (you could shoot in the reportage/journalist style...that could be nice). But I think your relationship with the couple would be better off if you strongly recommend that they secure the services of a professional or at least someone who has a portfolio of work showing they know what they're doing. And you do informals.
Apr 11, 2017 02:15:13 #
If all else fails, I think you can still get a good (or even better than good) image in post. Here's how I did it:
I selected the outside areas (saved the selection) and darkened a bit (curves). I selected the round elements out there (Umbrellas?) and increased their vibrance. I loaded my saved selection, added the highlight of the light in top right, inversed it and did a curves layer to lighten the interior a bit. A brightness and contrast layer darkened the area below the marble top on which the dog is sitting to anchor the photo. Selected the dog and used a curves layer to lighten the well dressed canine and increase contrast. Oh yeah, I also used perspective crop to "square up" the columns.
This sounds like a lot, but it actually took less time to do than it took me to type out the steps I took to do the post work.
I hope this demonstrates how, if you don't get it quite right, flash or not, you can still work in post to get a really nice photo!
I hope this is a help.
Apr 11, 2017 01:43:50 #
I agree that the couple are out of focus. That alone makes it a no-show for me. I could see this as a photo to remind them of the venue...if this was the venue for part of their day. But if it is, I have a problem with the composition. I like the couple to the side, but there's not enough to the right of them. You've cropped, either in camera or in post, the sides of the arch and the top. If you have others that have the full arch...sides and top...with the couple just inside the right upright and where the groom and bride are sharp, that might work for me. And, if they weren't wondering why you were placing them there for the photo, it might for them as well. But this one will not do your reputation any good. Sorry.
Mar 31, 2017 11:46:12 #
rmalarz wrote:
I don't see why not. It'd be part of the crop tool set. I've relied on that numerous times when doing architectural work and not able to correct in camera. It works quite well. Now, the disclosure, I'm still using CS6. I assume that the tool works the same as it would in CC.
--Bob
--Bob
It does. I use it frequently. I also use the tool in photoshop's raw processor. Both work well for me.