Posts for: SalvageDiver
Aug 19, 2023 15:52:44 #
Aug 18, 2023 18:35:41 #
jerryc41 wrote:
... Is indigo really there? That seems to be controversial. ...
Not among scientists. The colors of a rainbow is just a continum of wavelengths from the ultraviolet to the infrared. The visible color bands that we see are just based on human perceptions. But when measured using spectrometers, there are no bands, just a continuous spectrum. The spectrum is the sun's solar spectra.
The discussion (not controversy) revolves around how Newton described the different color bands based on what he could see and later revised based on a musical analogy not scientific reasoning.
Wikipedia:
"Newton, who admitted his eyes were not very critical in distinguishing colours, originally divided the spectrum into five main colours: red, yellow, green, blue and violet. Later he included orange and indigo, giving seven main colours by analogy to the number of notes in a musical scale. Newton chose to divide the visible spectrum into seven colours out of a belief derived from the beliefs of the ancient Greek sophists, who thought there was a connection between the colours, the musical notes, the known objects in the Solar System, and the days of the week."
Aug 14, 2023 15:38:29 #
Aug 14, 2023 10:10:04 #
theehmann wrote:
On my Comcast email, it won't allow me to send my photos as it says the images are too large. How can I reduce the size so I can email them?
Thanks so much for any help you can provide.
Thanks so much for any help you can provide.
Email is concerned with file size not image size or file type. There is no need to change the image size, i.e. pixel dimenisions.
The simpliest way is to use any photo editor, such as Windows Photo, Apple Photo or any other photo editor you may have. Open your jpg image and then immediately save (or export) it, but be sure to increase your file compression before exporting. Increasing your file compression will reduce your file size without reducing image size.
Increasing compression will degrade the image, but not to a degree that is noticeable to the viewer.
Aug 13, 2023 21:53:07 #
Aug 12, 2023 18:00:56 #
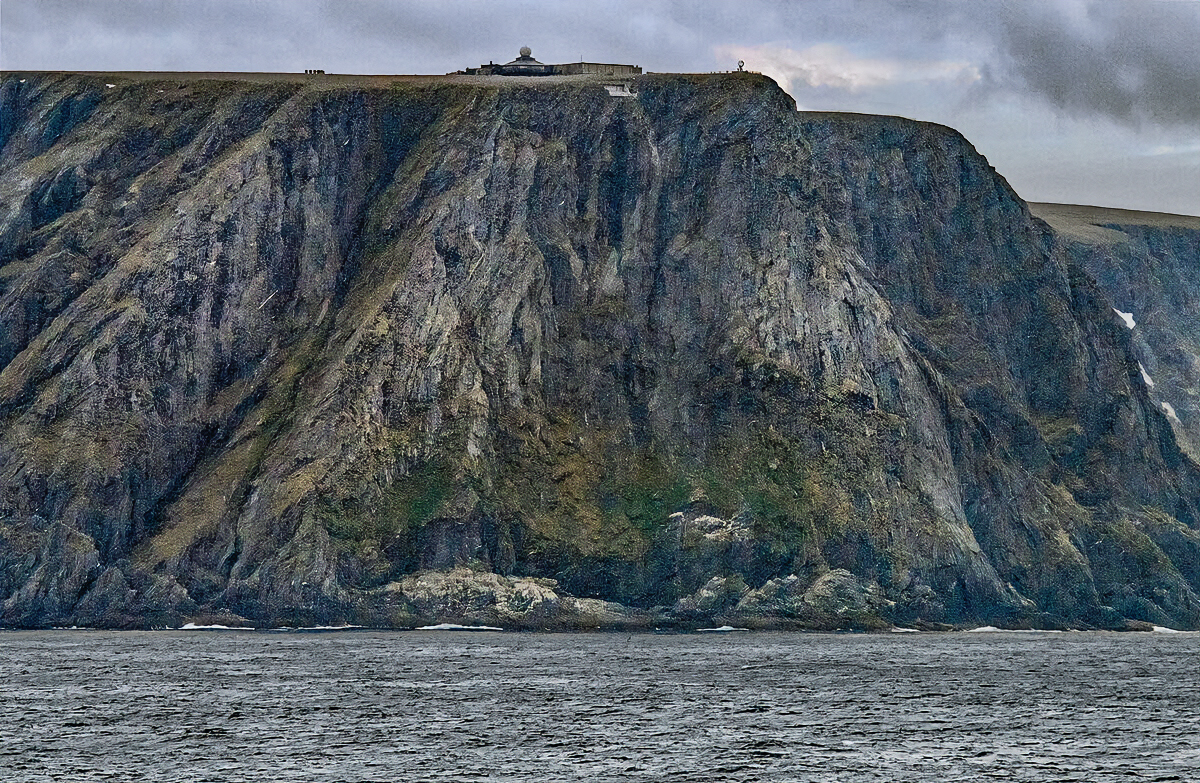
Aug 12, 2023 13:18:47 #
PhotoDerek wrote:
... could it be improved?
Yes. The image, taken on a cloudy dreary day, is rather flat and overly bright for the conditions. The subject is the cliffs and they're lacking detail, contrast and depth. There are details and colors in the sky that can also be recovered.
PhotoDerek wrote:
Any comments...?
Attached is an example of correcting the issues I describe above. Here are the basic steps.
1) Global Adjustments: Decreasing highlights, increasing whites, decreasing blacks and adding a little texture. This brings out sky detail, more detail in the cliff face, reduces brightness without changing exposure and increases overal scene contrast.
2) Removed Halo: This is a very minor correction but a pet peeve of mine. Edge halos, such as across the hill/sky boundary, just show a lack of attention to detail. If your posting to social media, then it's not really obvoius, but if you plan to print, the halos become more obvious the larger the print.
3) increase cliff detail: Recover a little more cliff face detail since this is the subject of the image. I used Aurora HDR to make tonal adjustments the layer image and then reduced layer opacity until I was satisfied with the result (~30%). This could also be done by other means such as increasing clarity or using curves.
4) Curves: Made adjustments to the cliff face using a series of curves (3) and luminosity masks to further bring out contrast detail in the cliff face. These were local adjustments to the cliff face only.
5) Dodge and Burn: Apply D&B to bring out depth in the cliff face.
6) Fix sky hotspot: There was a small area in the sky that was clipped at some point in the process, so cloning in areas from other parts of the sky, repaired the clipped sky highlights.
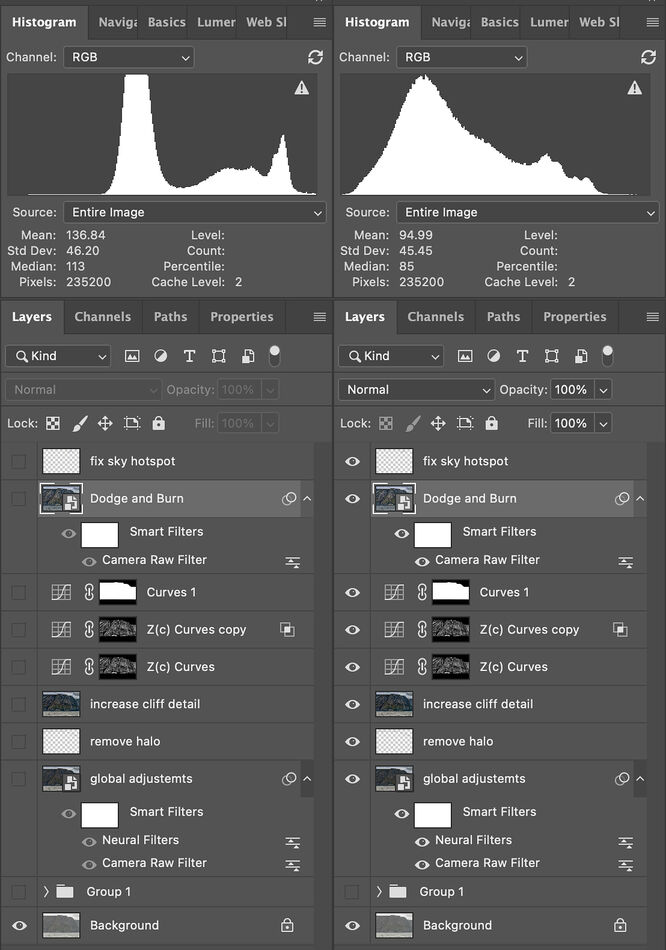
The attached histograms show how the original image (as posted) was right shifted decreasing contrast. This gives the image a soft hazy look since the blacks have been suppressed. The second histogram shows how the image uses a greater tonal range, increasing overall image contrast and left shifting (reducing) the tone curve resulting in a lower image brightness.
If you plan to further edit this image, I hope this gives you some constructive ideas to help you along the way.
Mike
Final
Histograms: before/after
Aug 11, 2023 20:13:41 #
Aug 3, 2023 19:11:02 #
Aug 2, 2023 20:53:13 #
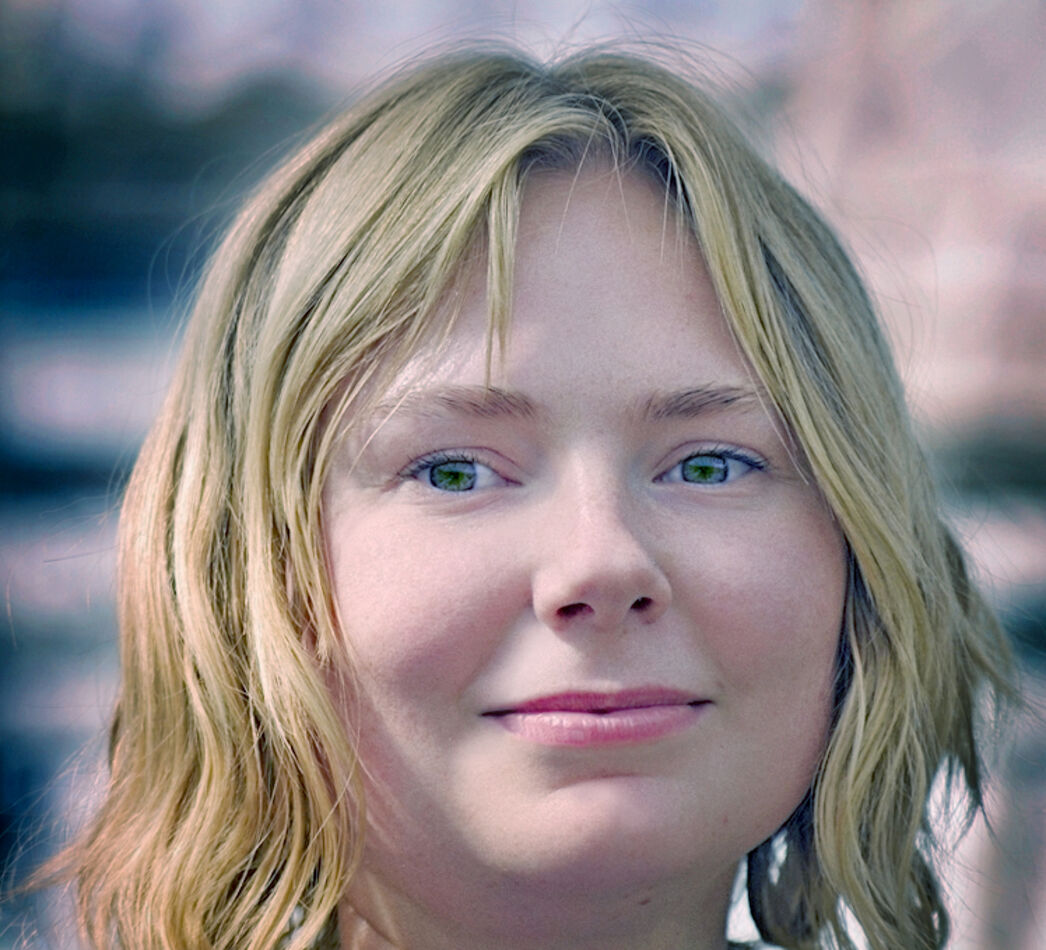
Tonytee wrote:
Here is a "after" image result. After t... (show quote)
[...Open for discussion. :)...]
Tony,
Have you checked your monitor calibration lately? These latest 2 images still have a huge red color cast. So much so that her eyes look almost black. Almost everyone gave you feedback on the red color cast.
Another possibility is that the color space was left undefined in your original file and the website is just attempting to translate your image into the attached thumbnail. This can be checked in your exif data. Since the original is not attached, it's hard to tell whether the original has the same color cast as what we see here on your UHH post or not.
In the spirit of honest feedback, the excessive red color cast is not flattering the model. Unless your sending a print, she will likely see an image similar to what we see in this post, i.e. a significant red color cast.
Personally, I would be reluctant to send her the edited image as it currently exists. But that is just my opinion. YMMV.
Mike
Aug 2, 2023 13:42:04 #
Tonytee wrote:
This lovely, young lady is an employee at the gard... (show quote)
As many have said, remove the red color cast and correct the skin tones. After removing the color cast you're left with a very bright and distracting background. Toning down the background would better accentuate the lovely woman's face. Reducing the harsh shadow transitions on her face would help the illusion of softer lighting.
If you were going to give her a print of this image, then there are other little corrections to be made such as blemish removal, softening the skin, softening (but not removing) the creases under and around her eyes, etc.
Jul 31, 2023 14:32:15 #
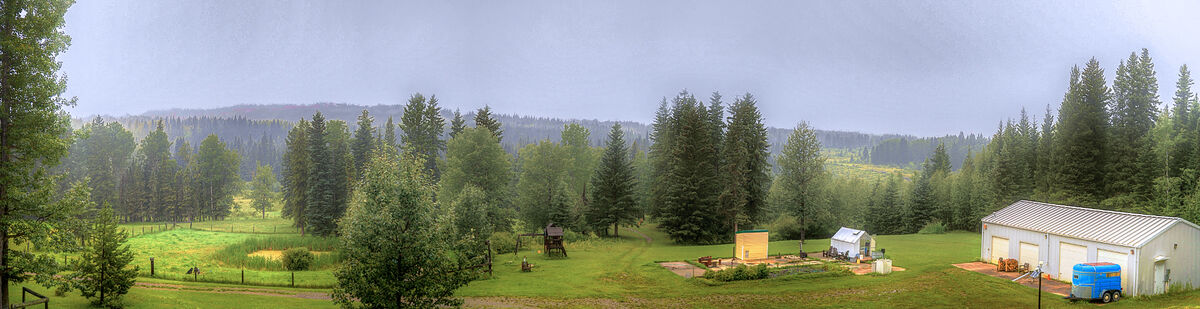
(Panorama)
bwana wrote:
This morning on the ranch after four days of rain and drizzle...
Sony A7R V, LA-EA4r adapter, Canon 24-105mm L (58mm, f/4, 13x1/125sec, ISO100), handheld
Panorama out of Lightroom.
Enjoy!
bwa
Sony A7R V, LA-EA4r adapter, Canon 24-105mm L (58mm, f/4, 13x1/125sec, ISO100), handheld
Panorama out of Lightroom.
Enjoy!
bwa
Very nice image and well executed pano. I especially like the mystique that the fog adds to your image.
Now for your title. Just for grins and giggles, I had to see for myself, since the title sounded a little like a challenge. But, just as you said, there are mountains in the background. And the fog definitely add character to your image.
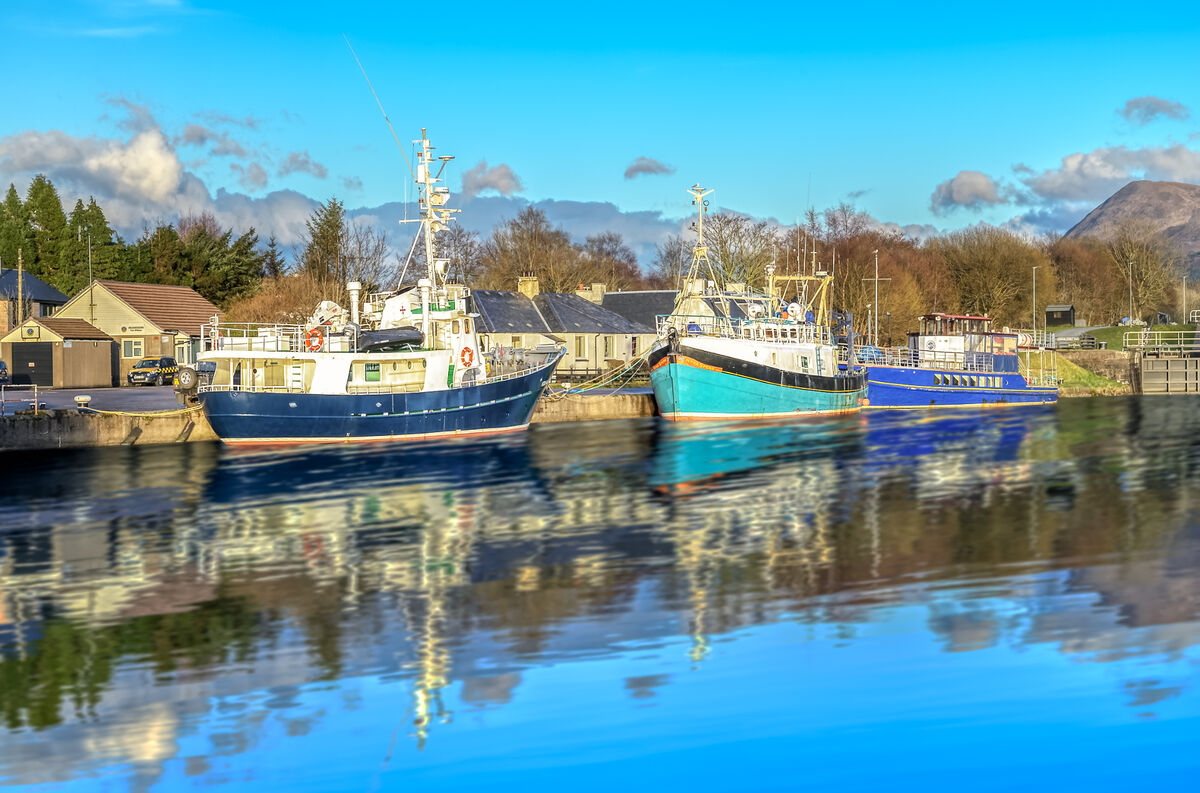
Jul 31, 2023 14:09:00 #
bobforman wrote:
Out in the bright sunlight yesterday, I was photographing a water scene with my D850, only to discover the photos were under-exposed. I figure I've done wrong...
I’m assuming that this is a SOOC image from your camera. It would have been very helpful troubleshooting this image had you posted the original included with the exif data. Without the additional exif data, you’ll just get generalized opinions and speculation about the problem.
bobforman wrote:
...The camera was set to "P", Active D off and matrix metering mode...
There was nothing wrong with your stated camera settings of P/active-D=off/matrix metering mode.
bobforman wrote:
...Any thoughts?
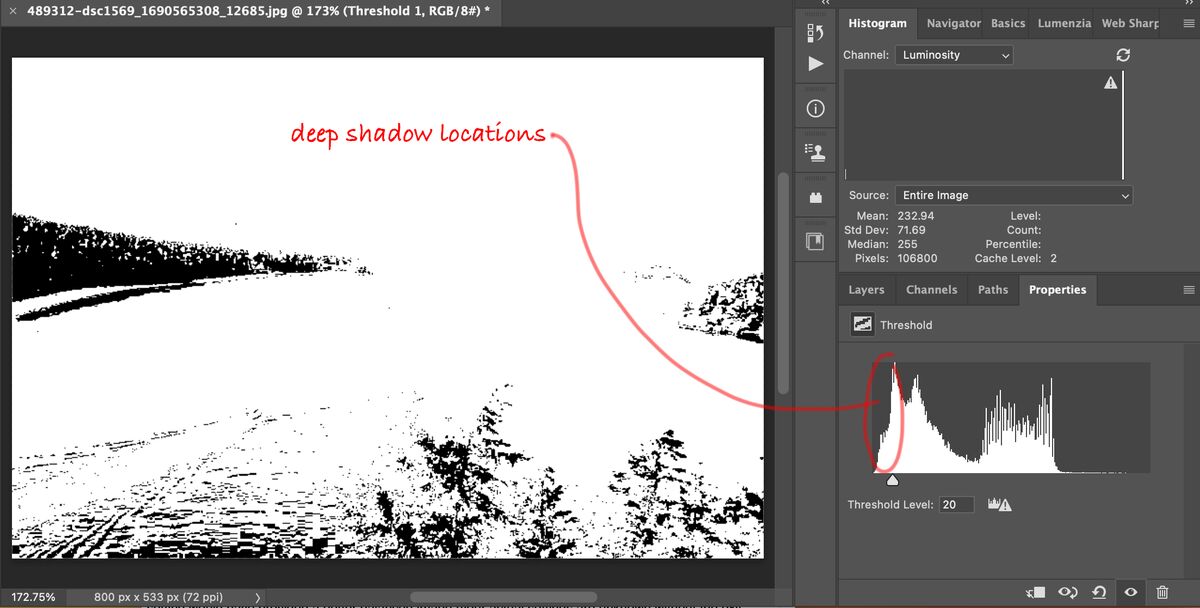
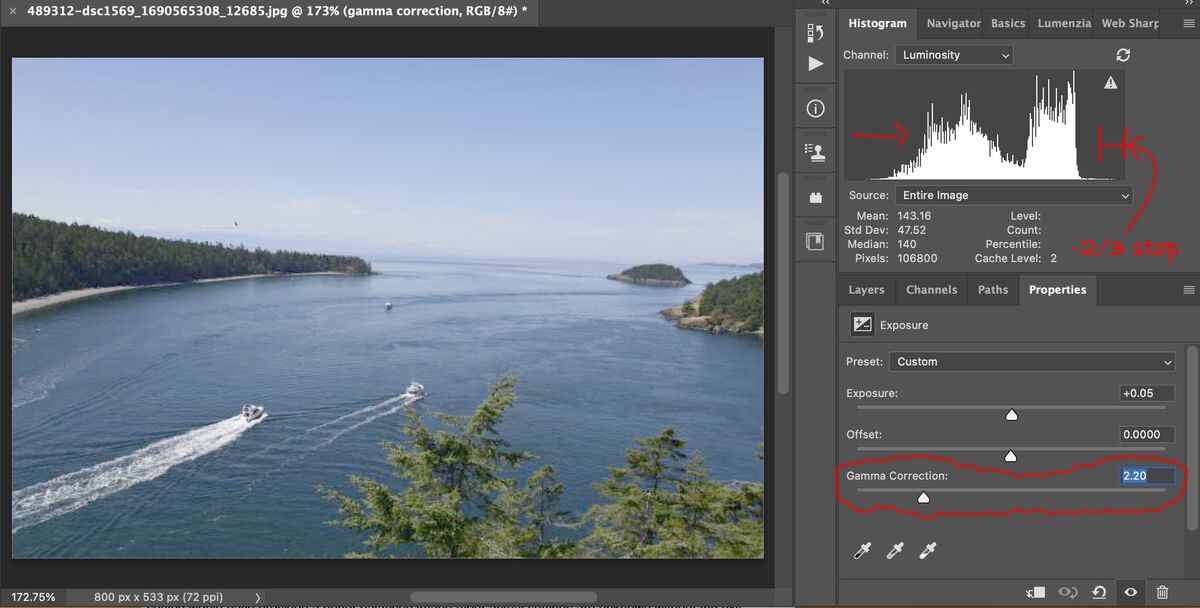
You do have, primarily, a gamma error problem with about a 2/3 stop underexposure. This is illustrated in the image histogram (1). Your camera did record the full dynamic range of the scene without clipping the highlights (2) or shadows (3), so no loss of information. However, the shadows are blocked up at the extreme low end.
The gamma problem can be caused by an increased contrast setting and/or an incorrect picture control setting for this specific scene. Selecting Neutral rather than Landscape in your picture control setting would have provided a better balanced image (your actual settings are unknown without the exif data). Also because this is a high contrast scene, reducing contrast in your picture control settings would have resulted in better shadow detail.
When shooting SOOC and letting the camera process the jpg without PP, the picture control settings are very important and needs to constantly change for the scene type. In this case, it appears to be incorrectly set for this particular scene.
However a simple negative gamma correction in PS brightens the scene and recovering shadow details without clipping your highlights (4). By increasing exposure about 2/3 stop, the boat’s wake will approach clipping where it should be.
There is a nice article in the ‘Cambridge in Color’ website about gamma correction. The associated links further explains how gamma correction impacts exposure.
https://www.cambridgeincolour.com/tutorials/gamma-correction.htm
Good luck with your troubleshooting. There is a lot of information from many contributors to digest. You may already know this, but letting the camera do your post-processing (i.e. jpg processing), using one setting never works well. You will always be changing the post-processing settings in-camera to match the scene type before ever pressing the shutter release button.
1 - original image. Note the histogram is shifted left. No clipping shadows or highlights.
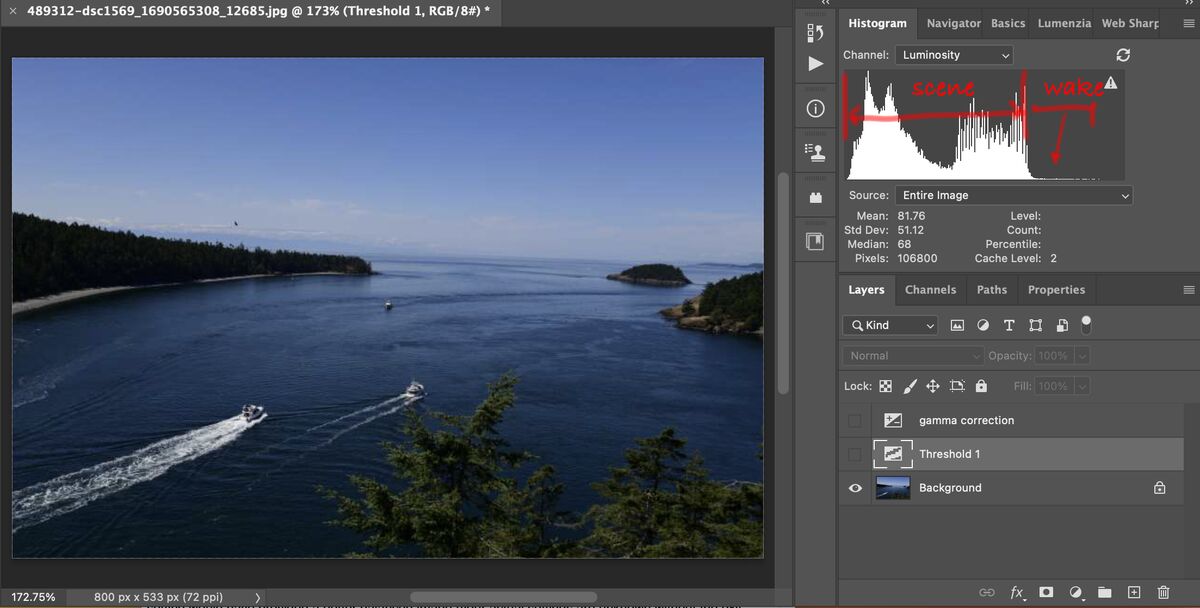
2 - boat wake should be near clipping but is still low.
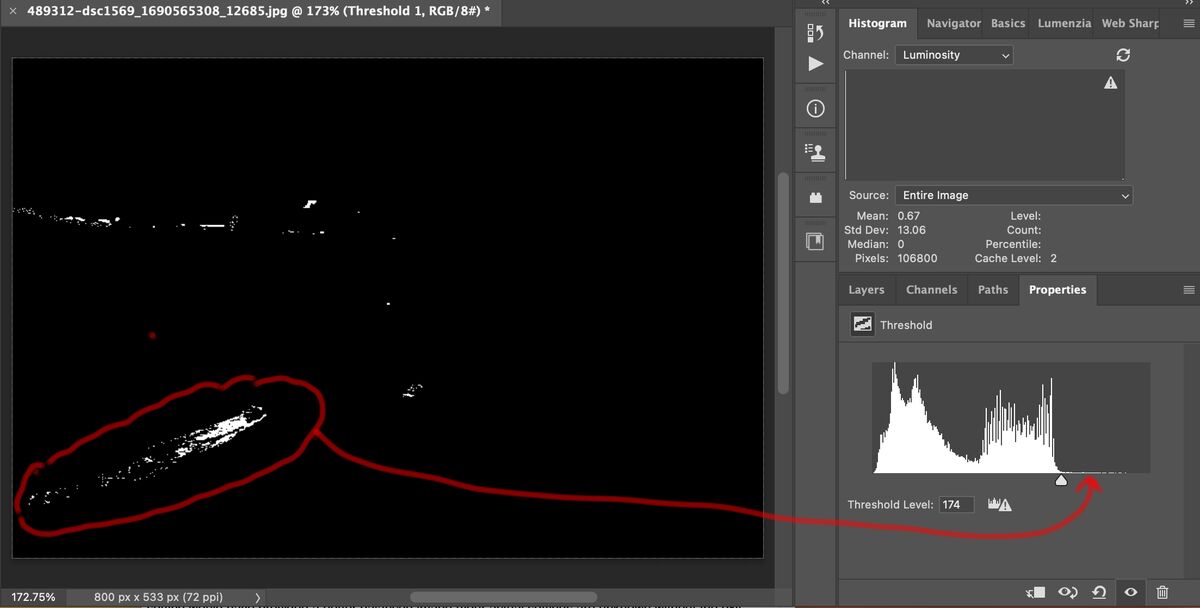
3 - location of deep shadows, but no clipping.
4 - only made negative gamma correction, no other adjustments.
Jul 22, 2023 09:49:04 #
Jul 19, 2023 11:27:22 #
Nice shot with leading lines bringing you into the picture.
When first looking at this image, my first thought was "so this is what it looks like from the nose-bleed section". LOL!
When first looking at this image, my first thought was "so this is what it looks like from the nose-bleed section". LOL!