Posts for: dave.m
Mar 13, 2019 14:22:03 #
Aprt from the obvious JPEG, RAW, or RAW + JPEG choice, there are 4 main things that affect any camera saving in burst mode - the size of the buffer, the efficiency of the camera firmware, the efficiency of the camera write hardware, and the speed of write of the memory card. A lot of things, but overall very easy to test for each of JPEG, RAW, RAW+JPEG. You can also do this to test different SD/CF card performance in your camera.
Take a burst mode sequence of a digital clock/ watch showing time in seconds (digital stop watch is best if you have one.) Start on a whole number for convenience (ie 10, 20). As soon as the camera shutter sound starts to stutter or slow down release the shutter. Immediately start watching the red recording led on the camera and, using the same watch, note the time it goes out.
From this simple test a number of really useful things can be identified:
* The latency or delay of the shutter - look at the time on the image of frame 1. The latency is the time from pressing the button to the time shown on the actual exposure. THis can be surprisingly high on older cameras.
* the number of frames possible before the buffer fills - is the number of frames exposed less one or perhaps 2 (depends how quickly you noticed the slowing down of the shutter before releasing)
* how long the camera takes to write the buffer to the card so you can take more pictures - the time between that shown on the last photo image, and what you noted on the stop watch when the red recording light went out.
None of this is laboratory quality testing, but it is very practical and gives excellent info which is also potentially useful. What I found from my EOS 6D:
* Shutter latency was about 0.2 sec (there is an element of human timing in this as it is surprising difficult to press exactly on a set second value. Counting down 5,4,3, etc to get in the 'rhythm' helps!)
* Maximum RAW was 10 frames, JPEG about 20 before I gave up pressing, RAW+JPEG 3 or 4
* Time difference recorded on first and last image gives the maximum number of seconds of burst for a given recording choice (intuitively JPEG is better than RAW+ JPEG but this test tells you how long.)
* Buffer write time depended very much on cards, until about class 6. After that was little change so essentially a class 6 could keep up with the camera quite happily if all I was recording was images not video. Use a class 10 and it will always be good enough.
I take no credit for this test, as it is the result of information I have found on the web over time, but it does work and I have been mildly surprised by some of the results. I guess you won't be too surprised to find that manufacturers quotes are often a little optimistic!
Mar 10, 2019 08:37:29 #
In my experience committed hobyists of any persuasion (photography, arts and crafts, DIY whatever) know the value of a specialist store and seem to be prepared to pay more for on-the-spot service and advice, ability to handle and check out, and the ability to return for warranty support etc.
I've been going to the same specialist photo shop for years. Probably 80%+ of my big ticket items come from there, and a similar percentage of my trade-in stuff has gone there. I know I can get cheaper on the internet, and get more selling on ebay, but the difference and hastle/ irritation factor is not worth it to me. They know I shop around so expect me to ask for best price. As others have noted, if it's reasonably close I'll buy from them.
When I was much younger, my parents owned a very successful traditional hardware store. When they came to retirement they offered the shop to me but with a warning that retail was changing fast and soon customers 'would get the kind of shopping they deserve'. He was referring to the concept that people concentrated on price not value or quality, couldn't care less about after sales support - until something went wrong. Because of my evolving career and their advice, I decided not to take up the shop which turned out be be a good decision. Since that time a town of 80,000 with 3 excellent hardware stores (ours the best of course) now has none and the nearest DIY superstore (B&Q, similar to Home Depot) is a 10ml round trip.
So support your local store if you can otherwise we will soon be left with general super stores or internet only.
Mar 6, 2019 08:42:50 #
interesting thread.
I use manual when auto doesn't work. I typically use A priority with landscapes and T for moving subjects. The camera then sets the other 2 components .
When doesn't auto work? Whenever the lighting of the scene as viewed in the viewfinder is not 'average' illumination.
All (?) light meters internal or external work on the assumption that the scene is 18% grey. When it isn't then the exposure will be 'wrong' to some degree or another. It is a credit to modern cameras and sensors that most of the time we still get an adequate exposure which we can work with (especially if we shoot RAW which has significantly more dynamic range than JPEG.)
Common examples of 'incorrect' exposure are a small dark object against a bright background, such as a bird or plane against the sky. The light sky swamps the scene and interpreting that as 18% grey will underexpose the bird/plane such that it is often just a silhouette. An increase by +2 or 3 EV will typically get the bird/ plane exposure correct. Another common example is snow scenes which often come out a dirty shade where a 1 to 2 EV exposure compensation does the trick.
The reverse is also true and a smaller white subject against a dark background needs a -ve EV compensation.
Another example when exposure compensation or Manual setting of A,S,ISO will be necessary is night photography, especially for star images where ISO needs to be as low as we can get (say 6400), aperture needs to be wide at f/2.8 or f/4, so 20s exposures are normal. Most of that will not happen if auto is selected.
Interestingly close ups of people are also typically incorrectly exposed with black people needing -ve compensation and white +ve. The bane of a wedding photographer is the massive difference between a black suit and a white dress in bright sunlight that can't be avoided.
If your still reading, why 18% grey? With reflected light (which is what a light meter sees) complete reflection is white or 255 on an exposure histogram, complete absorption (ie no reflection at all) is 0. Exactly in the middle the histogram is 128 and to get this reflection requires an 18% grey or equivalent (light meters see only reflectance not colour so a lawn of grass is also about 18%.) why not 50% grey? well think of mixing paint. If you mix equal parts of black and white paint you get an off-black. You need to mix about 1:4 to get mid grey.
Mar 4, 2019 07:40:27 #
kymarto wrote:
If you have Photoshop skills avoid GND filters, as the effect can be done much better and with much more control using masking and two exposures
True - although best in RAW so you have enough data for PS grad filter to find something to work with

My big issue has always been the clutter that comes with carrying multiple filters, for multiple lenses. Made much easier when I replaced my 82mm filter lens. As most lenses use 77m I now carry just 3 thin rim filters - CPL, ND3 and ND6. This gives 3, 6, and 9, although there is a hint of vignetting at 18mm with 3+6 it can easily be removed with PS
Mar 4, 2019 07:32:53 #
repleo wrote:
Breakthrough Photography has a good guide to ND fi... (show quote)
2 very good references - thanks
Feb 19, 2019 07:49:37 #
When it comes to restoring colour prints a huge amount can be acheived with PS especially using the white point dropper in RGB using curves (paticularly one colour channel at a time with heavy colour castes), followed by curves for contrast adjustment. And if I was doing a handful that is exactly what I would do.
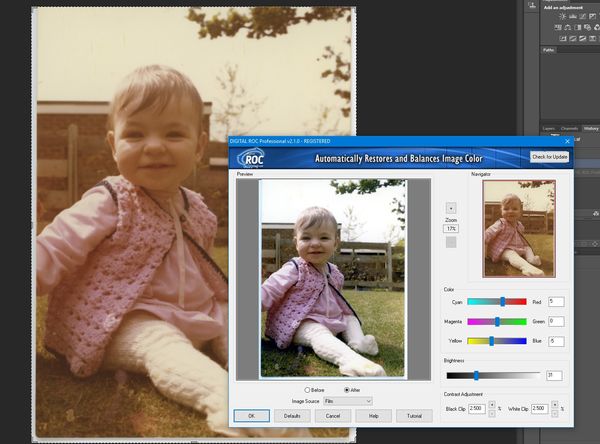
But if you intend to do loads have a look at Kodak ROC restorer. The speed of use and colour rendition achieved so easily, often without any adjustment, I think is amazing.
The screen shot below was a 45 year old print, scanned at 600dpi with an epson scanner. I tend to fill the platten then crop for each print to save time.I know you only need 300 dpi for prints, but if there is more detail to be had, then I take it, then resize for final storage/ printing.
I then selected filter>Kodak> digital ROC and the inset screen is what I would get with no further adjustment at all. Total time after crop at least 30 seconds!
The only time I typically use PS original tools is if there is physical damage or similar to repair
Downsides:
* The plugin only works on PS x86 (the only reason I still have PS CS6 x86 installed.)
* its perhaps a bit pricey for an unsupported application running on obsolete application
see http://asf.com/products/plugins/rocpro/pluginROCPRO/
Upside:
* for me its worth every penny as I can easily process 30+ prints an hour and there is no way I could achieve that with curves or colour correction, so I occasionally scan 40 or 50 prints as the mood takes me, then have a processing binge for a couple of hours :)
* with 300 + 40 to 50 year old prints and slides done already its less than 25c an image and reducing!
Another downside, is when relatives see what you achieved they have been known to offer a shoe box with prints and ask if you can do some of theirs
Feb 16, 2019 06:40:18 #
And no consolation at all, but if a directory corruption, it was probably caused by disconnecting the drive without Windows 'eject' after a long write. It's not well known that with a 'big' write task the PC 'caches' the files in memory while the relatively slow hard drive writes the files. Worse, it also caches the changing directory structure, so without an 'eject' which flushes the cache to disk it can be left in an indeterminate state - hence Windows asking to format
Feb 16, 2019 06:35:06 #
[quote=burkphoto]Various recovery programs are available to rebuild corrupt directories on drives, restoring most files to their former accessibility......}
Here's a well established company with loads of excellent HDD and SDD management sofrware whi have a free and paid version recovery tool which I have used more than once (fotuantely only once on one of mine but more than once on friends and relatives :)
https://www.minitool.com/data-recovery-software/free-for-windows.html
Its non destructive in that you need another drive to copy to. If it can't recover or decipher the directory structure it searches from end to end for files of your choice (ie JPEG, TIFF etc.) then allows you to copy to the other drive. A big drive low level search may take a few hours, and it may not be able to recover the orginal file names if they are the damaged part but at least you'll get the files back.
IMPORTANT - do nothing with your existing drive. Almost certainly part of the directory structure is corupted, so software like the above that is non-distructive is ALWAYS your first try.
Good luck!
Dunno about your backup strategy but guess it doesn't / or don't want to use the Cloud. I worked for a number of years in data management and most don't follow a 3 set local backup. And 3x 1TB drives are not such a big price issue these days. Once out of this painful experience PM me and I'll describe a relatively simple Windows based 3 set incremental backup with free software that will always leave at least 2 fallbacks if you have a disaster during use of 1 backup.
Feb 13, 2019 04:10:03 #
I think this thread has wandered well and truly off piste but hey, that's what happens when enthusiasts start a conversation :)
re fridge magnets and PP art images never seen - our fridge is built in and magnets don't work on the unit doors, and only some one else can judge if my pictures are of fine art quality. But I fully agree the viewing is what it is all about.
AND one of the very best photographic equipment purchase we ever made was a NIX 15" classic photo viewer. It has PIR detection so is only on when someone comes is in the room. I have been adding photo events to it for the last 4 years and it is amazing how often something catches someone's attention and they spend the next few minutes watching the show. The screen is large enough and has good quality so it does justice to the photos. I typically filter down to no more than 20 images or less (max 30) for a given event which takes 1 to 1 1/2 minutes to view at 3 sec per image.
Before that I used album software to print A4/ Letter landscape albums. Again it had the advantage that photos were in the order I preferred and were not just a heap.
While I keep the same selected images on my phone, the photo viewer has transformed the viewing of our photos. Seems to me (and I havebeen / am guilty as well) that many photographers are more interested in the equipment and the process than the end result? I'm sure that it why cellphone and the internet - with take and instant publish - is so universally popular.
Have a look at photo frames. I chose a traditional 4:3 frame as I only shoot photos not video, and that size is great for landscape and portrait orientation images. Those who shoot video as well have a bit of a challenge as a 16:9 profile is great for video and photo panos, ok for landscape format, but can struggle a bit with portrait orientation. Still much better than on a PC and seldom viewed
re wdross and your wife - if your still upright and breathing freely, take up bungee jumping - its less dangerous :)
Feb 12, 2019 02:56:28 #
wdross wrote:
That is why OVF can still be as viable as EVF. Some of us that really don't have PP software have to get it right the first time because even with a RAW file recorded there will be very limited software to process it if any at all.
What ? :) :)
https://listoffreeware.com/best-free-raw-image-editor-software-windows/
many would argue that RawTherapee is as good as ACR! Until I finally succumbed and went for CC I used it and it did all most could ask for.
Feb 11, 2019 10:30:47 #
dsmeltz wrote:
What was the last EVF you tried? The new ones in the Canon EOS R and the Nikon Z line as well as the last few Sony's are reported to be awesome.
At this time - like RAW vs. JPEG - this topic seems as emotive as gun laws, blood sports, religion and politics I think :) In a few years time I think it will be a source of constant amusement on what the debate was all about.
I can vouch the EOS R has a stunning EVF - in future I will never buy a camera by choice that doesn't have EVF. Apart from the superb sharpness and brightness, I can see what I want in the VF in real-time, can set it to emulate exposure/ DoF or stay bright (great for poor light/ night time.)
In a tangential way EVF vs. OVF is a similar argument to RAW vs. JPEG - there is little difference in ideal or even good lighting conditions, but if that doesn't apply cos lighting is difficult or downright bad, then with EVF you can actually see what is being pointed at, and with RAW you have a much improved chance to change light balance, exposure and have much more dynamic range to work with
Feb 9, 2019 08:02:56 #
This problem works both ways. Can't comment on your experience but as buyer and occasional seller the great majority of transactions are fine. I tend only to buy used optics from commercial sellers but anything else not a problem. The reason I steer clear of optics is I once bought a Canon 50mm f1.4 which by the time I tested to my satisfaction (ie it was the lens not me or my camera) I was out of 30 day return/dispute period. Basically I paid a yard sale/ car boot sale price and got what I paid for. At least with ebay you get the chance of a refund unlike a yard sale.
I don't know about US law but in UK you can demand and get a refund but not demand the lens is replaced with what you hoped you bought. Take the refund, mark it down to experience and try elsewhere.
Ebay does favour buyers in my opinion. I once sold a samsung smartphone. It was in perfect condition as I always use a screen protector and 'jelly' back case. Buyer returned under not as described, with an almost smashed screen and more scratches than a farm truck! I protested to ebay it was not the same phone to no avail. I even compared original photos in advert with photos of what I got back and still had to refund.
Learned from that experience and now when I sell I photo serial numbers and include in the advert. If no serial numbers I use UV pen to put my initials or some other concealed mark which i then photograph when packing. I mention it in the advert with the comment that to remind the seller to return the correct item if they have more than one :) In the 7 years since I started this I have never had a dodgy return although I have had a couple of 'tryers' who suddenly decided not to persue when I told them.
Unless a bona fide dealer I have even ask sellers to photo the serial number or other unique identifier for 'their protection' if I buy a more expensive glass or electronic item.
I emphasise in my experience of 2000+ transactions (prob 80% purchases) almost all buyers and sellers are genuine and there are no problems. Ebay is a huge market place - there are items I can get there I would have no hope of buying locally. But take simple precautions to protect yourself against the few that are working the system especially with pricier items
Feb 6, 2019 08:35:16 #
typical modern shutter life quoted is 50,000 to 150,000 so your already on borrowed time :)
https://olegkikin.com/shutterlife/
You'll know when it stops working or when exposure is inexplicably oncorrect 'cos shutter is not working correctly
https://olegkikin.com/shutterlife/
You'll know when it stops working or when exposure is inexplicably oncorrect 'cos shutter is not working correctly
Jan 30, 2019 06:58:33 #
I use auto ISO (thats 'eye-so' not 'eye-ess-oh' btw) most of the time when using aperture priority or shutter.
Effectively I'm managing the setting of most importance for that image. For example, I set Aperture for a landscape to achieve the Depth of field I want, say f/8. The Canon camera I use then automatically sets the shutter speed to suit the lens (ie around 1/50 if I'm using a 28mm but faster if a 200), and ISO is then set by the camera to achieve a balanced exposure for f/8 at 1/50. Works just fine most of the time even with exposure compensation applied.
When it doesn't I switch to manual and set Aperture, shutter speed, and ISO. Examples include long exposure night photography; where there is high contrast and I want to ensure exposure for the subject (eg dark bird against a near white sky); when I'm using fill-in flash and have set main exposure for the overall scene. I've set 1 parameter, the camera sets 2. I also often set 2 parameters and let the camera set 1 (ie in manual I might set Aperture and ISO, and let the camera set shutter speed)
Basically, if auto something doesn't work then switch to manual something
Note also that ISO doesn't behave like ASA of film. With film as the sensitivity increases (higher ASA) then the grains of silver media are physically larger - double the speed and the grains are 4 times bigger. With increasingly faster film the sharpness falls off rapidly (ie from 200ASA to 800ASA the grains are x16.)
This is not the case with ISO on a sensor. A 20mpx sensor is 20mpx no matter what the ISO is. The sharpness won't change but as the sensitivity increases the ability to capture sufficient data decreases. Essentially this means the sensor can't be sure of the amount of R,G,B in some pixels - resulting in noise (typically grey dots where the sensor pixel gets nothing, colour dots where perhaps the R channel triggered but the G,B didn't.
Picking up on comments by Salo: know your camera ISO range that suits you, and he obviously does. Best tested in subdued low contrast lighting such as a poorly lit room in the evening. Just take shots with auto (say P setting), but manual ISO. Increase ISO until you reach the camera limit. Then look at the shaded areas with a decent enlargement on your PC and the noise will be very apparent. You will then know how far you would prefer to go.
Jan 29, 2019 10:09:55 #
Swayne wrote:
Thank you. Very interesting information. I think Ill stay with non rechargeable batteries to play it safe.
Id like to hear from others who agree with your information.
Id like to hear from others who agree with your information.
I use the Yongnuo external pack with the so called 'stay' / 'pre' charged NiMh batteries without any problems. The flash still needs batteries as I understand the external battery pack only powers the flash charging not operating the firmware