Check out Panorama section of our forum.
Posts for: Dale40203
Dec 16, 2015 12:29:57 #
jeep_daddy wrote:
What's the point?
I guess no one else got beyond the nudity/censorship issue.
My reason for sharing this link was the level of choreography shared between technology and live dance.
1. Were the drones directed in real time to follow the dancers?
2. Were the dancers following a spacial pattern which the drones were then programmed to follow? If so, is GPS precise enough?
3. Or were the drones tracking anatomical features?
Dec 15, 2015 13:06:27 #
Nude dancers are censored by carefully programed drones in japanese ad campaign.
http://www.designboom.com/technology/nude-dancers-censored-buyma-drones-advertising-video-12-14-2015/?utm_campaign=daily&utm_medium=e-mail&utm_source=subscribers
http://www.designboom.com/technology/nude-dancers-censored-buyma-drones-advertising-video-12-14-2015/?utm_campaign=daily&utm_medium=e-mail&utm_source=subscribers
Dec 15, 2015 08:12:48 #
avemal wrote:
If you shoot in jpeg & go into Develop Mode, you cannot use the drop down edit bar to use White Balance.
I did not know this. I do know that you can open a JPEG in Camera Raw easily in Bridge, and all of the tools including White Balance are available.
Dec 14, 2015 22:35:16 #
Thanks. I've checked eBay. Nothing close.
Dec 13, 2015 11:29:48 #
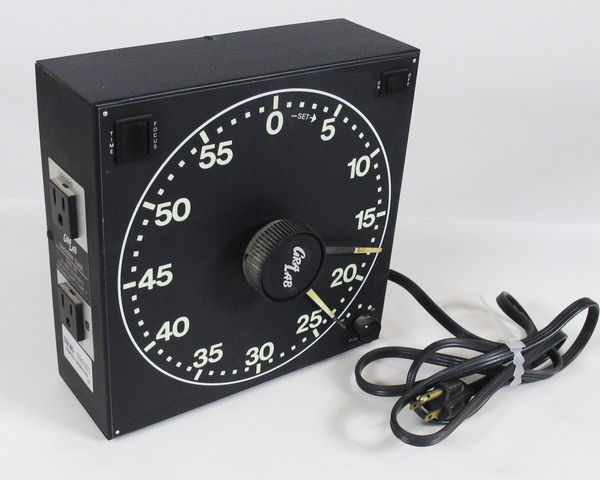
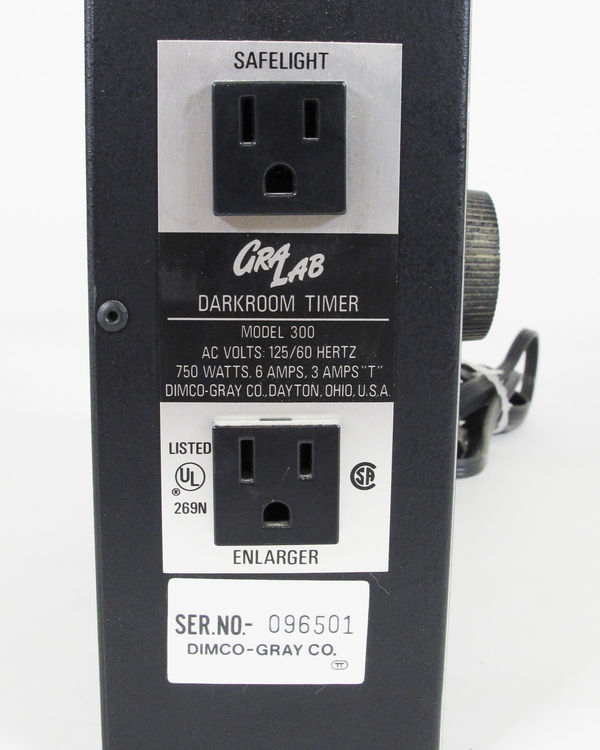
FS: GraLab Model 300 Timer
Darkroom timer 60 minute.
Clean, no corrosion. 8.5" x 8.5" x 3"
$50 plus shipping
Dale Hoffman
Louisville, KY
Darkroom timer 60 minute.
Clean, no corrosion. 8.5" x 8.5" x 3"
$50 plus shipping
Dale Hoffman
Louisville, KY
Dec 4, 2015 20:55:38 #
Four-Year-Old Girl Pilots And Completely Wrecks Truck In Volvos New Ad
An endearing view of complete innocence imbued with absolute power and no sense of guilt, blame, or responsibility.
http://designtaxi.com/news/382483/Four-Year-Old-Girl-Pilots-And-Completely-Wrecks-Truck-In-Volvo-s-New-Ad/?utm_source=DT_Newsletter&utm_medium=DT_Newsletter&utm_campaign=DT_Newsletter_04122015&utm_term=DT_Newsletter_04122015&utm_content=DT_Newsletter_04122015
Dec 4, 2015 11:26:28 #
Nalu wrote:
RE batch processing. I believe you can also do in Camera Raw, assuming you shoot raw of coarse.
You don't need to shoot Raw in order to use ACR. It will work on JPEGs as well, you just don't get the benefit of working with 16bit file depth with RAW. You can perform adjustments over multiple files (batch) in ACR by first opening multiple files in Camera Raw through Bridge or Lightroom. Then select one of the files (the one you want to preview the effects of your editing). Then choose "select all" from the preview pane on the left and the changes you effect to that one view will be applied to all images.
Check out Commercial and Industrial Photography section of our forum.
Dec 4, 2015 09:45:16 #
donnahde wrote:
Not sure about that. The PS instructor has repeatedly said that the PS processes are non-destructive. And on the RARE instance where it's not he tells us it's not and shows a way to do it so it is non-destructive.
Photoshop has what are called Adjustment Layers which allow you to make changes to an image which are "non-destructive" but only if you save the file as a PSD or Photoshop Document.
Bridge access ACR (Adobe Camera Raw) which is the same editing engine in Lightroom. "Right Click" an image in Bridge and you will see the option to "open in Camera Raw" (or got to File > Open in Camera Raw..." . Changes made in ACR remain "non-destructive" with the file - even a JPEG.
Dec 4, 2015 08:14:33 #
When I am handed a collection of photos from a client which will be used in a project, I use Bridge - not Lightroom - to manage them. I don't want to create a catalog for images that I will not maintain longterm, and Bridge gives me access to ACR, batch renaming, EXIF data editing, web and PDF output. From ACR, it's just a button away from sending the file to Photoshop if more editing is required.
The only layer management in Bridge that I am aware of is its ability to send selected files to separate layers within a Photoshop document.
The only layer management in Bridge that I am aware of is its ability to send selected files to separate layers within a Photoshop document.
Nov 25, 2015 08:23:20 #
burkphoto wrote:
FileMaker Pro has been around since about 1986. They are a division of Apple. Their database runs on Macs, Windows PCs, iPhones, iPads, and the Internet. They seem to update it regularly. It scales from single user to server level.
I've used FileMaker Pro for decades also and find it to be versatile and generous with templates if you need to pick something up without getting technical. Although they show an upgrade cost of $196, they also show a subscription option of $9 per month which I find troubling if this is the way they're headed.
http://www.filemaker.com/products/filemaker-pro/#new-filemaker-pro-14
Nov 23, 2015 08:31:57 #
raden wrote:
. . . I now just almost completely and totally despise having to do any editing at all. . . I am now tremendously motivated more than ever on "getting it right" in the camera. . . .
Back in the days of "souping" film and tray processing prints, "getting it right" in the camera was not so much of an obsession. Choosing a grade of paper to alter contrast, burning and dodging portions of the image, exposing the film itself based on range of shadow to high-light and then developing according to the Zone System - these were all analog steps similar to post processing of the digital workflow. The Master Printers and amateurs alike would spend hours in the darkroom trying to reveal what was on that silver halide frame.
Check out Travel Photography - Tips and More section of our forum.
Nov 22, 2015 20:56:29 #
Neil,
I downloaded your original three images and noticed that you had white balance set to "auto". This will allow the camera to (mis)interpret the exposure lighting if there is any difference in the color content of the subjects (which in the three examples there is). This may account for the variation of color cast on the earings between the three exposures. Either set the color balance to the lighting you use (fluorescent, flash, tungsten, etc), or shoot RAW and correct white balance using a standard grey card.
We do a lot of catalog work, mostly industrial items, and what I do as part of our post production is create a "clipping path" outline in Photoshop which allows dropping in any background the client or layout requires. A clipping path can also allow global changes to the background (hue, saturation, brightness, etc) without affecting the subject. Once you have control over the background in such a way, your photo becomes much more versatile from an end user's point of view.
You can achieve much greater uniformity in appearance by separating the subject from the background.
Nov 22, 2015 08:40:31 #
Note the variance in the light areas surrounding the heart shapes.
Consider inserting a grey card into each set up (remove it for the actual product shots). This will help with your color balance in post production.
Consider inserting a grey card into each set up (remove it for the actual product shots). This will help with your color balance in post production.
Nov 15, 2015 10:10:41 #
PixelStan77 wrote:
Index card cut to the size of the film with double stick tape will catch the tongue to be retrieved.
I don't see how the tape would get past the light trap which is pretty tight and made with felt which would certainly get stuck.
Nov 13, 2015 09:04:14 #
Keeping your camera assigned exposure number only works for the first 9999 images. After that - even if you append a descriptor to the end of that number - you're going to have problems sorting or organizing by name. I rename all images beginning with the date (20151113) and a sequential reference for the whole day (20151113_0001). Multiple cameras used on same day? Include them all in the same sequence. Keywords and comments in EXIF rule the search process for me.
Check out Astronomical Photography Forum section of our forum.