Posts for: JimH123
Oct 22, 2023 11:48:11 #
Architect1776 wrote:
How fast do cards really wear out from read/write cycles.
I have 20 year old cards that work as good today as they did 20 years ago and they get written to and erased all the time. One card failed about 17 years ago but assumed that it was defective as the other 5 cards are still going strong.
So again what is the life of a card writing and erasing?
I have 20 year old cards that work as good today as they did 20 years ago and they get written to and erased all the time. One card failed about 17 years ago but assumed that it was defective as the other 5 cards are still going strong.
So again what is the life of a card writing and erasing?
The cards from 20 years ago had much larger transistors and gates and were more hardy. They had much larger max figures for write/erase cycles. Perhaps 10x longer.
But those older cards had much lower capacities too.
As for your question, NAND Flash is structured in Blocks. And within a Block is some number of pages. Erase and write is done one block at a time. If you have older data living in another Block, that Block is not refreshed when you write new data to a different Block.
During erase, the whole Block is erased as one operation. And then data is written, one page at a time. Actually, there is RAM memory for the page that is first loaded, and then the whole page is written in parallel. And then on to the next page.
By making pages longer, the write speed of the memory can be made faster. The old memory cards used a page size of 512 bytes (called Core Memory) and some additional space (called Spare Memory - which holds additional information needed). Newer memory has increased that page size (a lot) and has also come up with multiple pages where data is distributed between core arrays, where multiple pages can be written in memory in parallel. Plus, the individual cells have gotten so small that errors are common so the spare area has also grown to hold info needed to do Error Correction within a page. Suppose you have a page size of 16K bytes, and the spare area hold in excess of 2K bytes. The extra data in the spare area is then used to detect and correct a certain number of bad bits within the Core Memory. The details for this are very guarded and vary from supplier to supplier and some can correct more bad bits than others.
As the block ages, certain bits are going to start to fail. And as they fail, Error Correction will mathematically detect and correct a certain number of bad bits on that page, and you the user will never be the wiser that you actually have bad bits that were fixed on-the-fly during a read operation. The manufacturer is likely never going to tell you how many bad bits it can correct and how many it has used up on any given page.
Before I retired, I was involved in writing test programs for these memory devices, and during test, we could determine this information at wafer level. But after the die are built into finished packages, the internal memory manager has no access to this information for the end user.
Oct 22, 2023 10:57:45 #
luvmypets wrote:
I am debating purchasing a fireproof safe and storing those full cards there or trying to decide if it would it be better to put in the safe deposit box at the bank.
Dodie
Dodie
Understand that memory cards are not ideal long term storage options. NAND flash has a floating gate that either has no charge or a negative charge with just a few electrons. This charge can slowly bleed off over a few years causing a loss of data.
Cards do have a spec that gives a max storage period of something like 10 years.
The older cards (single level cells, lower capacities and lower speeds) had larger gates and stored more charge and tended to wear out slower and hold charge longer. The newer cards (multi level cells, higher capacities, higher speeds and much longer page sizes) had everything scaled down in size resulting in fewer write/erase cycles and shorter max storage life. That's the price we pay to have these newer features.
FYI: Wear out is based on Write/Erase cycles. Read operations are not part of the wear out process. You can re-read the same card as many times as you want at no cost to wear out. Also, I have heard people claim that reading refreshes the card. This is not true. This is not DRAM. When data is written, that's the only time the gate is injected with electrons.
Oct 22, 2023 01:52:50 #
Adding another processing example -- DxO Photolab 6
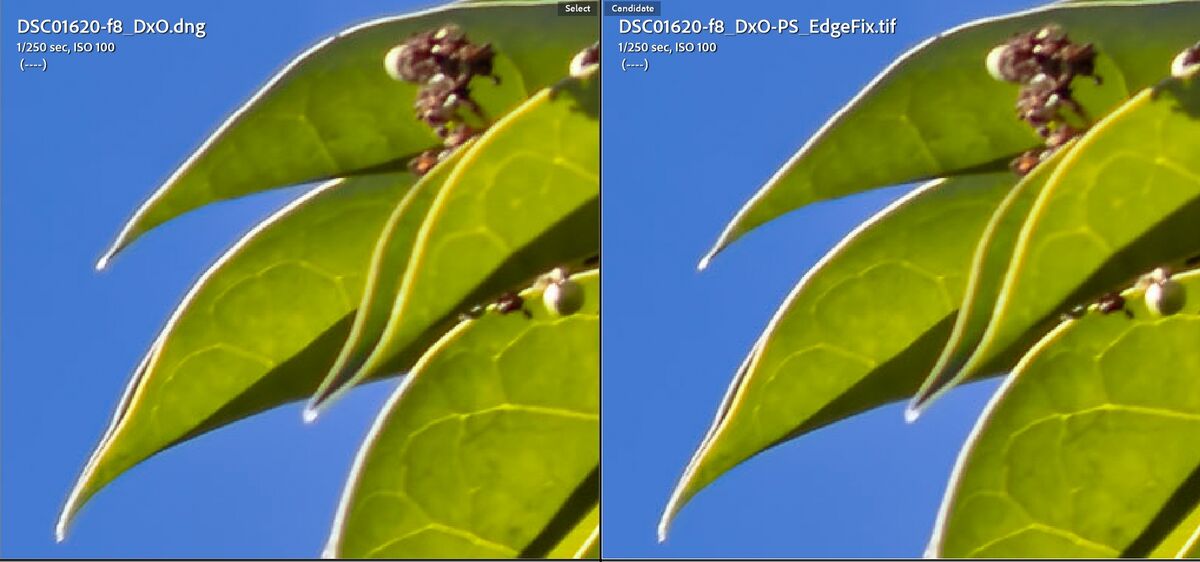
The left image is what was returned to Lightroom by DxO. If you Zoom all the way in, notice a very light, fuzzy gray halo on the edges of the leaves. Its hard to see. I tried hard to not have these halos and carefully adjusted DxO sliders while zoomed in trying to minimize them. But try as I could, when it was returned to Lightroom, they were there.
The image on the right was where I sent this image over to Photoshop and used the clone tool with a very tiny brush to sort of shave off these gray halos. A very manual job that I wouldn't make this a practice of doing all the time.
Original DxO on left, gray, fuzzy edges removed on the right
(Download)
A closer look at the gray, fuzzy halos

Oct 21, 2023 18:50:14 #
I have enjoyed reading this thread and how it has progressed (or perhaps digressed?).
For a look back in time, a place you would just love to visit with a time machine and to take a modern camera and laptop and to walk around a bit taking pictures of it, and to download those photos onto the laptop and to show it to the people on this project: ENIAC, 1947, Penn State campus.
https://en.wikipedia.org/wiki/ENIAC
The Wikipedia entry is well written and describes this beast in a way anyone can understand. A modern camera and laptop is so far beyond the capability of those 1947 professors and engineers that they wouldn't even know how to begin to understand how they worked!
Here is an example of things said about this monster:
By the end of its operation in 1956, ENIAC contained 18,000 vacuum tubes, 7,200 crystal diodes, 1,500 relays, 70,000 resistors, 10,000 capacitors, and approximately 5,000,000 hand-soldered joints. It weighed more than 30 short tons (27 t), was roughly 8 ft (2 m) tall, 3 ft (1 m) deep, and 100 ft (30 m) long, occupied 300 sq ft (28 m2) and consumed 150 kW of electricity.
or this quote:
Several tubes burned out almost every day, leaving ENIAC nonfunctional about half the time. Special high-reliability tubes were not available until 1948. Most of these failures, however, occurred during the warm-up and cool-down periods, when the tube heaters and cathodes were under the most thermal stress. Engineers reduced ENIAC's tube failures to the more acceptable rate of one tube every two days. According to an interview in 1989 with Eckert, "We had a tube fail about every two days and we could locate the problem within 15 minutes."[32] In 1954, the longest continuous period of operation without a failure was 116 hours—close to five days.
In looking at the power consumption, I took a look at my PG&E electric bill here in the Bay Area of California. During Peak hours usage, I am charged $0.51151 per KWhr. To operate ENIAC during today's peak hours, it would cost $76,726 per hour to operate. It would take a lot of solar panels to handle that load!
And for repair, it brings back memories of my childhood when the TV would stop working, and my father would take all the tubes out and take them down to the nearest drugstore where they had a tube tester. He would proceed to test each tube, buy a new one of the type that failed, and back home we would go. Put all the tubes back in, turn it on, and we were good to go again, and I could watch Popeye on the one strong station we could get, KDKA in Pittsburgh, plus 3 or 4 fuzzy channels. Life was different! And come to think about it, we were doing this during the years ENIAC was in use.
Oct 21, 2023 02:23:37 #
Initially, I was trying out a Zhongyi Lens Turbo II with curiosity as to how well (or not) it might work. And I used a Nikkor ED IF 300mm F/4.5 on a Sony A6600. And what I found out in this test is that this old legacy 300mm telephoto lens worked quite well with just a touch of CA in a few spots in which Lightroom was able to take care of just fine.
But what I ended up doing was doing a comparison of several methods of processing a RAW file and surprised a bit with the results.
First image is the result in which I used Lightroom's Denoise Button found by the sharpen slider. Note: the tree is not quite centered and there was more blue sky (and vignetting seen on the left side). I found that the Zhongyi Lens Turbo II does tend to produce vignetting with longer focal length lenses. Far more so than the Metabones Speed Booster Ultra. But it is also a lot less expensive.
For the second image, you are looking at the tips of a couple leaves on the left side. You will need to zoom in all the way to see the effects.
Starting on the left, the 1st image is just Lightroom. I used the sharpen slider and the corresponding mask slider that is used with it, as well as a touch of luminance for slight noise. This one look quite good.
Moving to the right, the next one is the one using the Denoise button in Lightroom plus the sharpen slider with mask slider. It also is quite good.
Third one is Topaz's PhotoAI in which I used the RAW file. When zoomed in all the way, the edges of the leaves just do not look good.
Forth one is Topaz's Sharpen AI where I decided that the Out of Focus - Normal Mode caused the least deterioration of the of the edges. Maybe a bit better that the one to its left, but still not that good.
None of the look bad when not zoomed in. But knowing what's there if one does zoom in stays in my mind.
Finally, the last one is using ON1 Nonoise 2023 on the RAW file. It doesn't have the same problems as Topaz, but it has a problem which you can see on the edges when zoomed in all the way.
I do intend to also try this using a cheap Pixco focal reducer with the same lens to see how it compares to using the Zhonghyi. I picked up a used one recently. And after that, I intend to try this using a Metabones Speed Booster Ultra. My experience with the Metabones has been really good in the past, and I have not seen vignetting either. But I have also not tried it with a 300mm lens either.

Oct 20, 2023 17:41:48 #
Longshadow wrote:
Like a collapsible rubber hood.
This is how I do it. EBay is a good source, and have a number them in different thread sizes.
If the rubber hood causes vignetting, use a step up ring and a larger rubber hood.
But this brings up another problem. I have a drawer full of dedicated lens hoods for which I no longer remember which lens they go to.
Oct 20, 2023 14:09:38 #
bwana wrote:
Thanks for this. Must try it out with my Minolta 500. Or maybe just reprocess some of my old pictures.
bwa
bwa
I do hope in the future, they improve the masking accuracy.
Oct 19, 2023 16:02:44 #
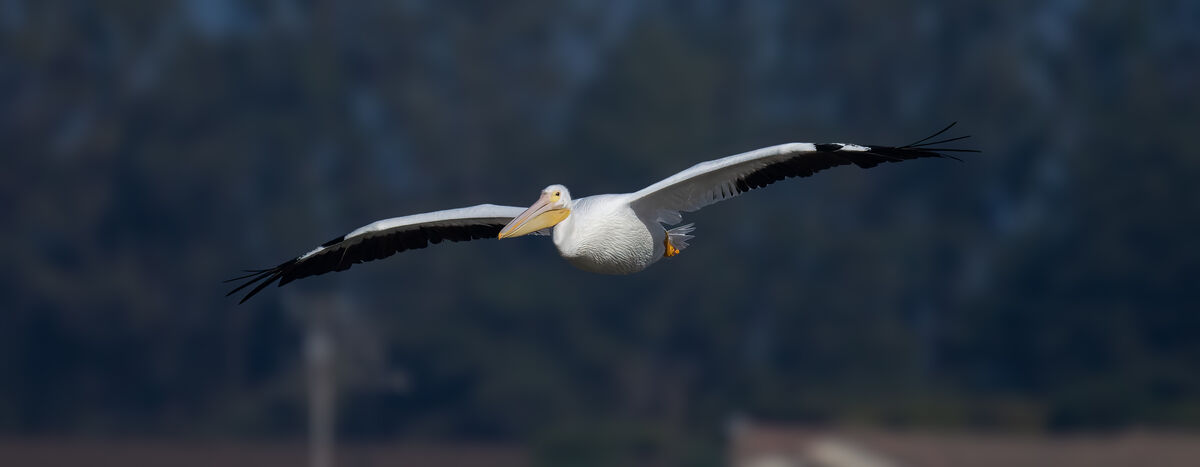
Here is why I like the Minolta 500mm Reflex lens. Lens is very compact and light weight. And with the donuts gone, the lens is quite respectable. The donuts have already been blurred out in this next image, where, it becomes apparent what the lens can do on this pelican flying towards me.
Camera used was a Sony with an APS-C sensor resulting in the FOV that would be 750mm.
First image is with no cropping, but donuts removed.
And the second image is with a crop and then resized 3x with Topaz's Gigapixel AI. This puts the lens into Nikon 950/1000 territory, but the sensor is larger and the lens focuses faster.
With the donuts gone, not a lot to hate about this lens.

Oct 19, 2023 10:48:48 #
mikegreenwald wrote:
I still see the donuts on Image 2 - just they're blurry now.
That's the idea. Blur the donuts to the point that they are no longer distractions. And also consider that this is a 500mm lens. It will often be used to photograph critters at a distance and the critter is the main attraction and the out of focus area just needs to be easy to ignore. This being the case, the tool is perfect for its intended use.
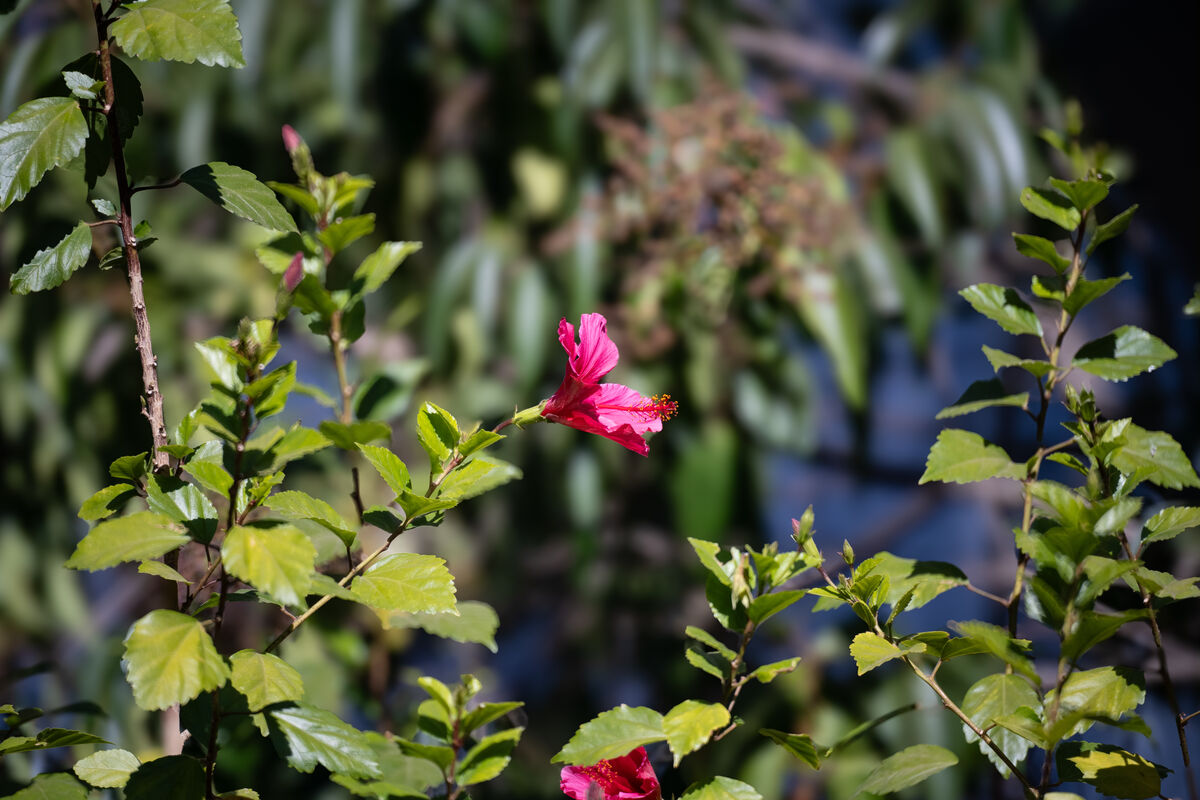
And by the way, as pointed out to me this morning in a PM, the flower was left hanging in space where a portion of the stem was blurred out of existence. I used the Focus Fix Brush to fix this problem. Also fixed a couple other stems too.
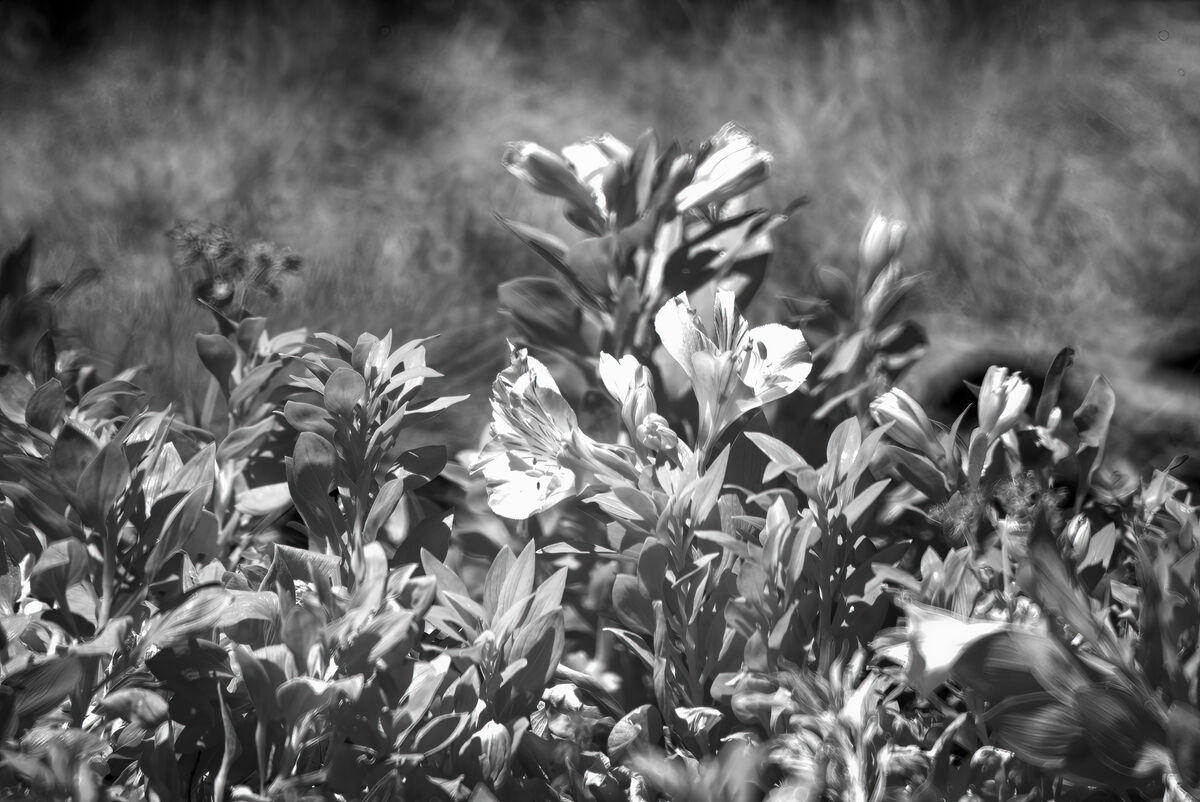
Adding another example. This time using my other mirror lens, a Tamron 500mm f8, and this one is manual focus only. And this was taken in B&W using a camera I had modified to mono sensor only. In this case, the out of background look is enough to give one a headache!
This is followed with the fixed version pushing the blurring to the very max to try to calm things down. Not a great picture, (actually a terrible picture), but it certainly shows donuts gone mad.
Next is an even uglier example showing how the light coming through the lattice in the fence turned into extra ugly donuts. Don't laugh. This was at the peak of Covid and I didn't leave my backyard very often!


Oct 19, 2023 09:31:33 #
REJ wrote:
what pray tell is a donut. REJ.
If you are not familiar with mirror lenses, it is an artifact created in the out of focus areas that look like little donuts. The first image is full of them. This is one major reason why mirror lenses have fallen out of favour.
But the advantages of mirror lenses are long focal lengths in a small package, and no CA.
But almost all mirror lenses are manual focus only, except this one, the old Minolta 500mm f8 Reflex lens. Minolta, and later Sony, for awhile, sold many of them.
Oct 19, 2023 01:56:26 #
The new Lightroom 13 has a new Blur Tool. Tonight I tried it for the first time. And from what I have seen, no need to fear using mirror lenses because of the Bad Bokeh Donuts.
Here is my first experiment. Using the Minolta 500mm f8 Reflex Lens. This one is famous because it has the ability to auto focus with Sony cameras.
Image #1 is the before, and there is no way you can miss seeing these donuts!
Image #2 is the after. Its automatic, but I did have to use the touch up blur tool to overcome one really bad donut.
Totally pleased with how this is working.

Oct 17, 2023 17:58:31 #
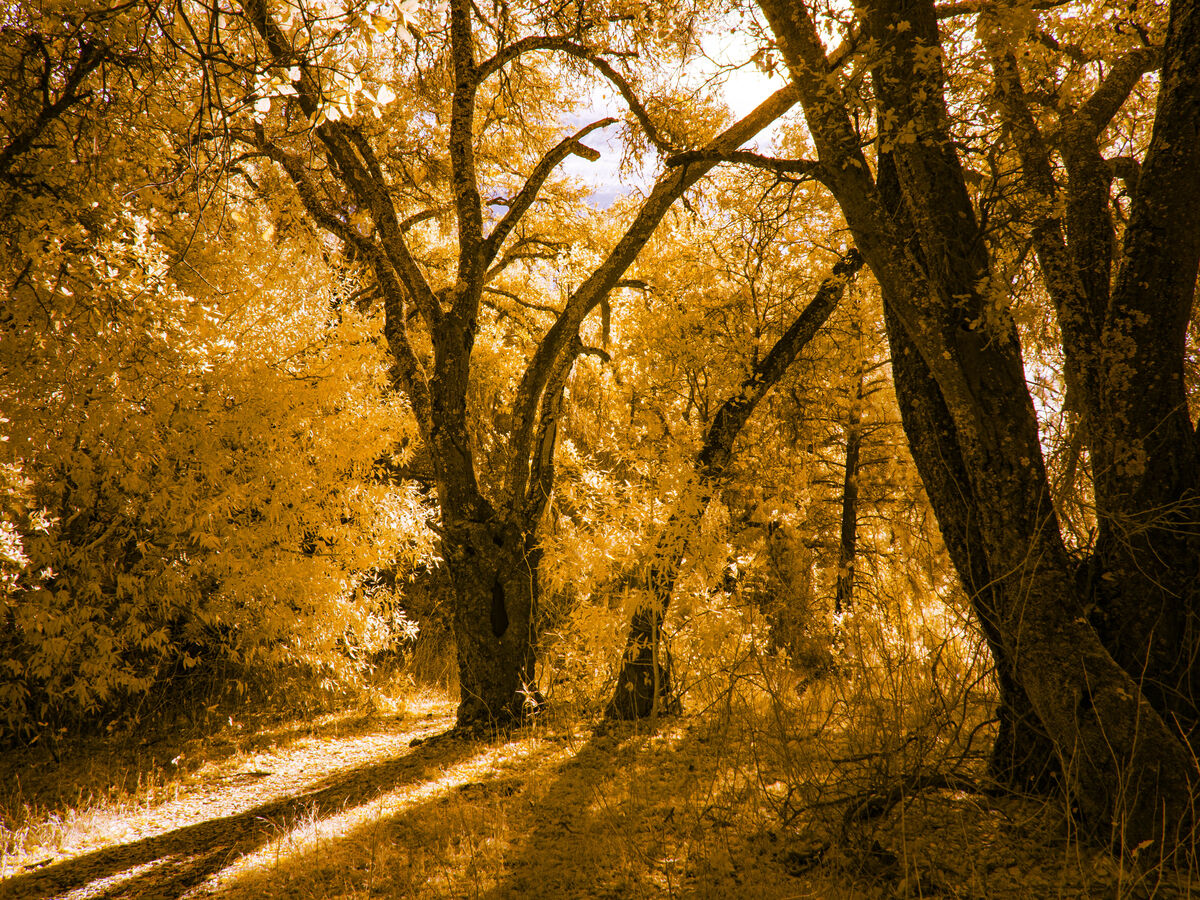
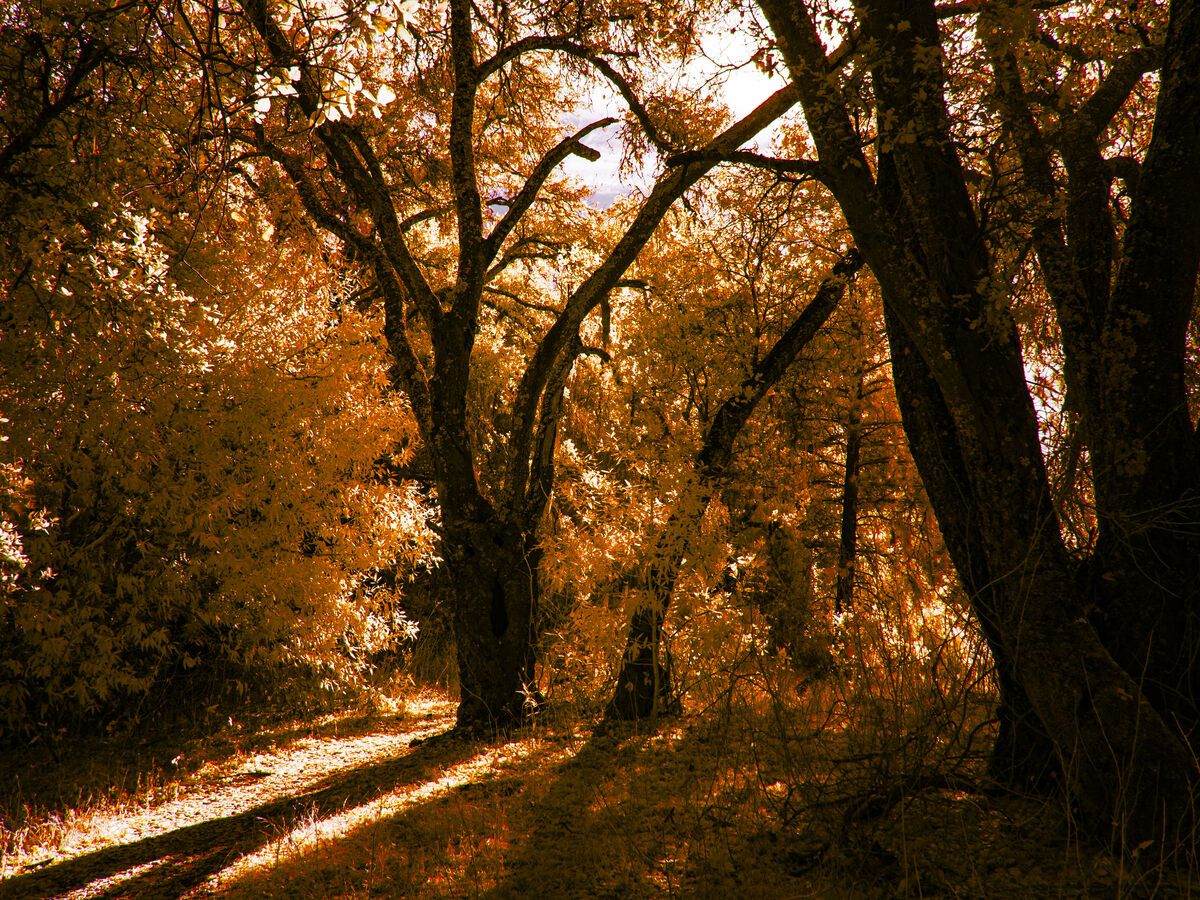
This time, I used a 590nm filter and processed correctly which ended with the tree leaves in Yellow.
Using Point Color, I allowed it to shift a little into Orange giving the impression of late afternoon.
Using Point Color, I allowed it to shift a little into Orange giving the impression of late afternoon.
Oct 17, 2023 16:47:15 #
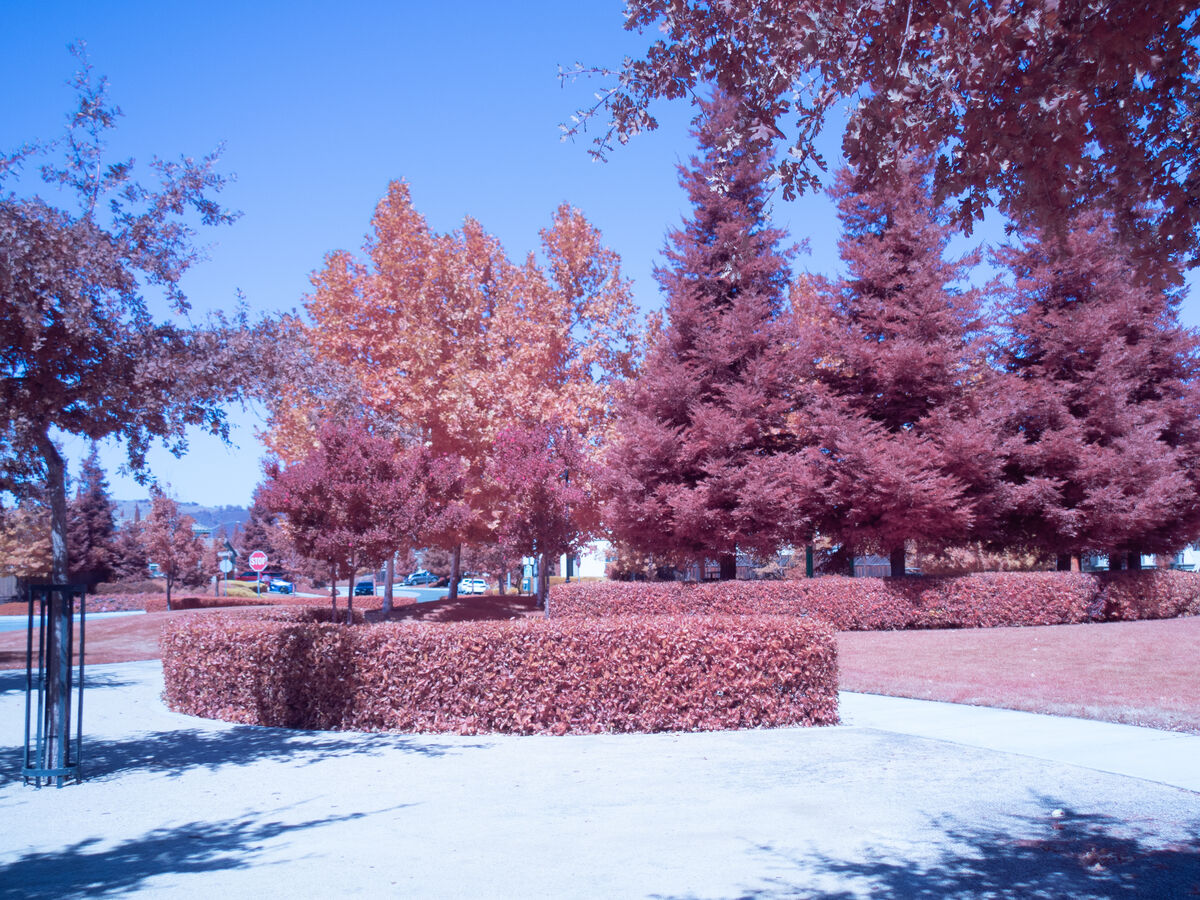
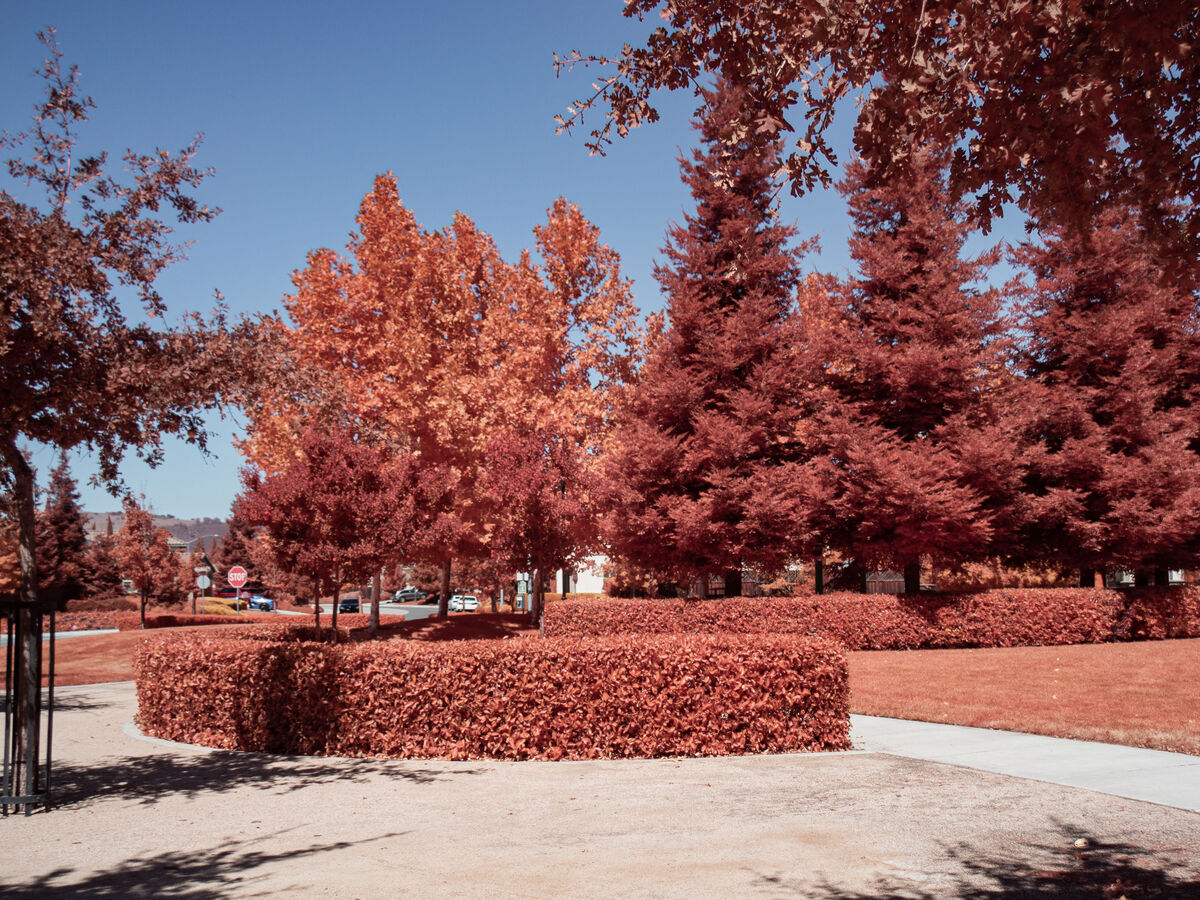
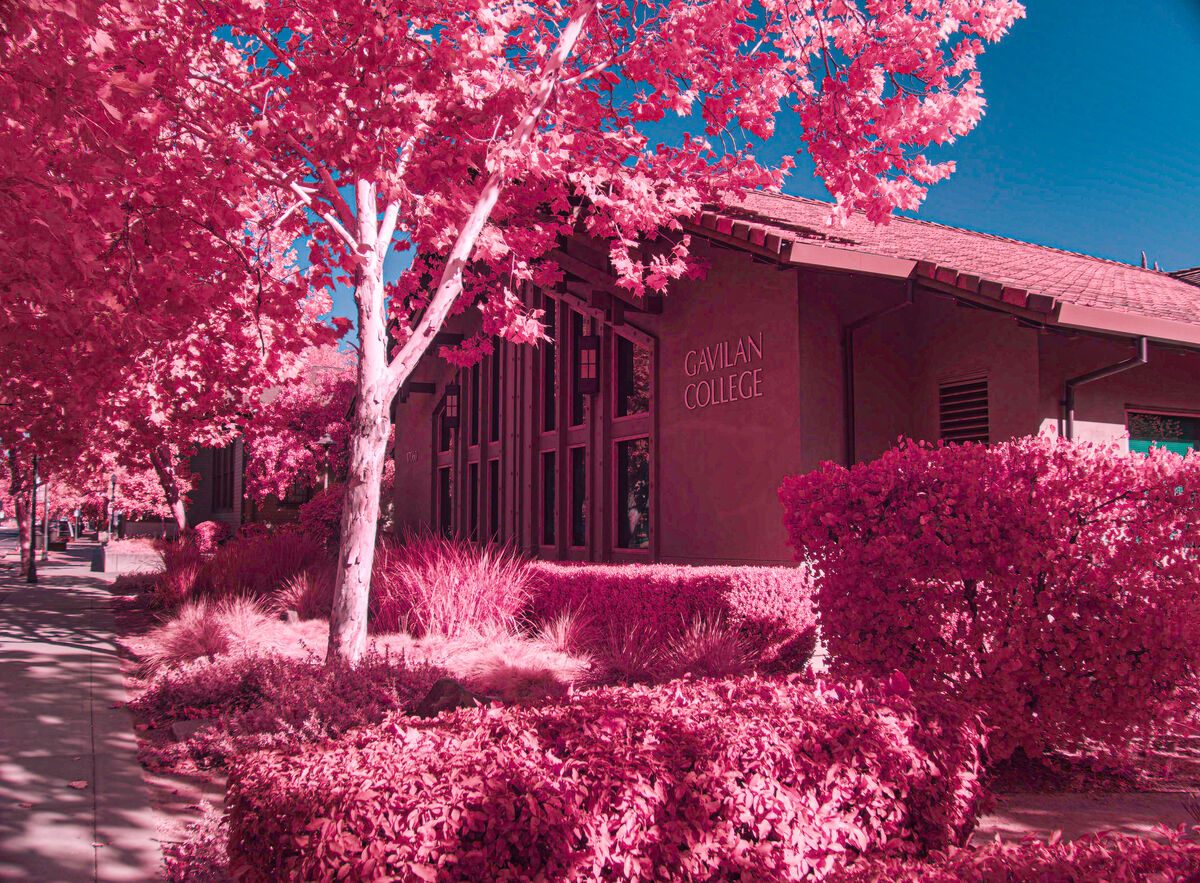
Since I was using a home brewed, 3 filter solution, to produce results on a full spectrum modified camera, I thought it would be useful to show the Kolari Vision Filter where they have combined multiple filters into one which also allows the taking of IR based images without the need for channel swapping.
See:
https://kolarivision.com/product/kolari-vision-ir-chrome-lens-filter/
Using this IR Chrome Filter from Kolari Vision, here is a Straight Out Of the Camera result that I took using this filter. Refer to Image #1.
And then I touched up using Lightroom's Point Color. Refer to Image #2.
Adding a second example. Image #3 is the before. Image #4 is the after Point Color.
Oct 17, 2023 13:42:05 #
Another example. This time my favorite 3 filter combo for this effect: The Asunuma YG(X0) filter, a KB20 filter, and the 80A filter. Note, there are 80A, 80B and 80C filters as well as an 81A, B, C family of filters and also 82A, B, C family of filters. The difference is mainly in the amount of IR light allowed into the image which will impact the red (or pink) that we see. The 2nd image is more along the Candy Pink look for an image.
Again, no channel swapping. This 3 filter approach is sort of how Kolari does their IR Chrome filter which also does not require channel swapping.
Again, no channel swapping. This 3 filter approach is sort of how Kolari does their IR Chrome filter which also does not require channel swapping.

Oct 17, 2023 13:29:26 #
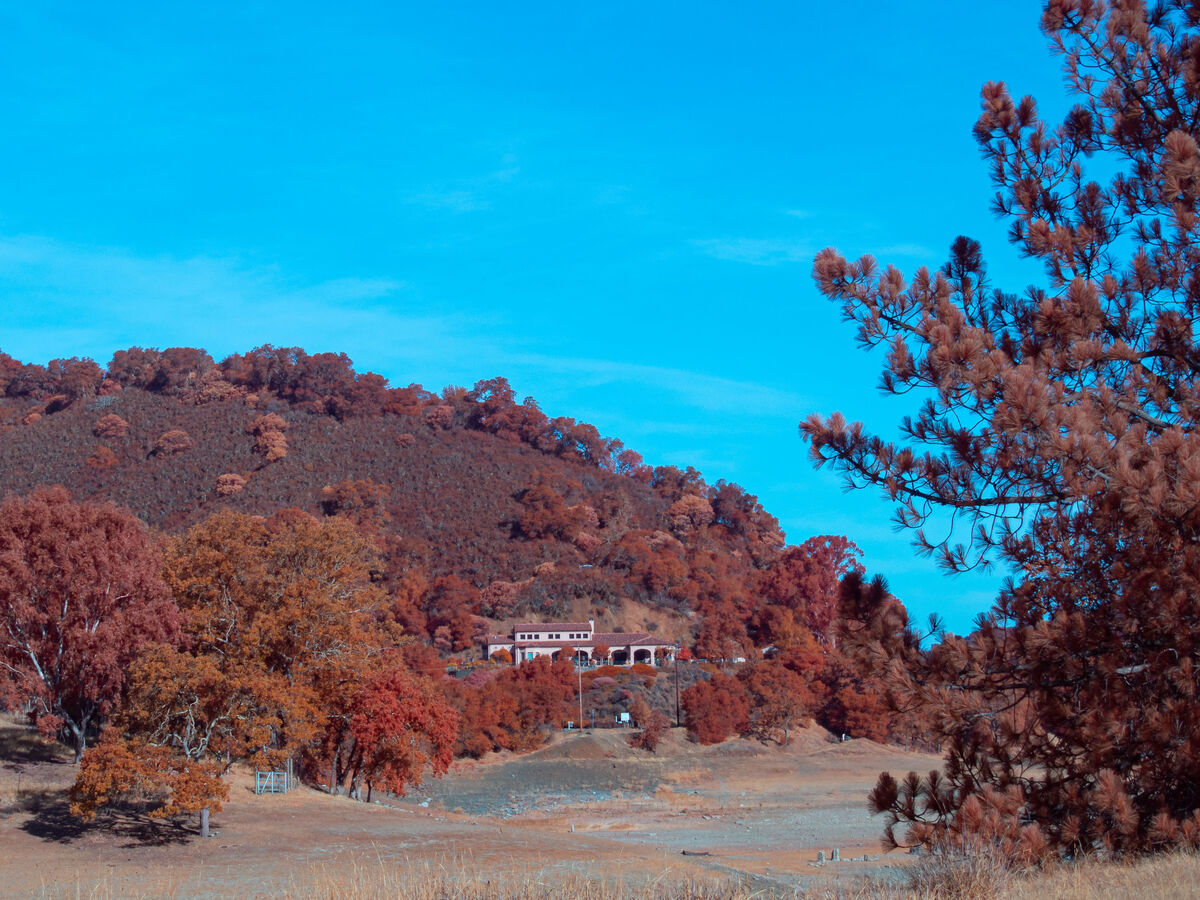
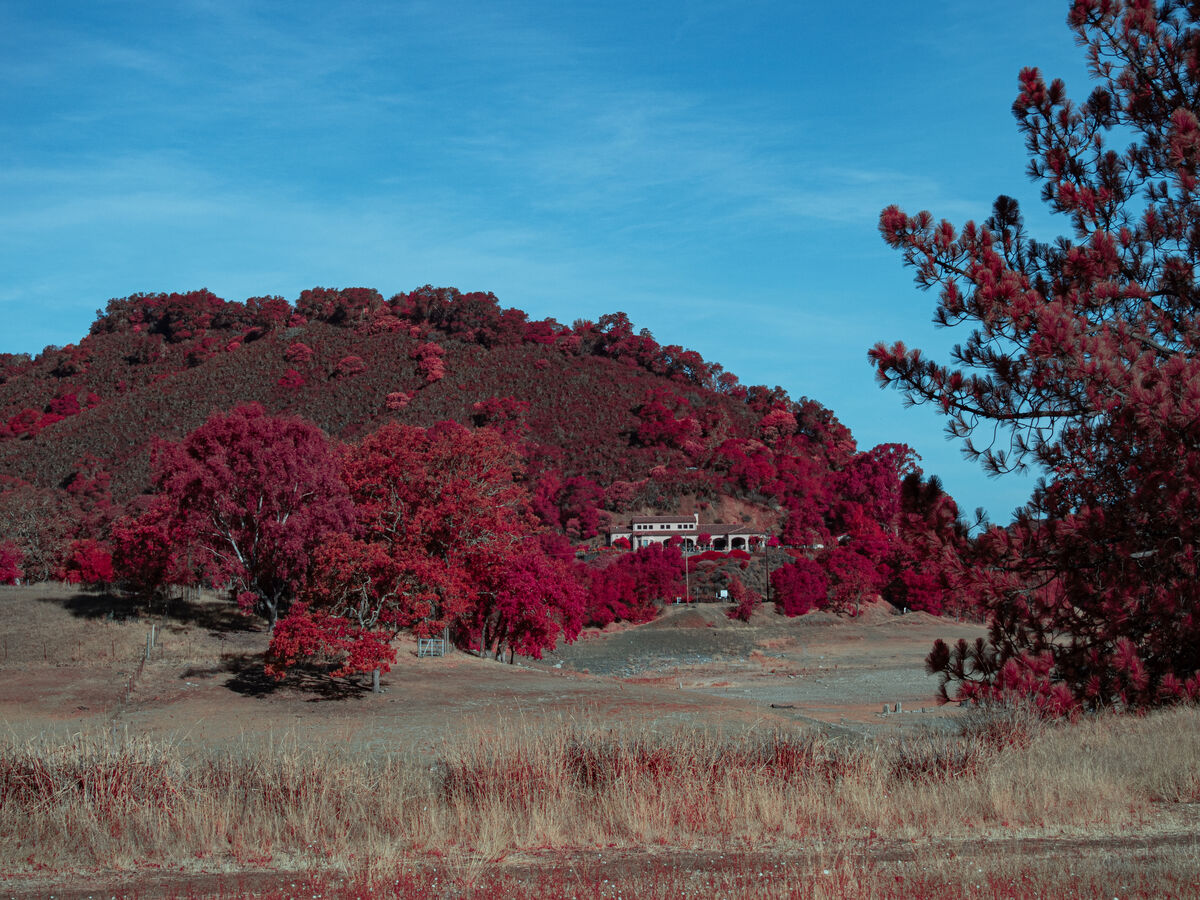
Here is another using the 3 filter approach without channel swapping. This time, the pale yellow filter is replaced with an Asanuma YG filter. I like this filter better than the pale yellow filter for its effect.
Image 1 is the original straight out of the camera.
Image 2 is after working on the image with the point color tool.
I should also mention that this is an IR image. It was done on a full spectrum modified camera. The 80A filter being used is light blue, but it leaks considerable IR light which increases the red in the image. But the other two filters work together to maintain normal coloring on those parts of the image that don't respond strongly to IR light such as the wooden bridge.

