Posts for: Rick36203
Apr 10, 2017 20:10:15 #
coach17 wrote:
...While I am at it will this work with my setup YONGNUO YN622N-KIT Wireless i-TTL Flash Trigger Kit with LED Screen for Nikon including 1X YN622N-TX Controller and 1X YN622 N Transceiver. I am having isues with the flashes going off even though the flashes can see the signal.
You did not say which flash is not firing as a optical remote. The optical sensor for the Yongnuo is on the front of the unit under the red cover. The sensor for the SB-910 is on the battery side of the flash. The flashes can be controlled separately by placing them in different groups. Be sure the sensors see the "Command" flash.
If you buy the Yongnuo 622 series system, you will need two yn-622n transceivers (one for every off-camera flash), and one yn-622n-tx controller for the camera's hot shoe. Using this radio system you set all flash units to regular i-TTL (just as if they were to be used on-camera), and then you set the channel and group on each yn-622n. This system does not need line of sight. Use normal i-TTL with the 622s even if you want to make remote "manual" adjustments.
Since you've had your Nikon flash awhile, I'm sure you are familiar with the settings. The following shows the correct display for using the yn-568ex as a radio remote and as a optical remote.

Apr 7, 2017 22:48:13 #
OriginalCyn wrote:
This is from an old shoot...just because I pulled out the file for the mom who was looking for another shot. I love how I captured her eyes, and cleared up her skin. However, I am NOT a skin retouching expert, and I know that I need to learn frequency separation (I don't even know what that means yet). So please, any guidance here would be appreciated. Thank you in advance for constructive criticism!
Perhaps changing the angle of the shot, putting the sun further behind of the subject, would have given better hair highlights and less mottled light. But, I still like the image other than the two obvious color temp differences between the natural light and the flash. A CTO gel would have helped, or it can still be adjusted either in ACR or LR with a graduated temp adjustment.
Frequency separation is just a retouching technique that attempts to easily edit color tones only and texture only on separate layers. A good youtube tutorial (and free Photoshop action download) is here:
http://phlearn.com/amazing-power-frequency-separation-retouching-photoshop
Apr 5, 2017 20:29:39 #
To my knowledge there is no yn-560 H speedlite (unless it is a very new release). Yongnuo makes (or has made in the past) the yn-560, yn-560II, yn-560III, and yn-560IV. The III and IV have internal radio receivers that are not compatible with Canon's radio transmitter. The earlier models have no built in receiver.
The only Yongnuo speedlite that is marketed as responding directly to the ST-E3-RT is the Yongnuo YN-600ex-rt. All yongnuo 560 series have at least 2 optical slave functions, but the power or zoom must be manually set by the user when used as you describe.
The only Yongnuo speedlite that is marketed as responding directly to the ST-E3-RT is the Yongnuo YN-600ex-rt. All yongnuo 560 series have at least 2 optical slave functions, but the power or zoom must be manually set by the user when used as you describe.
Mar 31, 2017 09:20:47 #
coach17 wrote:
...I was thinking of purchasing a Yongnuo YN-565EX Speedlight ( Don't need anything expensive, this is $80 at B&H)...
Any help or suggestions would be appreciated.
Any help or suggestions would be appreciated.
Even though you don't need anything expensive, I would consider spending $17 more to buy the yn-568ex Nikon or $22 more to buy the yn-685 Nikon. Both would add High Speed Sync capability that the yn565ex does not have. The yn685 has a built in radio receiver that can be used with the Yongnuo yn622 series radio controller. If you will never add radio, just get the 568ex.
All of these will work just fine as Nikon CLS optical remotes, allowing remote power adjustments from any Nikon Commander flash.
Mar 30, 2017 14:49:01 #
Dngallagher wrote:
I understand there may well be disagreements, however, mine work perfectly, they fit tight and have never been a cause for concern - that being said, of course you can get good and bad from any vendor of course. As they say, your mileage may vary.
Apparently you and I received our XIT extension tubes from a different production run than Thomas902 did. Mine also fit snug and all the contacts work just as they should.
Mine also receive very light use. I really don't know how well they will hold up over time, but for now I don't regret saving money.
Mar 25, 2017 09:43:26 #
OK. My old eyes have not sent my poor defective brain cells a message that something has changed in the Newest Pictures link (other than the "new!!!" in red). What's different?
I've been clicking on the latest pictures link for quite some time. Are the previews a different size now, or has something else improved?
I've been clicking on the latest pictures link for quite some time. Are the previews a different size now, or has something else improved?
Mar 13, 2017 16:54:33 #
SophieLila wrote:
Thanks, just started doing that and kind of backed off when several sites relied heavily on Photoshop- which I don't own. Will continue looking.
Not sure what you're looking for in the final image. Here's one I did recently. Although it was processed in Photoshop... other than the crop, most of the processing could have been accomplished by simply setting my in-camera picture control to 'vivid'.
Mar 12, 2017 21:38:56 #
Boris Ekner wrote:
Here's the pic after editing:
Again, glad Gimp works for you. But, for this particular image... you could have accomplished the same thing without ever leaving Lightroom.

Mar 12, 2017 16:07:11 #
Boris Ekner wrote:
My thanks to everyone. I have no clue of which is the best one of these free options so I went with Gimp. Looks like its doing what I want. The rest is just a learning curve that I guess I'll manage over time. Thanks again guys, much appreciated! :-)
I'm glad you found something that will work for you. Although I've never used it, I understand that Gimp is a powerful editing application with many uses beyond the one you described. But, I do wonder why you were unable to complete the single task that you desired (changing/painting a background area to black) without leaving Lightroom.
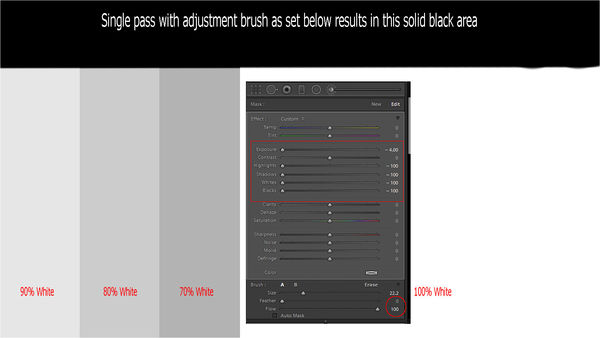
Changing an area from light to dark has never been a problem. Isolating an area for the effect, however, does makes a person grateful for the tools in other applications.
I find that if I were to want to change a portion of an image from even solid white to solid black it can be done with a single stroke from a LR adjustment brush at the following settings:
Mar 11, 2017 15:35:40 #
An enjoyable way to spend the day. Interesting effect. You might also consider trying a displacement map to give your texture a wrap around look. Gavin Hoey has one of the better tutorials on displacement maps. He is using a older version of photoshop, but it is still applicable. I find almost all of his tutorials fun to watch.
http://www.youtube.com/watch?v=iHNO4Sgnw5E
http://www.youtube.com/watch?v=iHNO4Sgnw5E
Mar 7, 2017 19:05:28 #
will47 wrote:
When using an adjustment layer, such as curves, what is the purpose of inverting the mask? Thanks.
Normally, you would not simply invert a white mask to a black mask and leave it at that. Since black on the mask conceals any adjustments made, having a mask that is 100% black effectively turns off the layer completely.
Say I want to make an adjustment to an image, but I only want it to affect a small area of that image. I will quite often make an adjustment globally with an adjustment layer. I then invert the white mask(show everything) to black(show nothing), and then paint, at the desired hardness and opacity, with the color white (or gray) on the mask in the areas I want affected by the adjustment.
Mar 6, 2017 20:40:42 #
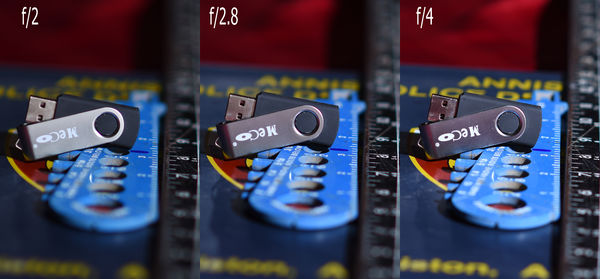
I noticed that the f/2 to f/4 sample above shows a nice representation of the bokeh difference at the different apertures, but not really the detail difference at the focus point. To show that f/2 is really a bit soft you need to look at the fine detail differences on the usb thumb drive in this image.
Mar 6, 2017 20:13:40 #
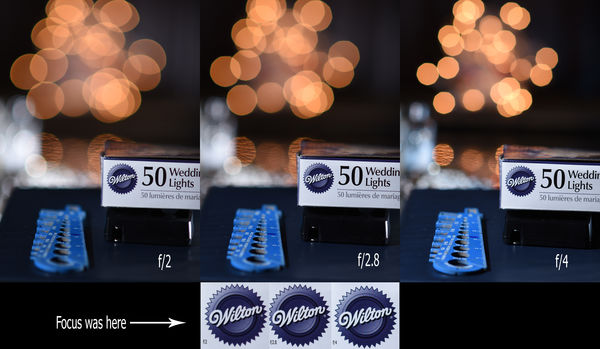
Mac, since all the examples here apparently have been shot at f/4 or greater I shot a few comparison shots with mine today.
The first sample shows f/2, f/2.8, and f/4 comparisons. DC not used. All were shot at very close to minimum focus distance on a tripod. The distance from focus point to background lights was about 5 feet or a little less.
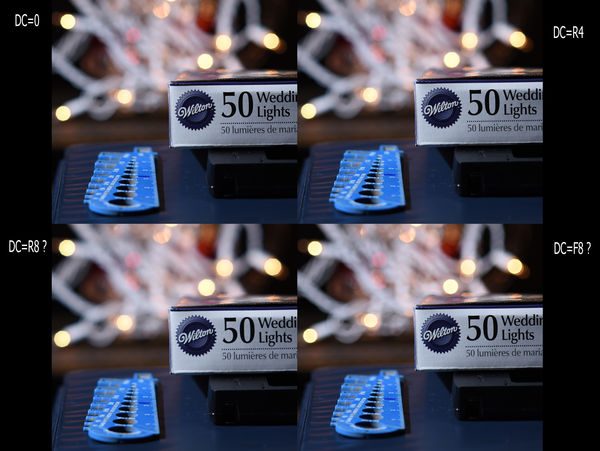
The second group were all shot at f/4. I used DC as indicated. The ones marked R8? and F8? were in the unmarked slot beyond the 5.6 indicators on the DC control ring. R and F indicate Rear and Front defocus. In the second group the lights were only 3 feet behind the focus point. You can judge if you think the effect is significant or not.
The first sample shows f/2, f/2.8, and f/4 comparisons. DC not used. All were shot at very close to minimum focus distance on a tripod. The distance from focus point to background lights was about 5 feet or a little less.
The second group were all shot at f/4. I used DC as indicated. The ones marked R8? and F8? were in the unmarked slot beyond the 5.6 indicators on the DC control ring. R and F indicate Rear and Front defocus. In the second group the lights were only 3 feet behind the focus point. You can judge if you think the effect is significant or not.
Mar 6, 2017 11:04:55 #
Apaflo wrote:
... though I'm pretty sure that while marked to only 5.6 it has another click stop for f/8...
You're right. It will continue a little past the last mark (f/5.6) each way and lock in position. I guess that may or may not be f/8. But again, as I am personally unable to detect any significant (or even subtle) difference when using and not using defocus control, I choose to leave mine in the off position at all times.
Mar 6, 2017 10:37:40 #
Apaflo wrote:
It does in fact control correction... and the DC control might be set to f/8 or f/11 (for less out of focus ears)...
Defocus control on the 135 is only available at full stop aperture values between f/2 and f/5.6.