Check out Video for DSLR and Point and Shoot Cameras section of our forum.
Posts for: pixbyjnjphotos
Jul 1, 2019 15:30:50 #
Linda From Maine wrote:
Thanks so much for your time and efforts in providing this tutorial, Jeff. I've added it to the member-tutorial section of PP Forum's guidelines:
https://www.uglyhedgehog.com/t-184368-1.html#10148446
.
https://www.uglyhedgehog.com/t-184368-1.html#10148446
.
Thanks Linda for viewing my post and adding it to the tutorials section. I wrote technical training materials for operation and maintenance of some pretty complicated equipment for many years. I sort of know a little of what it takes for people to be able to follow written instructions to produce quality results. This one requires layers and layers can be daunting to some people. I think they are almost required for a lot of post processing procedures. Layers can make things easier if they don't confuse you. Have a GREAT DAY!
Jul 1, 2019 15:22:14 #
Thanks for viewing my post. Hope you might have picked up a tip or two. Have a GREAT DAY!
Jul 1, 2019 15:17:24 #
dpullum wrote:
Tutorials like this are what I feel are an importa... (show quote)
Thanks for your remarks and comments. I was in hopes I might help someone. I have a lot of fun doing things like this and I learn new things all the time. I got an email that I qualified for the Topaz AI version with four of the their useful plugins included. I downloaded and installed and I like it a lot. Thanks again for you lengthy response and have a GREAT DAY!
Check out The Pampered Pets Corner section of our forum.
Jul 1, 2019 03:27:07 #
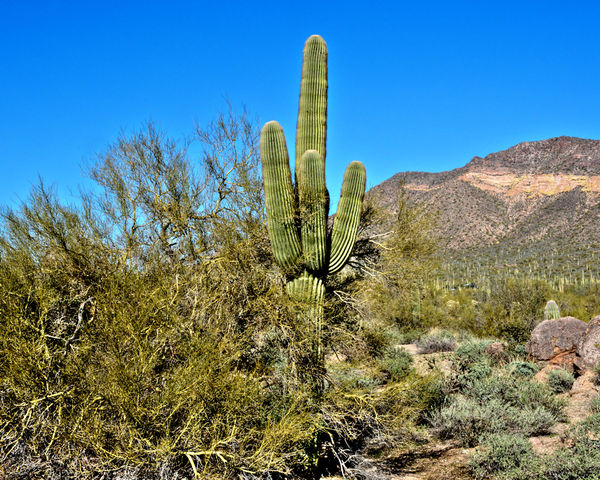
I haven't posted for so long and there are so many new categories I am not sure I am posting this to the correct section. My apologies if I did this incorrectly.
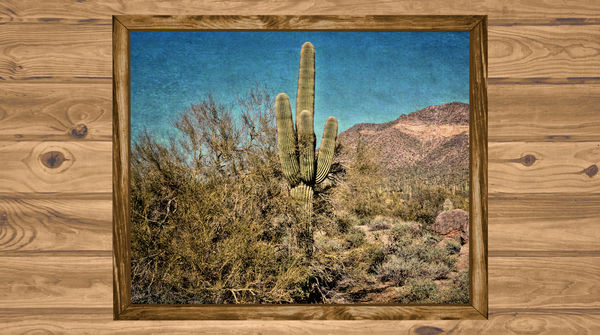
The original image was taken a couple of years ago and its colors were slightly dull. Since I like my photos with crisp clear color, I took it into Photo Matix as a single image. It came out looking very nice. I then took it into Corel PSP X8 and resized and cropped it to my favorite size and resolution which is 10x8 inches at 300 pixels per inch. It has been in my archives for a while. I ran across it looking for saquaro cactus photos so decided to to something with it. I am now using PSP 2019 with many plugins. I also have been building some full screen (16x9 aspect ratio) background photos. Thought I might like this image in one of my backgrounds as well as share how I accomplished it. Used PSP 2019 to make the 10 x 8 for my background using the following steps:
Step 1 – Open your photo and promote the background layer to a raster layer.
Step 2 – Copy the raster layer to a second layer (over the promoted layer).
Step 3 – Went to Topaz Textures 2 to modify the upper layer.
Step 4 – I selected and applied the Black Hole texture and returned to PSP.
Step 5 – Change the opacity of the upper layer to your liking.
Step 6 – Flatten layers to merge into single image (10x8 inches) yielding image 1.
Build a new second image. (keep all layers visible)
Step 1 – Built a 16x9 background using an image of a couple of boards I had in archives.
Step 2 – Create empty raster layer above the background.
Step 3 – Create a second empty raster layer above the layer created in step 2.
Step 4 – Built a frame from another wood image I had in archives and positioned in upper layer (centered).
Step 5 – Size frame to just cover the outside edges of a 10x8 image.
Step 6 - Save new image with layers as a pspimage (project image) for future use.
Step 7 – Copy and insert the first image (or any other 10x8 image) into the middle (empty) layer so all edges are under the frame.
Step 8 – Flatten layers into single background image and save as a jpg.
Step 9 – Copy image into folder where your screen background images are kept.
Step 10 – Personalize your desktop background using your new desktop background image.
The combinations are nearly unlimited. You can use any photo you want and use any kind of background material you like for the 16x9 background. I like this setup because it allows me to have some program shortcut icons on the left and right sides of my photo and they do not destroy the photo. The reason for saving the project image is to be able to call it up with the layers ready to accept a different 10x8 image without having to build a new background or frame. Have fun.
Jun 23, 2019 15:15:17 #
I have been using this technique for a long time. Not only can you subdue the background but, you can insert a totally new background. Works very well. The trick is to get a good clean cut when you extract the main subject. You did a superb job with your photo. I like it a lot. Have a GREAT DAY!
Mar 1, 2019 04:14:52 #
billbarcus wrote:
The grand enormity of Flat Iron significantly dwarfs the saguaros of the foothills - and saguaros aren't small by any means. As an Arizona native, I enjoyed and appreciate your photo of this Icon mountain. 
Thanks for viewing my photo. I am glad you liked it. It is an iconic mountain and I have many photos of it taken from different angles and at different times of the day. One of my favorite objects for photos. So many different colors on different days and different times of the day. Have a GREAT DAY!
Jeff
Feb 26, 2019 22:04:42 #
GreyOwl40 wrote:
Jeff, An excellent shot! There are many times when a bit of snow adds contrast to an image and makes it considerably more appealing.
Thanks for viewing my image and your comment. Yes, the bit of snow adds enough contrast to make it a little nicer. Especially, since snow on Superstition Mtn is rather a rare occurance. Have a GREAT DAY!
Jeff
Check out The Pampered Pets Corner section of our forum.
Feb 26, 2019 21:57:37 #
Earnest Botello wrote:
Very good shot, Jeff.
Thanks for viewing my image and your good comment. Have a GREAT DAY!
Jeff
Feb 26, 2019 21:56:39 #
water falls wrote:
Beautiful capture!
Thank you for viewing my photo and your kind comment. Have a GREAT DAY!
Jeff
Feb 26, 2019 21:54:30 #
jaymatt wrote:
Nice one! No snow when I was there in the summer. 
Thanks jamatt for stopping by and viewing my image. It was probably too warm for snow when you were here, LOL. I have many photos of Superstition Mtn as it is one of my favorite objects to photograph. Have a GREAT DAY!
Jeff
Feb 26, 2019 21:44:24 #
angler wrote:
Excellent shot.
Thanks for stopping by and viewing my image. And thanks for the comment. Have a GREAT DAY!
Jeff
Check out Smartphone Photography section of our forum.
Feb 26, 2019 21:41:57 #
J-SPEIGHT wrote:
Beautiful image.
Thanks for viewing my photo and your kind comment. Have a GREAT DAY!
Jeff
Feb 26, 2019 21:30:39 #
Very well done. It's a keeper. Have a GREAT DAY!
Feb 25, 2019 18:48:10 #
CHG_CANON wrote:
Excellent! I lived in Phoenix and didn't even know it could snow there or any where south of Mogollon Rim. Stay warm
Thanks for viewing and your comment. Lots of folks here have never seen snow on SS Mtn.
Have a GREAT DAY!
Jeff
Feb 25, 2019 18:45:53 #
jerryc41 wrote:
Nice one, especially since it is a rare occurrence.
Thanks Jerry for viewing the photo and your kind comment. Yes it is kind of rare. Have to get the shot quick because the snow doesn't usually stay up there very long.
Jeff