Posts for: blackest
Jan 4, 2014 07:09:16 #
There are essentially two methods for scanning negatives a flatbed scanner or using a photo based method.
The flatbed scanner has a fixed focus and is fairly slow. and hopefully with an icc profile it can do a pretty good job. The best scanning software will record at a 48 bit depth. The best software works with multiple passes and has some dust detection. Vuescan silverfast and colorperfect are probably the best programs available.
The common commercial photo based scanning product (marketed to consumers) is the ion scanner http://www.amazon.co.uk/Ion-Multiformat-Slide-Photo-Scanner/dp/B0038WJXIM/ref=sr_1_1?s=electronics&ie=UTF8&qid=1388832586&sr=1-1&keywords=ion+film+and+slide+scanner
This has a 5.1 Megapixel sensor and scans to 2,500 dpi that one usually bundled with arcsoft media impression. generally you only get jpgs from it I'm unaware of a raw capture from these devices.
Your digital slr has at least as many pixels as the ion and can capture in 48bit raw. My old entry level DSLR has a 10 Megapixel sensor and nice lenses. I expect most people on this forum are using higher resolution camera's with better glass.
It seems that some people think the flatbed scanner can produce better images than a DSLR. Interesting, so does that mean when you take a photo with your DSLR the image is poorer quality than that taken by your old SLR using film?
If that is the case surely we should go back to film camera's as it is the better process.
However you digitise an image, a colour negative is going to be hard to get right. Each film is different in how it records an image its tonal response is different between manufacturers and the assorted films they make. Kodak has a collection of "film terms" this allows a film to be processed and the output tweaked to match the characteristics of the film. Even then every shot is different with a degree of under and over exposure.
Another thing to consider is what is the true image?
If you used kodacolor gold back in the day, your photo's came back vivid saturated warm, but was that how it was that day in Skegness or was it more like summer in Miami? As time passes the memories fade so you accept the photographic record.
What i'm really setting up for is that the image you make today doesn't have to be identical to the photo you got from the photo processor years ago. How accurate is that image? The film was processed pretty much automatically with a few boosts like the loudness on our stereo's.
Even today we still have that problem that the processor usually wants to tweak our images to increase the vibrancy of our images.
We like strong trashy colours apparently.
Black and White film processing we could do ourselves. Like Ansell Adams we could go into our dark rooms and produce the image we wanted, but colour film was too hard for most of us thou and we took what we could get. We now have the control that we didn't have with film processing.
I think the true image is very hard to obtain,the camera doesn't see as we do.
What it boils down to in the end is to make an image which pleases you.
When you capture in raw there has been no post processing done to the image. This can leave it a bit flat and dull however we have the same post processing options available that we have for our normal digital images.
If anyone knows of a post processing software which does get colour negatives "right" without any major effort on the part of the operator please let me know.
Dec 30, 2013 13:10:33 #
I don't really have an issue with dealing with sellers located all round the globe. Most of what I want isn't available locally and it's the same stuff made in china or HK just at double or more of the price. Usually its postage which makes up the bulk of the difference anyway. By buying without the mark up i'm left with more money to spend in the local economy and i'm able to buy locally produced goods.
For the case of your lens your local supplier will be sending a comparable amount of cash out of the country, your supplier may be his supplier or pretty close.
On the other hand its a lot of cash and the comeback if the product fails well you are paying for the risk of failure instead of your local supplier. He can offset returns against aggregate profits you on the other hand do not have that cushion. you either save $500 or cost yourself $500 depending on if it fails or not. (buying at $1000 replacing at another $1000).
With me I must have bought 40 low cost items in the last few months mainly from china and HK if 10% fail within a year i'm still winning since I paid half the price , heck most of the time the cost of fuel to buy locally (around 70 miles round trip) plus parking pretty much covers the cost for me. I can't lose buying from china because I buy a lot of things cheaply. Ebay even stacks the deck in my favour by forcing the vendor to refund should i not be satisfied and making them take the loss.
Would I buy the lens from hongkong probably not, the reason being that i'd be exposing myself to a potential loss of $500 on one item. That would probably put me at a loss over all.
The only way i could really justify the risk would be to spend around $5000 with hk and hope i get very little loss from failures. You are gambling, I don't gamble like that.
Your local supplier is spreading his risk over larger volumes he should be able to take the hit if he sells you a lens and it fails in 3 years.
Will your lens need servicing? who would pay for that?
Yes logically the right thing for you would be to buy local
A friend of mine imported a guitar from the USA about $1000 that works because a guitar is good or bad from new any repairs needed later would be relatively cheap. I don't think a lens would be cheap to repair.
Dec 29, 2013 11:28:35 #
Been playing with the Bower. It has a lens but its removable and attaches with a 52mm thread. unfortunately the lead is too long for the threads to mate with a lens but it has a 52mm-58mm adapter which will fit and with a 58mm - 52mm adapter i could then attach it to my camera lens a 18-55mm kit lens I have a panagor macro converter which gave me the macro focusing It could be done with extension tubes. The focal length was around 30mm on the 18-55mm
I could adjust to make the image full frame with the kit lens i have no aperture control so i will retry with an alternative lens later. as it is this 9,250,000 pixels and my camera is around 10 megapixels. A little more zoom and there is no need to crop in post ok you sacrifice a little of the edge of the negative but that means you can batch process quickly.
The bower now is little more than a plastic holder with an opaque screen. The image quality depends on your camera and lenses you could actually get a bit more detail by exposing above and below the ideal and combine the images. Colour balance is still tricky but I found it better to spot white balance rather than use vuescan for example. If you don't have a macro converter macro tubes are also a possibility these can be had for 10 for manual ones.
This image is 10 seconds, at probably f5.6 (wide open) it would work better a little stopped down to the sweet spot . Exposed against the light from my netbook screen with a white image. white balance was set to as warm as possible in order to minimise the orange mask.
main thing is i can shoot around 4 shots a minute maybe faster if i increase the light. Post can be batched and obviously the quality can be much higher with better lenses and camera's a D800 should be recording 4 pixels for every one of mine roughly 3713x 2493 pixels is just over 100 pixels a mm a 35mm frame is 36x 24mm. You can do better.
larger capture.

Dec 27, 2013 20:22:06 #
So what have I learned from this little exercise
1) work in raw
2) take your time colour balancing the first image (choose the easiest one).
ufraw can save the settings as a separate file so once you have got the right settings you can probably do the same film type with the same settings.
3) once you have done the capture you can post when you want.
4) ufraw has a batch mode :)
5)if you need to tweak and get a better result you can go back and redo the images you did earlier.
Dec 27, 2013 19:59:39 #
Ok since I did the last 1 i tried the same 3 i uploaded earlier ufraw remembered my settings from my previous post. So after taking the shots all i did in ufraw was crop & save.

Dec 27, 2013 19:29:32 #
http://petapixel.com/2012/05/18/how-to-scan-film-negatives-with-a-dslr/
This page is quite useful, I even used the blank white side to illuminate the negative. A tablet screen, a macro lens works but you need something opaque to obscure the pixels (probably still true with a retina screen). It's a lot less work if you want black & white. Oh and make sure the dull (emulsion side of the film) faces to the lens and flip it in post.
This page is quite useful, I even used the blank white side to illuminate the negative. A tablet screen, a macro lens works but you need something opaque to obscure the pixels (probably still true with a retina screen). It's a lot less work if you want black & white. Oh and make sure the dull (emulsion side of the film) faces to the lens and flip it in post.
Dec 27, 2013 19:18:25 #
AzPicLady wrote:
Someone mentioned having negs/slides scanned at Costco. This certainly is an option and inexpensive, if somewhat tedious. However, their normal scans are quite small. I learned that they CAN make larger scans but most don't know how. Find an employee that actually know what they're doing and explain it this way: treat the mnegative as though you were going to print a 20x30, then copy that file onto a CD. WORKS!
Don't I know it! Years ago I thought i'll get my films developed and put on CD and not bother getting prints. After all not every shot is worth the paper its printed on and even in those days I figured i'd rather crop and post process. So now I have a bunch of 2 Megapixel images on CD :(
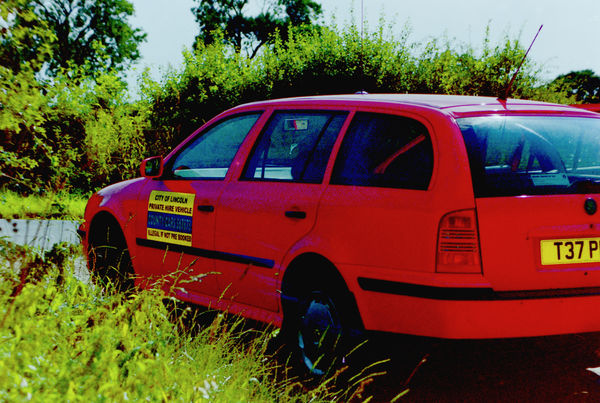
Now this is a 1 second exposure at f8 with the negative inversion done in raw and a bit of spot colour balance. it still has issues and was a bit under exposed.
An improved version of my old taxi

Dec 27, 2013 13:06:06 #
This might be of interest http://petapixel.com/2012/12/23/why-you-should-digitize-your-film-using-a-camera-instead-of-a-scanner/
Dec 27, 2013 08:40:43 #
Converting colour negatives is hard the colour balance is wrong.
so I decided to ignore it for now and concentrate on detail.
With this in mind i decomposed the images into hsv and disgarded the hue and saturation (for now)
With having the original digitised file,(I always got the photo cd when I got film developed).
I have a fair basis for comparison.
The 3 images are
first the capture using flash, I think you can see its details are quite poor
the second is the photo cd image decomposed and just saved with the detail value.
the third uses natural light to capture (30 seconds) and again is inverted and detail recorded.
Of the three the second is clearly best, the flash illuminated capture is uneven I think you can see the point of origin of the light. The third is approaching the detail level of the original, but is not quite there.
One issue is that the red channel is over exposed compared to the green and blue channels so I think i need to add a filter to rebalance the levels.
Post processing is quite critical, there are some good scanning software programs which will do a good job in post and can work on a file not just a scan.
Given that the time consuming part with a conventional scanner is performing the actual scan. This is a faster method for scanning and it can give decent results even if my initial captures suck. As I'm on a break i have time to refine my methods.
Googling should find you some good camera based methods and results.
first go detail using value only

original using value

reshot using natural light

Dec 26, 2013 19:36:07 #
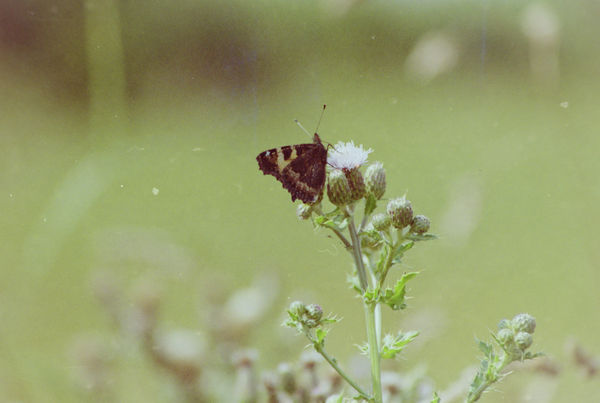
This is the original of the third one as digitized by a frontier machine obviously i got the colour balance miles off. but like i said it is the worst you can do

Dec 25, 2013 23:13:02 #
roughly a negative is 36mm wide so the dpi is around 2,200 with my camera.
Dec 25, 2013 22:55:38 #
These 3 are from 5 year old negatives taken on a K1000 probably using a 80-210mm adaptal lens. The bower slide duplicator was attached to a K200D with a 2.0 50mm lens the pictures were taken at f11 and 1/180th used 2 tripods with a slave flash wirelessly triggered about 1 foot away.
The pictures were simply inverted and a spot white balance applied. They could be better. software used was ufraw and the gimp. taking the pictures is a matter of seconds, you just slide the strip along and take the next frame white balance was set to flash. after cropping the images are about 3162 x 2123 or 6712926 pixels. The K200D is a 10 Megapixel camera. I did no cleaning of the negative. You can do much better.
The pictures were simply inverted and a spot white balance applied. They could be better. software used was ufraw and the gimp. taking the pictures is a matter of seconds, you just slide the strip along and take the next frame white balance was set to flash. after cropping the images are about 3162 x 2123 or 6712926 pixels. The K200D is a 10 Megapixel camera. I did no cleaning of the negative. You can do much better.


Dec 20, 2013 16:17:13 #
http://www.amazon.com/Opteka-Slide-Copier-Digital-Cameras/product-reviews/B000EQ24Z4
google diy slide copier for several links. i used a coffee lid for a screen for one version i made.
I actually need to have a play since i have some designed for film which is a pain as my sensor is a crop sensor which "scans" the centre of the negative. Its a good winter project. I've got more equipment since i last had a play. A solid tripod for one. Maintaining the distance correctly and illuminating evenly makes a big difference. I've learnt a lot about setting and fixing white balance. Since i last tried.
Dec 20, 2013 15:27:44 #
No one seems to have come up with the obvious use your camera, slide converters are relatively cheap to buy as a screw on version for a suitable lens or as a t2 mount. Slides naturally are easiest needing very little post processing. Colour negatives are a bit tricky as the colour mask needs eliminating, black & white pretty easy. you can use a macro lens some pipe and diy a holder. A popular option uses a bounced flash to illuminate the negative.
some people prefer to take multiple shots and stitch together for even higher resolutions. An 80a filter can help restore some colour balance to negatives and its relatively quick. once set up its a few seconds to do 5 or 6 frames lightzone maybe a good tool for post processing as it builds a stack of operations you can apply over and over again.
some people prefer to take multiple shots and stitch together for even higher resolutions. An 80a filter can help restore some colour balance to negatives and its relatively quick. once set up its a few seconds to do 5 or 6 frames lightzone maybe a good tool for post processing as it builds a stack of operations you can apply over and over again.
Dec 17, 2013 04:02:24 #
I would question the value of backing up the c: drive If all that is on that drive are system files and programs then you should have an install disk for windows and your program files.
where ghosting system drives comes in handy is when you have a standard setup (eg windows and an office install a webbrowser and messaging programs) and you need that on several systems. Also quite handy when you need to resize a partition. It's your data thats valuable and keeping it on a separate drive is commendable as it makes backing it that much easier(you must back up data at least once preferably twice or more). Google for [gparted clonezilla iso] for free tools to clone copy resize.
I'd also recommend picking up a live cd of a linux distribution such as Mint or Ubuntu and either burn to disk or use a program such as unetbootin to create a bootable usb stick. Why because it can let you access your files even when windows can not boot. That can be very useful.