Posts for: phoneguy55
Nov 27, 2011 21:36:42 #
nice shot bro....maybe a tiny bit washed out as far as lacking contrast, but maybe that was the brighter look you were going for. Doing the "invert" made it an interesting picture to ponder. In Elements, what I sometimes do to get "selective" sharpening is to make a duplicate layer, zoom in real close on the parts you want to sharpen, and use the sharpen tool with a small brush size, around 50 to 60% opacity. You can then paint in the sharpness, and see right away if it causes too much pixelation and noise. using that layer's opacity slider gives you some lee way after making the changes , also. Keep every different editing technique on it's own layer, and they can all be undone, or adjusted as the whole edit goes forward. Good luck man...
Nov 27, 2011 17:58:21 #
joelb wrote:
Thanks for your help. That is a good job. I hope I can get close to what you did.
step by step...(or layer by layer ...ha ha )...you can. This can be your lesson , that helps you learn how to do each phase.....( be challenged, ....I was ) Good Luck..
Nov 27, 2011 17:56:37 #
Quote:
Terrific job, you certainly made some family members extremely happy.
Ian
Ian
Yes...it was an emotional presentation when I gave them the final printed 8x10. That made the work well worth it...
Nov 27, 2011 17:44:28 #
I have done quite a few restorations over the years...some come out good, and some are tough to improve on. It depends on so many factors. Here is a kind of workflow that I find works well for me: ( make a new layer for every change, so you can always make adjustments later ) First I try to fix the worst damage, like stains, tears,folds,etc. Secondly I might work on the color cast ...either improve the sepia, or work on the contrast of a B&W. Third I might try to work on sharpening....a little bit on the whole picture, but selectively on certain areas also. The toughest ones are the ones that require you to actually "paint" in missing information that just can't be cloned from another area. But it can be done....Many members on here are quite willing to help step you through any process you are trying....
Here is one I did of a friends sister who had recently passed away. Just to show the before and after .....
Here is one I did of a friends sister who had recently passed away. Just to show the before and after .....

Nov 27, 2011 16:21:10 #
the "rules " have been recently updated whereas doing an edit to someone's posted photo should only be done when specifically requested. I find the only gray area to that rule is when it is implied via the subject of a post, or in the comment that an edit might be appreciated. When in doubt, I will refrain....but a P.M.. or a request within the thread would be a safe bet also.
Nov 27, 2011 15:12:05 #
if you click and hold on the lasso tool icon, you will see that there are 3 modes to this tool.
1. lasso -just free hand drawing
2. magnetic lasso - it will try to find the edge of whatever you are trying to select
3. polygonal lasso - this one will draw a line from each "click" to the next "click"...so you can build a selection by clicking all around the edges.
I end up using other selection tools most of the time, myself. It pretty much depends on the contrast between what I want to select and the background. If they are similar, I just use a selection brush and vary the size as i get into the detailed areas.
Don't forget the "dodge" tool for something like teeth whitening. Set the exposure to a mid to low setting, and working with a zoomed in image, you can lightly remove an off color cast. So many different ways to get a good result with this ( and other) programs......Good luck.
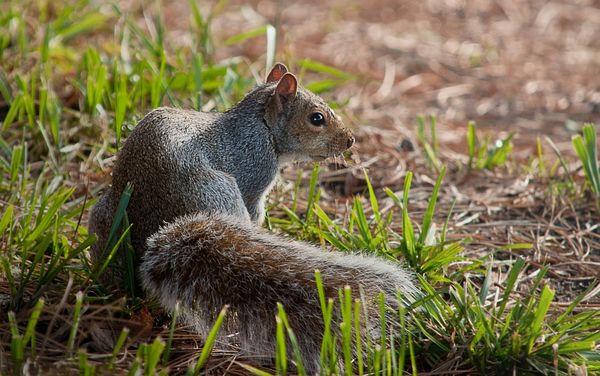
Nov 27, 2011 12:14:38 #
we had a "stare down"....which let me recompose the shot for quite a while.
" ok buddy....take the shot already ...."
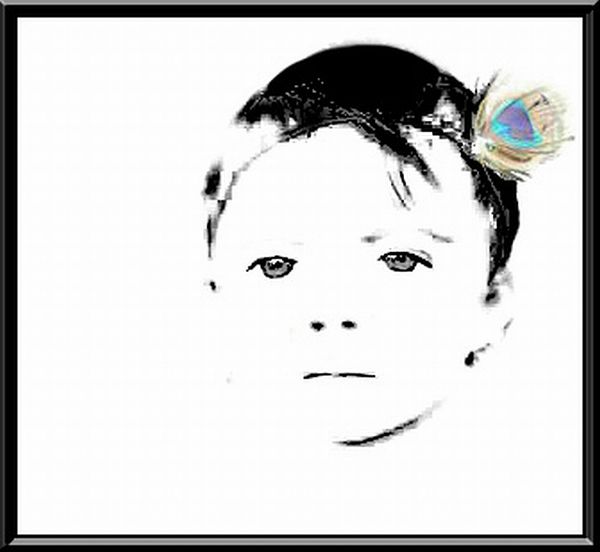
Nov 26, 2011 21:52:47 #
wow....what a great keepsake photo. There are so many ways you could tweak this shot....some very time consuming, using some detailed cloning of the background areas...or painting in a solid color background over what's there......but the easiest way ( to me)....would be to make a duplicate layer, then select the "burn" tool and gradually darken the whole background by slowly going over it until it was dark enough to not be a distraction, ...but not just total black, either. If you carefully use the clone tool, you could take out the slight glare on her glasses too. I just did a quick version to show you, but you can try yourself and carefully get more detail. The trick is to work on a highly magnified section of the pic , a little at a time.

Nov 26, 2011 11:00:53 #
Nov 25, 2011 16:22:35 #
feleekshia wrote:
accidentally was in manual mode and this is way overexposed. Just curious what it would look like after editing? Thanks!
as stated by the others, when the "information " just isn't there,...it's hard to get it back. SO.......you have to use what IS there.....if you want to use it at all. Maybe an artistic touch is the only option.
Nov 24, 2011 22:14:28 #
Eugene wrote:
Don't see sepia there. I thought I saw it under one of the drop down list at the top before. This is driving me nuts.
phoneguy55 wrote:
click on WINDOW in menu ....drop down menu will have items to check....click on EFFECTS...and effects panel will open on sidebar
on my window,.....when I click on the third icon ( of the four)in the effects panel....the drop down shows "monotone color"....I see various "tints" listed and one is "sepia"
Nov 24, 2011 21:42:01 #
click on WINDOW in menu ....drop down menu will have items to check....click on EFFECTS...and effects panel will open on sidebar
.....another method would be to make copy of background layer....click on ENHANCE...drop down to ADJUST COLOR......REMOVE COLOR....then maybe do a levels adjustment to get the best contrast of your darks and lights.....then make another copy of that layer ...then go to FILTER...drop down to ADJUSTMENTS....PHOTO FILTER....drop down to SEPIA......crank the slider to the far right.
What this gives you is a way to adjust the black and white contrast ( separately via opacity slider) AND...adjust the sepia effect ( separately via it's opacity slider) . You get a bit more control of each setting rather than just applying the "effect" . So...one easy method...or one more involved , with better control of outcome.....lots of choices.....
Nov 24, 2011 21:23:20 #
gave one of the shots an attempt at editing, but when posted here it didn't actually reflect as much change as it did on my monitor....so deleted it. It was fun trying to recover what was lost....hope you can get the chance to reshoot. I would have loved to have been there....
Nov 24, 2011 19:57:20 #
cool assignment for sure.....just think outside the box, and let the others in class turn in the mundane , ...you turn in the imaginative idea, which you invested the time to make each shot ...(near) perfect.....( I may challenge myself to this project, ...just for fun ...)
Nov 24, 2011 19:53:02 #
another good place for tutorial videos.....
http://www.photoradar.com/category/videos/elements
http://www.photoradar.com/category/videos/elements