Posts for: canon Lee
Dec 14, 2019 20:18:45 #
I have been using the CamRanger for years now and cant live without it..
Dec 12, 2019 16:36:34 #
Hi Gene... Ive been away from this discussion group.. How are you Gene. As to shooting only raw. For me I do Picture day for youth sports clubs. I use CamRanger so I have to shoot Raw + Jpeg ( camranger uses jpeg camera output to speed things up). I do shoot action sports as well and use jpeg for rapid shooting. I use jpeg for my real estate shoots because they are used on the listing sites... If I were doing lets say images for print I would use RAW. There are occasions where high quality prints are needed and that of course would necessitate RAW.
Nov 16, 2019 12:21:41 #
the 2 programs have very different uses.. Lightroom is a raw converter, which means it converts digital coded ( RAW) files into an image (JPEG).. Lightroom works with RAW digital codes, JPEG works with pixels.. RAW is not an image but digital code.. JPEG is an image created by pixels...
LR is a program where you need a fast way to pick keepers, Photoshop moves and changes pixels. PS is an editing program, LR is a selection program as well as a RAW converter....
Advantage of LR; retains the full digital info that can be adjusted without loss of resolution.. Dis-advantage of PS; Loss of resolution each time you edit and save...
Apr 25, 2019 18:43:21 #
watersedge wrote:
i have a canbn 60d
my daughter wants me to take the photos. what setting is full proof on the camera to get reasonable in focus and sharp photos
my daughter wants me to take the photos. what setting is full proof on the camera to get reasonable in focus and sharp photos
Do your daughter a favor and pay for a pro as a wedding gift. Then enjoy the big day.. You have no idea what you are getting into. The pro's make it look easy that's because they have experience.
Apr 25, 2019 18:33:38 #
Always have a mat when framing. The mat keeps the print from sticking to the glass.....
Apr 25, 2019 18:27:03 #
When outdoors use the flash in TTL and set your camera for Aperture Priority. Especially in the Fall when the sun is low in the sky and creates high contrast. I never use the built in flash. Using 2 speed lights works better. If you do weddings you can set one speed light in the back of the room and bounce or use an umbrella for the subject shot. A speed light ,at full power, is only a 1/4 power of a mono light so using 2 gives you more light. when taking portraits you can put a speed light behind the subject and face it towards the wall behind creating a nice halo effect.
Remember that a flash exposes the subject only and is activated after the shutter has taken the ambient light. You are working with 2 light sources, ambient and supplementary flash. The 2 together work for better exposure.
Remember that a flash exposes the subject only and is activated after the shutter has taken the ambient light. You are working with 2 light sources, ambient and supplementary flash. The 2 together work for better exposure.
Apr 25, 2019 18:07:52 #
buckscop wrote:
Amateur. Canon T7i. Usually jpg, sometimes raw &a... (show quote)
I suggest that you save as a TIFF
Apr 12, 2019 19:05:58 #
DWHart24 wrote:
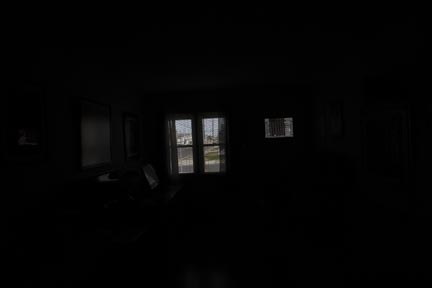
You have blue on the floor from the window and the room looks dark. Real Estate agents want photos that are bright and show the true colors of the room.
Edit: Lee didn't mention that this is for real estate photos.
Edit: Lee didn't mention that this is for real estate photos.
Yes David it for real estate.. I agree that the pix above is too dark and the door window is blown out and I would never submit a photo that is dark with blown out windows,.
Apr 12, 2019 18:59:37 #
billnikon wrote:
OK, this is really simple. Use Manual exposure on your camera, make sure you are under 1/250 sec.
Take the exposure for the outside for the correct exposure and keep camera on manual.
Now, attach Nikon Flash and set it to TTL. Aim flash up and behind you. Take shot.
You will now have the correct exposure for both inside the room and outside.
Take the exposure for the outside for the correct exposure and keep camera on manual.
Now, attach Nikon Flash and set it to TTL. Aim flash up and behind you. Take shot.
You will now have the correct exposure for both inside the room and outside.
I know I have frustrated many here are with me. Actually most shots I am able to get a reasonable balance from the window and the ambient interior. ( reasonable not great ) I ran across a house that was dark and had small windows and I was not able to get a good balance between the inside and outside. this is why I chose to take separate outside and inside shots so that I could adjust both separately.
Then I discovered I had no experience with layer masking. I still cant get it. This is why in a few dark rooms I need to cut out the windows. It doesn't take me very much longer to cut out the windows, but I have to be pleased with the results.
Apr 11, 2019 21:42:09 #
Photocraig wrote:
Just say'n, Lee it is WAY easier in LR using the m... (show quote)
In many ways I do agree with you. Most rooms have enough ambient light to get a good ambient shot, enough ambient light that the room isn't totally dark with blown out windows. Its the dark rooms that I have to use slow shutter to get a good window pull, and that gives me a noise filled dark shot which I cant use to merge with the flash shot. some of the houses are empty, with no lights just low ambient. I don't have a problem with a room that has more ambient light. I can even get away with not doing a window pull.
Apr 11, 2019 21:18:46 #
DWHart24 wrote:
Watch the video I posted above. It explains it.
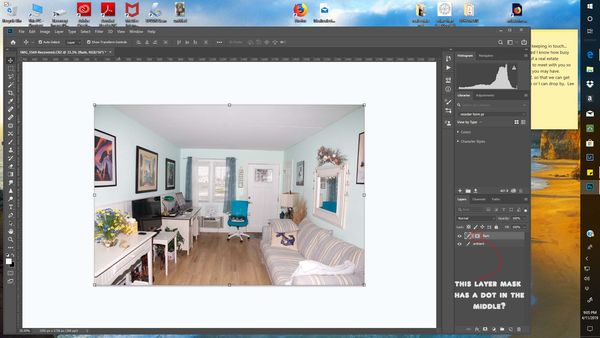
the screen shot has the layer mask with a dot in the middle, not the usual white box ???? I don't know what that dot means but I think it is preventing me from using the brush tool to make the shot beneath visable??
This is as far as I get and the brush does nothing. Its not so much about the ambient and flash exposures that I put into PS, but the layer mask.
Apr 11, 2019 18:45:09 #
DWHart24 wrote:
You're doing way too much work. Set the camera on ... (show quote)
I will take the pixs tomorrow when the sun is up & will send the pixs . can you explain "layer mask hide all" ? I have tried to get darken to work with no luck.
Apr 11, 2019 15:36:10 #
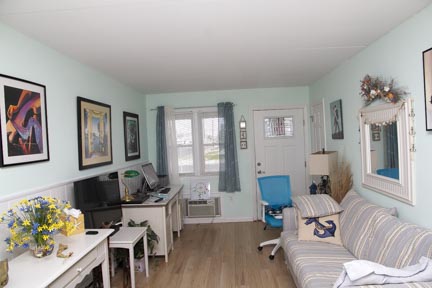
hi I am trying a new technique using my camera as light meter. The room is lit with window light, very little ambient. As I understand what I looked at on YOUTUBE, I went up to the window and in M mode, spot metering, put my AF point dead center, flash off, I set my A to F7.1 and the ISO at 320 then adjust for center meter and got 1/1000s. I moved back into the room and shot photo #1 using those settings. I then got the interior reading, moving my AF point to a dark spot in the room, and got 1/250, F7.1 ISO 320
Flash @ M 1/1 bounced to the celling and shot #2 Then selecting both went to PS/layers and proceeded to use Darken mode . It did not work. However I did notice that when I clicked on "vector mask" in darken mode the icon wasn't the usual black square. Maybe that's the problem.
Flash @ M 1/1 bounced to the celling and shot #2 Then selecting both went to PS/layers and proceeded to use Darken mode . It did not work. However I did notice that when I clicked on "vector mask" in darken mode the icon wasn't the usual black square. Maybe that's the problem.
Apr 11, 2019 13:05:23 #
Pablo8 wrote:
'Window Pull' is an alien term to me, sorry. I ha... (show quote)
Hi again Pablo. After reading your comments, I got the feeling that you really are not up to date with the real estate photography business. Your comments were not about using the cameras light meter but about your assertion that I was not knowledgeable about exposure. Todays techniques are much different than when you were shooting houses. Todays techniques use digital cameras and flash. Real estate photography is a business that requires a photographer that can get in and out fast, as not to keep the realtor waiting, so I am always looking to get faster and more accurate. Like you I take an exposure shot for the window and one of the interior. Blending the exposures in HDR does not always work Pablo. As a result we real estate photographers have to mask out the window and adjust each layer to balance out the light. Some use a technique called "darken" mode and others like myself cut out the blown out window to reveal the good exposure beneath. Both take time. I take around 50 different angle images. So you see, Pablo I don't have time as you suggested to take 10 min per shot to find the right settings, I really have to get all shots in an hour or less. Editing is where I spend more time. I am sure you thought I was a novice and using "P" mode. I started photography many yrs ago doing studio product shooting/head shots, and like you I used very expensive equipment as well as lighting, backdrops, etc. But shooting real estate is different, for on thing unlike studio work there is the difference in light which cant be adjusted, such as "incident as well as reflective. So these two light sources require different settings. In a studio it is easy with just being able to adjust lighting for reflective light. I am 82 and still working in the business. I would say Pablo I acquired a lot of experience and feel I do have a working knowledge of camera settings and exposure.
Apr 10, 2019 16:13:48 #
Pablo8 wrote:
As a Professional Real Estate Photographer, you seem to show unusual naivety, in lighting situations which must crop up every day, and every, or most shoots. You have the equipment, and 10 minutes testing (Trial exposures)for yourself, will surely give you the answers. Doesn't seem like you have done a lot of work in this field of photography, if you haven't got the basics sorted yet.
BTW here is my original question, not insinuating that I was ever going to use "P" mode for any of my shoots... here is the technical question" …"How accurate would it be to use the "P" mode as a light meter? I never use "P" mode and use M or A for my shoots, but what if I need a light meter to measure, lets say a window, and then use flash for the room? How accurate is the light meter in a camera in that mode?" And you never answered my question... Have you ever shot a window pull?