Posts for: Rongnongno
May 6, 2024 14:07:07 #
gvarner wrote:
Get a cable made by Apple, male USB-C to plug into the phone and female USB to plug into the PC. In Windows File Explorer, navigate to the iPhone device. Your photos will be in the DCIM folder. If this doesn’t work you may have faulty USB port device driver on your PC. A workaround is to get Drop Box or a similar app to transfer your photos from phone to PC. Windows One-Drive works well too. I find it easier to use than Drop Box.
You cannot use a USB-C M/F cable unless you want to create a longer cord. Connecting a device to another, both are M.
The cable does not need to be from Apple, it simply needs to a USB-C (P). These cost less than $10 for two (or more units) on Amazon, very likely also available on B&H for the same price.
May 5, 2024 23:46:09 #
Pam Hewstone wrote:
Message is no devices found, it has been suggested I try airdrop, I will try that. Thanks for replying.
Cable.
May 5, 2024 20:21:33 #
Pam Hewstone wrote:
Help please, I am unable to transfer photos from IPhone 14 to Windows Laptop OS is Windows 11, I have been trying via USB C cable without any success, any suggestions would be appreciated. Thanks in advance.
You need a good quality cable, then it is likely that you have to set up the USB tethering to transfer if you see the phone in explorer and still cannot transfer.
May 5, 2024 15:53:00 #
I am not sure if you have noticed by this forum is slowly changing.
Cosmetic (click, animation), it became 'responsive' (Seamlessly adapts to smaller screens) last year or so...
Admin has been busy.

Cosmetic (click, animation), it became 'responsive' (Seamlessly adapts to smaller screens) last year or so...
Admin has been busy.
May 5, 2024 09:58:38 #
May 5, 2024 04:46:20 #
May 4, 2024 23:06:03 #
Found a simpler way to do this...
https://static.uglyhedgehog.com/upload/nt/2024/5/4/834162-ephanie_vector_colr_better.svg
https://static.uglyhedgehog.com/upload/nt/2024/5/4/834950-stephanie_vector_colr_copy.svg
https://static.uglyhedgehog.com/upload/nt/2024/5/4/834162-ephanie_vector_colr_better.svg
https://static.uglyhedgehog.com/upload/nt/2024/5/4/834950-stephanie_vector_colr_copy.svg
May 4, 2024 14:06:08 #
*sight* another sterile discussion.
Canon vs Nikon... PC vs Mac... X vs Y...
Canon vs Nikon... PC vs Mac... X vs Y...
May 4, 2024 10:58:32 #
May 4, 2024 09:06:40 #
Zooman 1 wrote:
.../...
It might be even better was this posted in the bird gallery.
May 3, 2024 19:38:49 #
These trigger happy tourists missed the kawaii (spelling, mean 'cute') girls in their cosplay outfits... A thing to see once in a lifetime.
May 3, 2024 19:34:50 #
Longshadow wrote:
Seems photography too, but, your logic is faulty.
It also supersedes "Don't post pictures on other people's threads unless asked to do so.".
It also supersedes "Don't post pictures on other people's threads unless asked to do so.".
Did I mention posting in this thread?
May 3, 2024 18:39:48 #
I wonder if I should post the few hundred captures from my trips or while leaving abroad... On the same thread, of course.
May 3, 2024 02:24:33 #
Quick vector outline creation...
Preparations:
► Open image
► Duplicate the background layer (Ctrl-J)
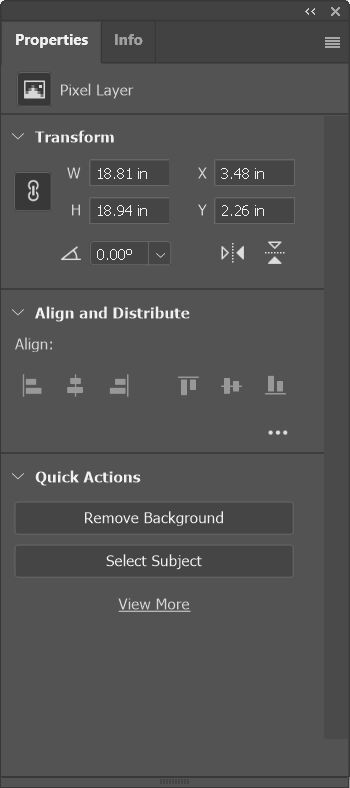
► Select background (properties, quick action removed background.)
https://static.uglyhedgehog.com/upload/nt/2024/5/5/167394-reenshot_2024_05_05_022741.png
► Delete background (Ctrl-click on mask, switch to layer icon, Ctrl-J)
► Duplicate layer (Name it - I use basic)
► Delete layer underneath (Background copy)
► Ctrl-right click on subject (Basic layer)
► Create a fill layer (Black - Color does not matter, but having a visual clue is)
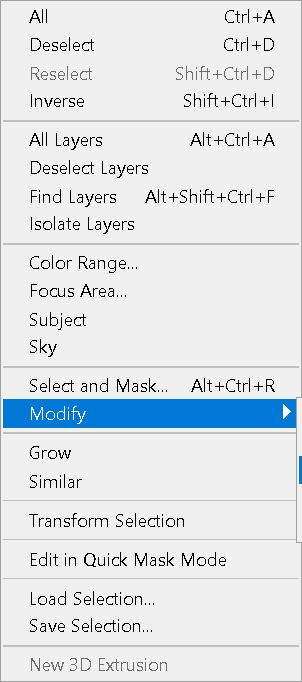
► Ctr-click on the new layer mask to create a new selection.
► Expand the selection (Modify ► Expand, select a number proportional to the size of your image, I select 10)
https://static.uglyhedgehog.com/upload/nt/2024/5/5/168404-reenshot_2024_05_05_025229.png
► Create a fill layer (White)
Now you should see a Black outline and a white fill.
Creating a path using these two layers:
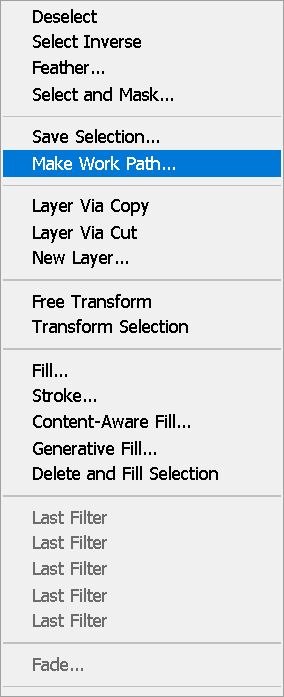
► Ctrl-click on the black layer mask
► Ctrl-Alt-click on the white layer mask. (Remove from selection)
► Select any marquee tool (You will not use it)
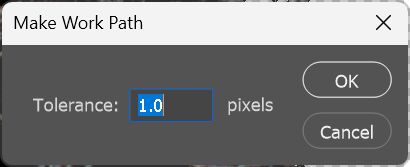
► Right-click within the selection. Select "Make work path" (I select 1, a greater number will make the vector looser)
https://static.uglyhedgehog.com/upload/nt/2024/5/5/169936-reenshot_2024_05_05_022513.png
https://static.uglyhedgehog.com/upload/nt/2024/5/5/170938-reenshot_2024_05_05_022651.png
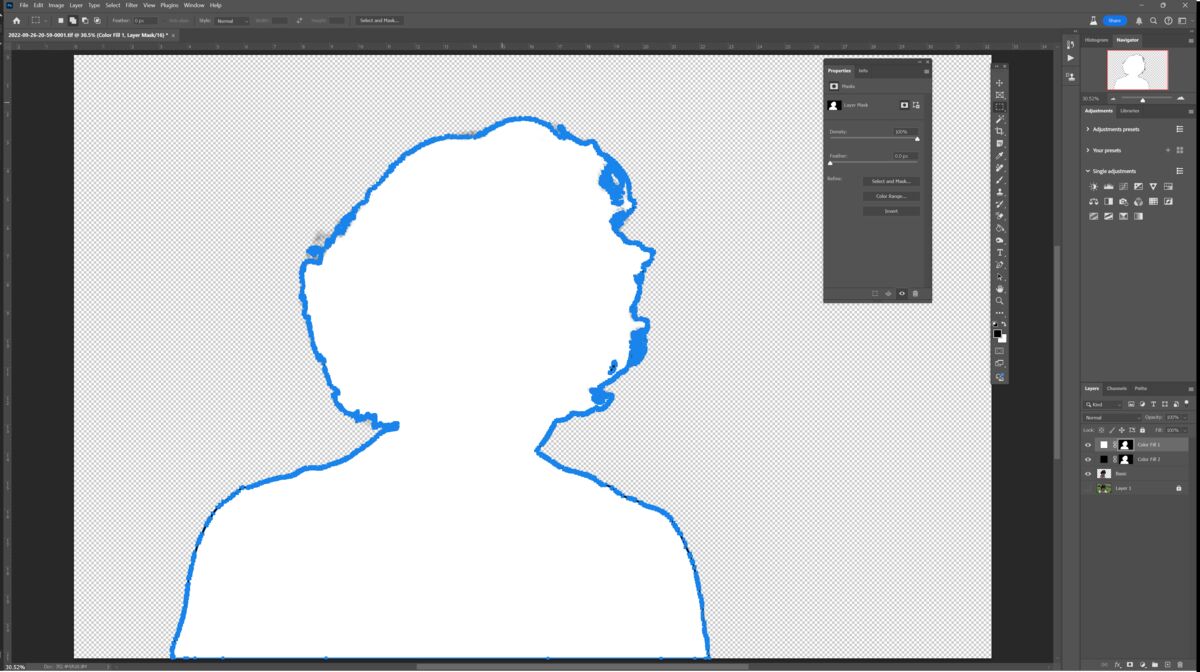
► Now your screen should be looking like this.
https://static.uglyhedgehog.com/upload/nt/2024/5/5/171545-reenshot_2024_05_05_031948.png
► Create a fill layer (I selected red) and press enter twice, one to confirm the color, the second to remove the vector path outline.
► Uncheck or delete the Black and white layers.
You have created your first shape layer from an image.
Use the move tool to verify that you can expand, distort the image at will without losing any loss of sharpness.
I will write another tutorial, just as simple, on how to create a vector shaped color image. The principle is the same... Make a selection, transform it into a shape outline.
Preparations:
► Open image
► Duplicate the background layer (Ctrl-J)
► Select background (properties, quick action removed background.)
https://static.uglyhedgehog.com/upload/nt/2024/5/5/167394-reenshot_2024_05_05_022741.png
► Delete background (Ctrl-click on mask, switch to layer icon, Ctrl-J)
► Duplicate layer (Name it - I use basic)
► Delete layer underneath (Background copy)
► Ctrl-right click on subject (Basic layer)
► Create a fill layer (Black - Color does not matter, but having a visual clue is)
► Ctr-click on the new layer mask to create a new selection.
► Expand the selection (Modify ► Expand, select a number proportional to the size of your image, I select 10)
https://static.uglyhedgehog.com/upload/nt/2024/5/5/168404-reenshot_2024_05_05_025229.png
► Create a fill layer (White)
Now you should see a Black outline and a white fill.
Creating a path using these two layers:
► Ctrl-click on the black layer mask
► Ctrl-Alt-click on the white layer mask. (Remove from selection)
► Select any marquee tool (You will not use it)
► Right-click within the selection. Select "Make work path" (I select 1, a greater number will make the vector looser)
https://static.uglyhedgehog.com/upload/nt/2024/5/5/169936-reenshot_2024_05_05_022513.png
https://static.uglyhedgehog.com/upload/nt/2024/5/5/170938-reenshot_2024_05_05_022651.png
► Now your screen should be looking like this.
https://static.uglyhedgehog.com/upload/nt/2024/5/5/171545-reenshot_2024_05_05_031948.png
► Create a fill layer (I selected red) and press enter twice, one to confirm the color, the second to remove the vector path outline.
► Uncheck or delete the Black and white layers.
You have created your first shape layer from an image.
Use the move tool to verify that you can expand, distort the image at will without losing any loss of sharpness.
I will write another tutorial, just as simple, on how to create a vector shaped color image. The principle is the same... Make a selection, transform it into a shape outline.
May 3, 2024 00:24:42 #
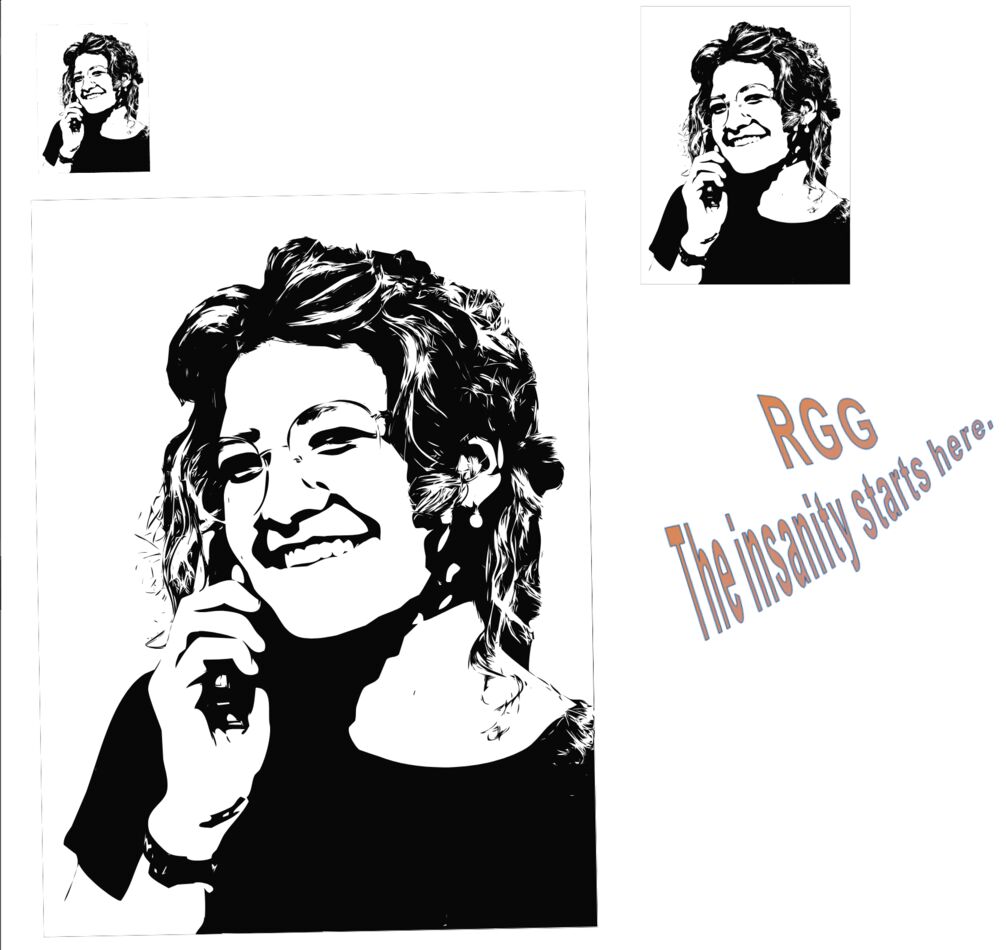
This is a snapshot of a quickly created web page to check the scalability.
The large one was created as a PDF, slight left rotation... The others two as SVG files.
There is a border issue, not sure why...
The large one was created as a PDF, slight left rotation... The others two as SVG files.
There is a border issue, not sure why...