Posts for: dave.m
Dec 6, 2017 09:28:48 #
part 3 - nice image by the way - why do Americans put sheds over their bridges? :)
Dec 6, 2017 09:27:13 #
And I would add I've also picked up some great suggestions I hadn't considered from the several contributors above :)
Dec 6, 2017 09:25:03 #
If I knew how to insert images in the text as I went along this would be easier! However:
Create a duplicate layer,
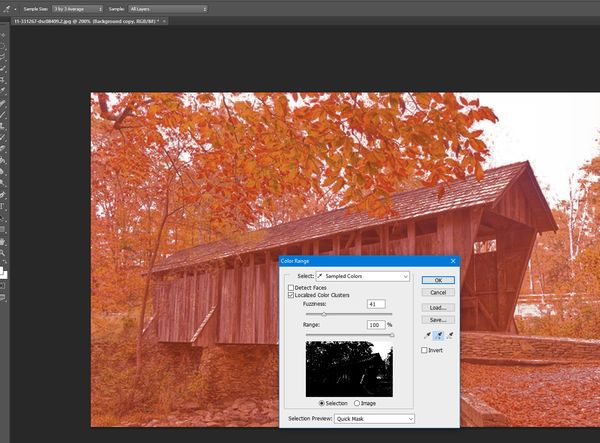
Use Select > color range. Use the LH dropper for initial selection then the middle + dropper (or -)to add (remove) other area clicking in the sky area until you think you've got the sky area of interest (not precise but this selection took less than a minute and 3 or 4 dropper clicks) I tend to use 'quick mask' display to see where things are ahppening. See first screen grab below
Once you think you have a reasonable selection, Click OK to get 'marching ants'
You may then need to experiment with Select > modify. I typically increases the selection by 2 or 3 pixels, then feather by 1 or 2 pixels. This will usually ensure no ghost edge is visible on the selection and blend anything you do afterwards (like color fill!) - and not a big deal on foliage but could be on a persons hair.
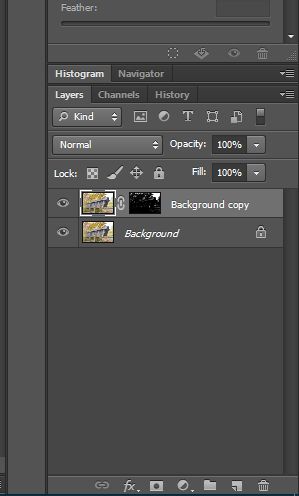
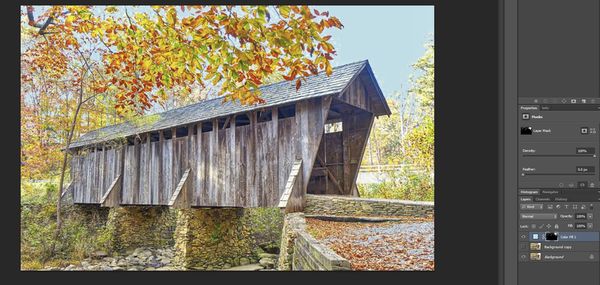
Make sure layers window is selected then click on the mask icon at the bottom (3rd along in this screen grab) See screen grab 2 below
Hold Alt and click over the layer mask icon to show the mask full screen
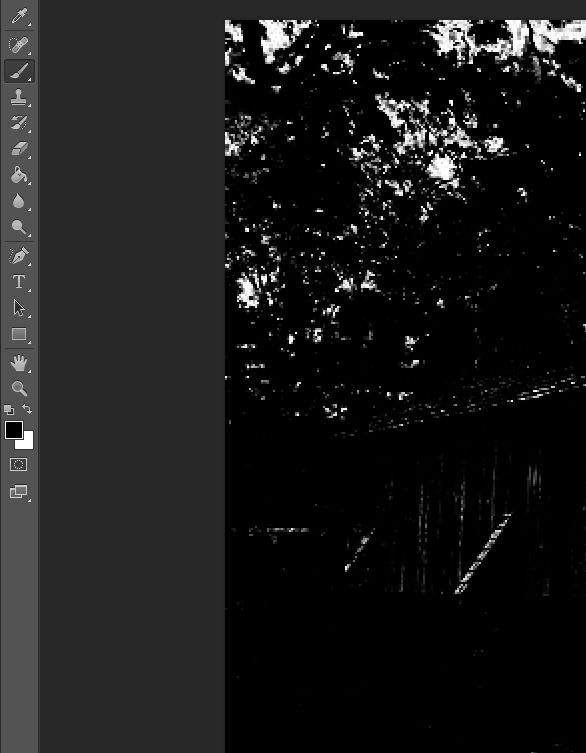
Select the paintbrush tool. Use X key to toggle between black and white brush (white reveals and black conceals.) Paint over the bits of the mask you don't want to include in the mask selection
See screen grab 3
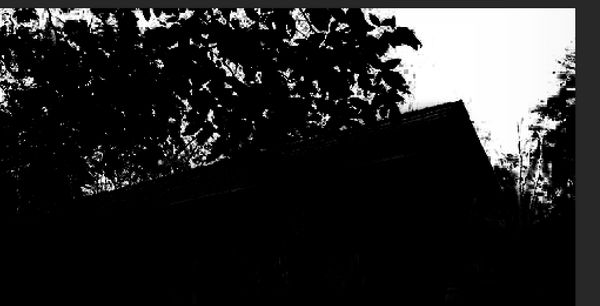
Obviously the bigger the brush the quicker but more coarse the result. With this image I used a 40 pixel brush and took a minute but it would take a bit longer if I was working with a high res image I wanted to enlarge :) see screen grab 4
Once you have painted out all non-sky, Press esc to exit full screen edit of mask
Once you finish the mask decide if you want to replace the sky or just give it a bit of colour. As this was not a 'Big sky' I just used a single color to fill for this demo. If you want to replace with an actual sky the principle is the same, except use a layer mask with the new sky as already suggested instead of a sold color fill layer.
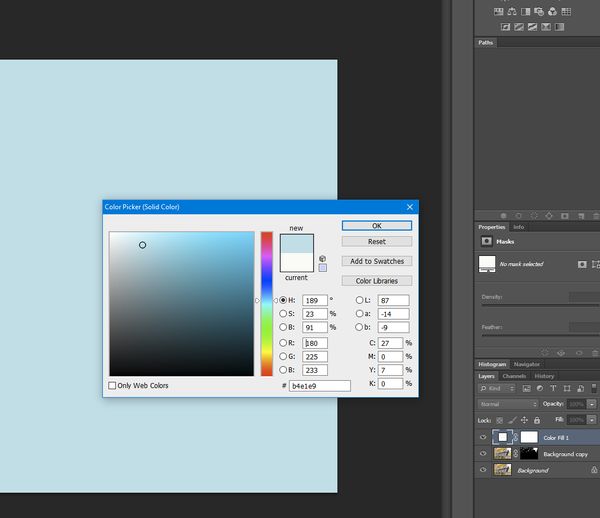
To use a solid color, Layer > create new fill layer > solid color see screen grab 5
Once you have a colour you like click OK.
Then click and hold the layer mask icon from the previous layer, drag and drop it over the new solid color layer and click Yes see screen grab 6
Tidy up layers and done. This demo took less than 5 minutes but obviously a lot more care would be required with masking for a presentation enlargement but still less than 1/2 hr I think, maybe an hour tops?
There are several other ways to do this but this works for me and is quick. Hope this helps - PS is so comprehensive it took me ages to piece all these bits together!!
Create a duplicate layer,
Use Select > color range. Use the LH dropper for initial selection then the middle + dropper (or -)to add (remove) other area clicking in the sky area until you think you've got the sky area of interest (not precise but this selection took less than a minute and 3 or 4 dropper clicks) I tend to use 'quick mask' display to see where things are ahppening. See first screen grab below
Once you think you have a reasonable selection, Click OK to get 'marching ants'
You may then need to experiment with Select > modify. I typically increases the selection by 2 or 3 pixels, then feather by 1 or 2 pixels. This will usually ensure no ghost edge is visible on the selection and blend anything you do afterwards (like color fill!) - and not a big deal on foliage but could be on a persons hair.
Make sure layers window is selected then click on the mask icon at the bottom (3rd along in this screen grab) See screen grab 2 below
Hold Alt and click over the layer mask icon to show the mask full screen
Select the paintbrush tool. Use X key to toggle between black and white brush (white reveals and black conceals.) Paint over the bits of the mask you don't want to include in the mask selection
See screen grab 3
Obviously the bigger the brush the quicker but more coarse the result. With this image I used a 40 pixel brush and took a minute but it would take a bit longer if I was working with a high res image I wanted to enlarge :) see screen grab 4
Once you have painted out all non-sky, Press esc to exit full screen edit of mask
Once you finish the mask decide if you want to replace the sky or just give it a bit of colour. As this was not a 'Big sky' I just used a single color to fill for this demo. If you want to replace with an actual sky the principle is the same, except use a layer mask with the new sky as already suggested instead of a sold color fill layer.
To use a solid color, Layer > create new fill layer > solid color see screen grab 5
Once you have a colour you like click OK.
Then click and hold the layer mask icon from the previous layer, drag and drop it over the new solid color layer and click Yes see screen grab 6
Tidy up layers and done. This demo took less than 5 minutes but obviously a lot more care would be required with masking for a presentation enlargement but still less than 1/2 hr I think, maybe an hour tops?
There are several other ways to do this but this works for me and is quick. Hope this helps - PS is so comprehensive it took me ages to piece all these bits together!!
Dec 2, 2017 11:20:16 #
In reply to Boberic re straight line of paint on canvas doesn't make you an artist - I think it definitely does if you look at some of Emins or Hurst work :)
Dec 2, 2017 08:12:03 #
My view is there are 2 components to a competent photographer and any image he or she will create - the technical and the artistic.
I also started in the 60s and if you didn't understand and could not adapt Aperture, shutter speed, and to a lesser extent ISO (because for most of us that was fixed the moment you put the film in the camera) you were almost certainly doomed to many poorly exposed negs. So we carried an exposure meter or used the sunny 16 guideline. The advent of inbuilt exposure meters, TTL only on the most expensive cameras, was a huge advance as they were tuned to the camera and one less bit of kit to carry. Also it sped up the process no end as no fumbling for and using the meter etc. Also about this time came Fresnel and spit image focussing which knocked the spots off of ground glass screens! Automatic focusing and TTL auto aperture - pure heaven! Why? Because for occasional users all these innovations had a dramatic effect on the length of the process, and in most cases gave better results as they removed major sources of error. For the more experienced / professional user they offered the speed advantage when it mattered.
Like most I now have a camera that has more bells and whistles than a shopping mall Christmas tree. Do I shoot manual? Occasionally when I know that automation will not work too well, otherwise for my type of photography I tend to use Aperture priority, knowing the camera computer will adjust shutter speed to suit the lens focal length I have fitted, and let auto ISO take care of the rest.
Has it improved my photography? Unfortunately not as much as camera manufacturers suggest as I have always found that perfect composition to be frustratingly elusive - but I get very few exposure and focus duds, and with people subjects I don't get 'are you gonna take a picture are keep fiddling with your camera?'
Dec 2, 2017 07:48:03 #
This issue will be perennial I think... I think the moment someone does anything except just click the shutter and reproduce whatever comes out then the objective must be for the image to represent what the photographer wants to show - his or her 'view'/ intepretation/ vision of the scene in front of them. It doesn't matter whether its film with a red filter to bring out sky in monochrome, dodging and burning under an enlarger, lighting in the studio to emphasise or de-emphasise, cropping, Photoshop or whatever.
As someone already mentioned there is a difference between documentary imagery and just about anything else. Any attempt to massage the image to portray other than the visible truth is unacceptable - or is it? Adjusting contrast or other methods to increase dynamic range to show detail more comes to mind. Different lenses to achieve DoF, shutter speed etc. And of course composition. One of the most famous documentary images - among so many - must be Raising the Flag on Iwo Jima. Just a documentary image? Was the composition like that just because the photographer couldn't get any higher as the subject happened to be on the top of a mountain? There are hundreds, if not thousands of such images in history which are iconic/ emotive/ or whatever superlative you want to pick.
Other than documentary images - and my personal view is the argument has never been proved that a documentary image cannot be artistic - I think all bets are off. Perhaps I wish I could be like David Bailey, Ansell Adams and others masters of film or digital who just used a camera because it was convenient to show what they wanted to convey. As Bailey once said he would be happy to use paints and canvas but it was just too slow!
Nov 17, 2017 09:38:35 #
Was going to mention Cutepdf (mentioned above), also Bullzip PDF printer. Also have a look at ZAN printer. It installs, and you print to, as any other printer. It has all the options on colour, resolution , margins etc that you would typically get on a normal good inkjet.
I got it for a similar reason to you - not overly cheap BUT it works. Bullzip is free, also very good but lacking the options of ZAN which is particularly aimed at photo/ imagery and can print in almost any format. As an aside, I found ZAN and Bullzip great for printing PDF albums from my album software. A PDF photo album has the digital advantage of a paper album - photos are in the size, orientation, annotation and paging that you decide.
All have a free download and try
Nov 6, 2017 06:18:30 #
rather than glass I prefer to use matte plastic self adhesive screen protection. The extra protection is useful especially on a smart phone, but the main reason I use matte is that it significantly reduces stray light reflections - same reason I add them to my phone and gps (even the one in the car). They work just fine with touch screens also
Oct 12, 2017 08:11:06 #
I too carry one of the WhiBal credit sized cards. It 2 or 3mm thick plastic so pretty robust. As others have mentioned the grey is handy for checking exposure, and the whibal has a white patch also handy for colour balance. Don't use it much but useful for weird lighting conditions.
Oct 1, 2017 07:52:11 #
there is another argument that shutter speed is at least reciprocal of the focal length because the length and weight of any lens are approximately proportional to the focal length and therefore need increasingly higher shutter speed to hand hold.
If that's the case, then a zoom lens should be used at the reciprocal of the longest f length. Goofynoofy hits the spot with his sniper friend - it all depends how steady your hands are.
Image stabilisation also confuses the issue as does aperture - some manufacturers quote 4 stops of image stabilisation (which implies a 200m lens could be used at 1/25s with acceptable results.) And i know from using a friend's lens that a FF 300m f2.8 lens weighs a ton so wouldn't think of using without a monopod or tripod.
Like all rules of thumb it depends on so many factors, so when in doubt err on the conservative side :)
Sep 16, 2017 10:05:21 #
i've had the V600 and now the V850. Negative scanning is definitely much better than the low priced scanners. The problem changes to then being one of speed, and no matter what the scanning method, the colour quality of the scanned result.
The cheap dedicated scanners are typically (always?) taking a photograph with a cheap lens and sensor. This is the limitation, and no better and probably worse than using your own camera with one of the old bellows or similar slide copiers. Just search ebay for slide copier. But be aware that if you have a cropped body camera you will get restricted coverage.
Which brings me back to the Epson Vxxx neg scanning. Some points:
* The results are certainly much better than anything I have used except a dedicated film scanner;
* most 35 negs or slides have been commercially 'mass' developed. The image quality is often lacking and no amount of pixel increase will change sharpness as the originals are often grainy from the processing
* enlargements from scanned good negs are at least capable of 10x8 printing and usually good enough for 23" monitor viewing (although the difference in quality compared with a modern DSLR can be obvious)
* professionally developed b+W 120 roll film will enlarge to A3 easily.
* scanning is slow, and if you set a high resolution very slow (minutes for a few scans)
* colour rendition depends very much on the original neg and how it has been stored. Colour fading is common and it is not easy to correct at first. Add mediocre original mass processing + natural fading and the results can be really disappointing
I'm guessing your old photo collection is similar to mine - hardly ever threw anything away as film was so expensive, lots of snapshots, many I can't recognize where they were taken, but also containing a number of gems, or for you of great personal or historical significance. If this is the case then what I did was:
view or scan everything with the cheepo scanner; sort out the keepers (usually just a small proportion); if necessary clean the neg with a microfibre cloth/ blower (liquid cleaner as a last resort); scan with Epson Vxxxx
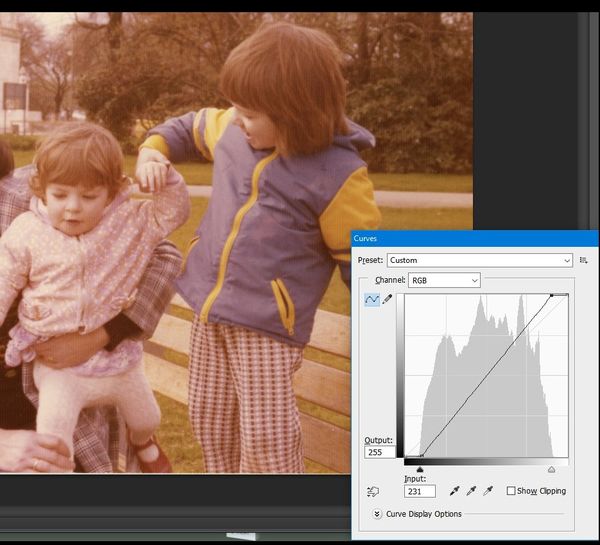
There are tons of good videos on youtube about retouching old images but there is always a risk of hours of computer assisted time-wasting on a single image! I typically Post process using PS, and one of the best quick tools for a fast sort out is Curves. A very passable image can often be achieved with a few clicks.
Here is an example scan with corrections just using Curves (its a print scan but principle just the same as Epson Vxxx software takes care of the dull orange overall tint of a neg )
* On loading there is obviously a hefty red colour cast (1st image below)
* open curves and adjust for histogram being short on the left and right(2nd image)
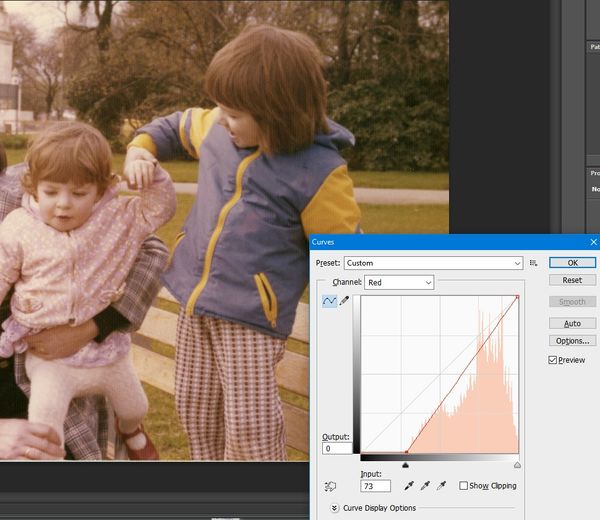
* Contrast is better, but still red. Open curves again and select Red instead of RGB. Adjust again so the red histogram fills the width (3rd)
* Much better but Still a slight red which can be seen in the leggings of the little girl on the left. Open curves again, select red, and select the right hand white dropper. Click on a bright white part of the leggings which should be white (4th)
There's more that can be done, but not bad for 3 simple adjustments using just curves.
If you want to splash out a bit and have PS CSx x86 have a look at Kodak ROC filter. I think its brilliant but it won't work in x64 so presumably no later that CS6?)
Once installed as an filter in PS, just select Filters >Kodak> ROC and in this image even default settings does an excellent job (5th) and a small touch with Levels gives me a very reasonable result (6th)
The cheap dedicated scanners are typically (always?) taking a photograph with a cheap lens and sensor. This is the limitation, and no better and probably worse than using your own camera with one of the old bellows or similar slide copiers. Just search ebay for slide copier. But be aware that if you have a cropped body camera you will get restricted coverage.
Which brings me back to the Epson Vxxx neg scanning. Some points:
* The results are certainly much better than anything I have used except a dedicated film scanner;
* most 35 negs or slides have been commercially 'mass' developed. The image quality is often lacking and no amount of pixel increase will change sharpness as the originals are often grainy from the processing
* enlargements from scanned good negs are at least capable of 10x8 printing and usually good enough for 23" monitor viewing (although the difference in quality compared with a modern DSLR can be obvious)
* professionally developed b+W 120 roll film will enlarge to A3 easily.
* scanning is slow, and if you set a high resolution very slow (minutes for a few scans)
* colour rendition depends very much on the original neg and how it has been stored. Colour fading is common and it is not easy to correct at first. Add mediocre original mass processing + natural fading and the results can be really disappointing
I'm guessing your old photo collection is similar to mine - hardly ever threw anything away as film was so expensive, lots of snapshots, many I can't recognize where they were taken, but also containing a number of gems, or for you of great personal or historical significance. If this is the case then what I did was:
view or scan everything with the cheepo scanner; sort out the keepers (usually just a small proportion); if necessary clean the neg with a microfibre cloth/ blower (liquid cleaner as a last resort); scan with Epson Vxxxx
There are tons of good videos on youtube about retouching old images but there is always a risk of hours of computer assisted time-wasting on a single image! I typically Post process using PS, and one of the best quick tools for a fast sort out is Curves. A very passable image can often be achieved with a few clicks.
Here is an example scan with corrections just using Curves (its a print scan but principle just the same as Epson Vxxx software takes care of the dull orange overall tint of a neg )
* On loading there is obviously a hefty red colour cast (1st image below)
* open curves and adjust for histogram being short on the left and right(2nd image)
* Contrast is better, but still red. Open curves again and select Red instead of RGB. Adjust again so the red histogram fills the width (3rd)
* Much better but Still a slight red which can be seen in the leggings of the little girl on the left. Open curves again, select red, and select the right hand white dropper. Click on a bright white part of the leggings which should be white (4th)
There's more that can be done, but not bad for 3 simple adjustments using just curves.
If you want to splash out a bit and have PS CSx x86 have a look at Kodak ROC filter. I think its brilliant but it won't work in x64 so presumably no later that CS6?)
Once installed as an filter in PS, just select Filters >Kodak> ROC and in this image even default settings does an excellent job (5th) and a small touch with Levels gives me a very reasonable result (6th)


Sep 7, 2017 16:53:24 #
Prelies sofar have covered this answer in that almost any modern camera battery charger is 110/220v so only an adapter or alternative mains cord is needed.
Alternatively get the USB 5v charger for your battery eg http://www.ebay.com/itm/LED-Light-Single-Dual-Battery-Charger-USB-Cable-for-Canon-Sony-Nikon-Fuji-Camera-/112377006998?var=&hash=item1a2a310b96:m:mpcn9cBbiZDsFYXTozaJKPg
Then all you need is one of these or similar http://www.ebay.com/itm/8A-4-Port-USB-USB-C-Type-C-Travel-Wall-Fast-Charger-QC-3-0-Quick-Smart-Charging-/222577252035?var=&hash=item33d2a356c3:m:m35X76DprTt6dBj69ghNZ3Q
and you can charge camera batteries, phone, pad etc from one wall point. (and also charge from any suitable car accessory socket)
I live in UK so have been using these 'universal' chargers for ages in Europe and USA on vacation for ages without problems. The USB camera battery chargers are a fairly recent innovation, but again I have been using them for 6 months or more without problems. As I'm a bit anal about these things I tend to carry a 2 port spare and another camera battery charger in the checked bag but have never needed them.
Also, if you use usb cables to charge anything get decent ones. I tested a load of USB cables with one of these http://www.ebay.com/itm/USB-Charger-Detector-Current-Voltage-Power-Tester-Digital-Volt-Amp-Meter-GYTH/142484155831?var=441478632200&_trkparms=aid%3D222007%26algo%3DSIM.MBE%26ao%3D2%26asc%3D41375%26meid%3Df29bb7fa1664451fb954798d0d225db0%26pid%3D100005%26rk%3D5%26rkt%3D6%26sd%3D111501696274&_trksid=p2047675.c100005.m1851
and was amazed at the difference with poor cables charging at .5A and good ones at 2A - chucked a bucket of cruddy cables as a result.
Enjoy your trip!
Aug 24, 2017 10:19:40 #
I have the WD passport with SD and wifi and also a Hyperdrive UDMA3 (search Amazon.com for udma3)
The WD is compact and reasonably priced. You need nothing else except a normal usb 5v charger and cable when you travel. You can view images saved on it with a phone or pad using the wifi. Raw images take a little time across the wifi. It is a bit heavier than you might expect I guess because of the batteries needed. As mentioned above, it has a traditional HDD so needs the normal care when being carted about. There is no control over where the files go. It can be connected to your PC as an external HDD for transfer.
I had the previous model of the Hyperdrive and was happy with it so upgraded to the UDMA3. This is much more flexible that the WD passport. Takes SD and CF cards, has a small viewer to scan, you can do incremental or complete backups of a card over a period of days, and can examine each image, delete duds etc. It is completely self contained and also needs a 5v charger and cable when traveling. I used an SSD instead of a HDD because it is physically more robust, much lighter, and uses less power so will run on batteries longer. I accept that SSDs have a lower total life span than looked-after HDDs but don't care about that.
On a 'trip of a lifetime' event I take both and also keep the SD cards. That gives me 3 copies on different media. Seems excessive but before retirement I was in data management and security so have a more pessimistic approach perhaps :) Also my wife and I did an Atlantic crossing to NY and a failed card in the middle of the trip irretrievably lost a large number of images of 3 days of the voyage (and believe me, at that time I had shedloads of resources to get stuff of of knackered media.) To be fair I have only ever had that one catastrophic loss so depending on your viewpoint one backup device + keep the cards until you get home will give you more than enough I think.
Aug 15, 2017 06:40:15 #
I tend to use my local camera shop with p/x, and I negotiate like mad. I don't get the best price but get a reasonable one given they have to stock, market, sell, warranty etc. Also, if we don't, before long there will only be mail order. For me its p/x and forget - no tyre kickers, no 'can you tell me how this works', 'its not as good as I thought', 'there's a cheaper one advertised' etc etc.
If the price offered is too low I will sell on ebay but always add a note ' I photograph the item all round, including serial numbers etc in case it is damaged or lost in transit'. Not really for that, but to stop fraud by buyer. It has only happened to me once when I sold a really tidy mobile phone. Buyer said screen was cracked. I was surprised as well packed. He returned an entirely different phone! I complained to ebay but they invariably side with the buyer - £150 loss. Only once, but once too many.
Also very cautious buying used lenses on ebay. Paid a fair price for a 50mm f1.4 which was blatantly off centre focus. Seller blamed postal service or me and refused to accept return because advert said ' no returns'. Ebay confirmed no return policy, and it cost me £100+ to get it fixed. Might just as well bought a new one.
Also worth noting that in UK (and presumable world-wide) ebay + paypal fees are 13% on total transaction including postage. Factor that in on an £185 item + insured post of £15 and net is just under £160. Not a complaint about ebay+paypal (well maybe a little one) as it is still much less than an auction house.
So my message is with market sites 'buyer and seller beware'. If you sell something of value, then protect yourself with notes on adverts and take lots of images to prove condition when you sell. If you buy something of value check feedback and make sure there is a no-quibble return policy. Fortunately my experience of crooks on ebay is limited to 2 cases over several years but with our hobby or business, mistakes can be expensive.
Aug 4, 2017 16:50:25 #
all this reminds me of when I was a 1st time supervisor 45 years ago (had to work that time out and it took me by surprise!)
The guys came in to clean the windows inside. I called down the office to tell everyone to clear the window ledges so the window cleaners could get access. I was told 'we are not window cleaners, but transparent wall cleaning operatives'. I asked what the difference was - 'about 2 shillings (10p) and hour!' (well it was almost 1/2 a century ago).
It seems that heffer dust is alive and well, and often for the same reasons, but at least some of this thread has explained why there are differences