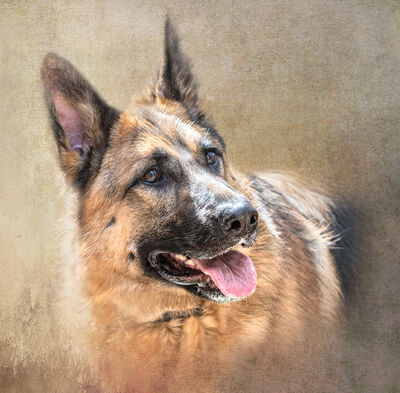
Kamara in the Spring
Mar 2, 2019 13:15:53 #

I posted this in the photo gallery and was invited to post here and give the steps used to accomplish the final (?) image. My thought is that most of you have used overlays, textures, combining images, and that this would be old news. But then, I had been given instruction multiple times on "how to" and it took several people, multiple tutorials, and excessive trial, error and frustration before I got it figured out. So maybe there is somebody out there that needs just one more tip...
I work with Adobe PhotoShop Elements 14 and Topaz Adjust 5.
Download 2 images into the photobin of PSE.
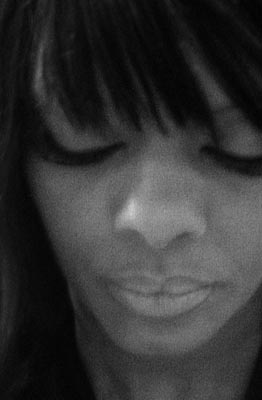
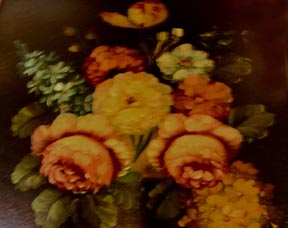
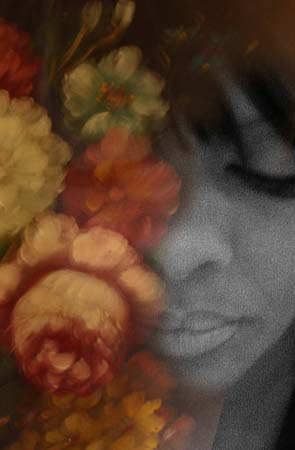
1. open the background (face) in PS, place the flowers image over the face image as an overlay.
2. Go to “free transform” under “Image” and use arrows to cover the entire background layer. You may also wish to go beyond the bg image or rotate the overlay to get the flowers placed to your preference.
3. Bring the opacity of the bf’s opacity to where you can see her face coming through. You may want to go back to “free transform” and relocate the overlay a bit until you find a place you like.
4. Add a mask to the overlay and remove (black paint brush) areas that you want to remove to show her face. I vary the brush opacity , 66-80% most areas.
5. Increase the opacity of the overlay back to where you like it. I actually liked it quite vivid and bold, but then wondered what else I could do. I merged the layers and then went to Topaz Adjust 5 and played around. I chose “Delicate Details” under Classic Collection and applied and then chose “Soft Pink” under the Toned Collection to make the more spring-like, softer look of the image I posted in the gallery.
I work with Adobe PhotoShop Elements 14 and Topaz Adjust 5.
Download 2 images into the photobin of PSE.
1. open the background (face) in PS, place the flowers image over the face image as an overlay.
2. Go to “free transform” under “Image” and use arrows to cover the entire background layer. You may also wish to go beyond the bg image or rotate the overlay to get the flowers placed to your preference.
3. Bring the opacity of the bf’s opacity to where you can see her face coming through. You may want to go back to “free transform” and relocate the overlay a bit until you find a place you like.
4. Add a mask to the overlay and remove (black paint brush) areas that you want to remove to show her face. I vary the brush opacity , 66-80% most areas.
5. Increase the opacity of the overlay back to where you like it. I actually liked it quite vivid and bold, but then wondered what else I could do. I merged the layers and then went to Topaz Adjust 5 and played around. I chose “Delicate Details” under Classic Collection and applied and then chose “Soft Pink” under the Toned Collection to make the more spring-like, softer look of the image I posted in the gallery.

Mar 2, 2019 13:51:39 #
kenievans
Loc: Dallas
Excellent job! Thank you for sharing your workflow. There are so many ways to accomplish the same results in PSE and PS. Your process is a little different than how I would approach it but we all think differently and there is no right or wrong way. Your process may resonate with someone more than another.
Mar 2, 2019 13:57:25 #
carlysue wrote:
I posted this in the photo gallery and was invited... (show quote)
Thank you Carlysue! I'm one that needs multiple explanations for these processes. Your instructions are clear and your results are motivating. I appreciate the push!
Phil
Mar 2, 2019 14:01:31 #

Carla, thank you so much for taking the time to compile this tutorial. Your willingness to encourage others is greatly appreciated.
Click here for larger size, in carlysue's Photo Gallery topic.
Click here for larger size, in carlysue's Photo Gallery topic.
Mar 2, 2019 21:26:09 #

Beautiful work, Carla, and you're so very generous to share your processing secrets!!
Mar 3, 2019 13:45:52 #
Thanks for the listing your workflow Carly. I enjoyed your final image. Bev
Mar 3, 2019 14:20:12 #
kenievans wrote:
Excellent job! Thank you for sharing your workflow. There are so many ways to accomplish the same results in PSE and PS. Your process is a little different than how I would approach it but we all think differently and there is no right or wrong way. Your process may resonate with someone more than another.
Thank you, keni. And you are absolutely right. Some ways make more sense to some than others. I usually end up trying the most difficult way but if I "get it" than I stick with it.
Mar 3, 2019 14:23:50 #
rockdog wrote:
Thank you Carlysue! I'm one that needs multiple explanations for these processes. Your instructions are clear and your results are motivating. I appreciate the push!
Phil
Phil
Thank you, Phil, especially for saying my instructions are clear. Often times an instructor will quickly skim through one aspect and then I seem to dwell on that more than the whole. I'd feel that this exercise would be a total win if you become motivated to try and then show your own results! I hope you feel "pushed"!
carla
Mar 3, 2019 14:25:40 #
Linda From Maine wrote:
Carla, thank you so much for taking the time to compile this tutorial. Your willingness to encourage others is greatly appreciated.
Click here for larger size, in carlysue's Photo Gallery topic.
Click here for larger size, in carlysue's Photo Gallery topic.
You are welcome, Linda. I think there was probably an easier way to post instructions, perhaps having a thumbnail image beside each photo...but I couldn't figure that part out. I'll save that for another day!

Mar 3, 2019 14:26:57 #
Dixiegirl wrote:
Beautiful work, Carla, and you're so very generous to share your processing secrets!!
you are welcome, Donna. I have many secrets but absolutely none that are related to photography or processing!
Mar 3, 2019 14:28:35 #
NikonGal wrote:
Thanks for the listing your workflow Carly. I enjoyed your final image. Bev
I am so pleased you enjoyed this, Bev. It's the first time I've tried to post instructions and I could have probably done it in a better way but glad it made sense to you.
carla
Mar 3, 2019 23:40:12 #
carlysue wrote:
you are welcome, Donna. I have many secrets but absolutely none that are related to photography or processing!
Oh don't we all!!
Mar 8, 2019 06:49:02 #
Carla nice job! I've tried explaining this process several times using PSE12 with good results. You have a couple of controls in 14 that I don't have in 12 which give yours a slightly different look. Thanks for sharing...everyone gains from those who take the time to help! 

Mar 8, 2019 20:19:31 #
So glad you checked this out, Snap! You have certainly been one of my patient mentors! You patiently helped me when I wanted to rant and rave and throw in the towel. Yet, after a while and suddenly like magic, it just clicks. Thank you for your thoughts and help.
Mar 15, 2019 20:59:06 #

carlysue wrote:
I posted this in the photo gallery and was invited... (show quote)
Very well explained, my friend with concise illustrations.
If you want to reply, then register here. Registration is free and your account is created instantly, so you can post right away.