Raw vs jpeg
Aug 1, 2018 18:08:23 #

Aug 1, 2018 18:33:56 #

Selene03, To start with, I have my camera set to use a custom white balance at the time of capturing the initial image. This particular balance is referred to as UniWB or unitary white balance. Here's an article I posted covering that. https://www.uglyhedgehog.com/user-page?upnum=2765
I downloaded a uniwb file for my camera and installed it so I can select it for a custom WB.
A follow-up article refers to this technique along with exposing to the right (ETTR). https://www.uglyhedgehog.com/user-page?upnum=1527
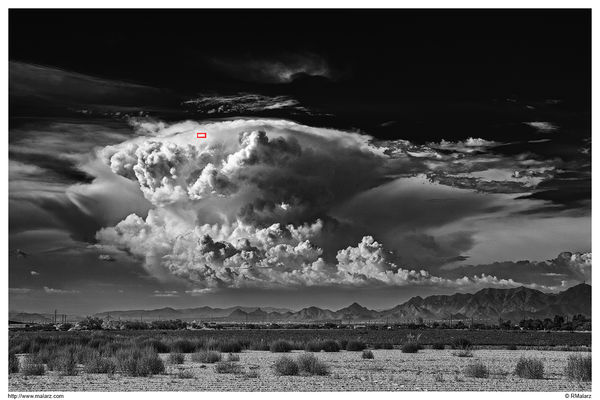
Now, the approach to this photograph was such. I spot metered the whitest part of the scene, which was part of the cloud. I wanted to make sure I didn't blow out this highlight. The area is marked with the red rectangle. Keeping in mind that almost every light meter reads a scene and indicates which exposure setting to use based on middle gray, or Zone V. Thus, if I were to use the indicated spot meter reading, the actual scene would have been underexposed.
Instead, I increased the exposure by three stops. This placed the whitest part of the cloud in Zone VIII. Due to the nature of digital images, this also dragged the darkest parts of the scene up by three stops, as well. But, this also had the benefit of increasing the details captured in the shadows of the bushes in the foreground. I then made the exposure, which looks like the SOOC image. My visualization of this was toward the dramatic, as one can easily imagine from the foreboding appearance of the storm cloud.
To achieve that drama, it's off to ACR for some initial development. During that stage of the process, I apply an auto WB which renders the colors to appear more natural. I adjust the exposure slider to accommodate the additional exposure during capture, the Shadows and Highlights sliders and the Whites and Blacks sliders to get close to my visualization of the scene. I imagine that ACR is similar to the development of a film. So, it's something like I now have my ideal negative.
Now to make the "print" in Photoshop. The first thing I do in photoshop is an image specific white balance. This utilizes the blacks and whites in the scene along with the Average of each of the R G and B values throughout the entire scene. I apply these corrections using adjustment layers.
Now that I have an accurate, but visualized version of the scene, I apply an appropriate conversion to black and white. I avoid specifying which conversion I use because I use various methods and choose which by the appearance I'm trying to achieve. Once that conversion is done, I make adjustments to each of the tonal ranges within the Zones of the image, along with burning and dodging and some sharpening.
It should be noted that I have NOT recovered any blown highlights. As, there were none. I had the details of those areas captured within the capabilities of the camera. Knowing those limits was achieved through testing.
I hope this answered your question. If not, please feel free to ask specifics that weren't explained.
--Bob
I downloaded a uniwb file for my camera and installed it so I can select it for a custom WB.
A follow-up article refers to this technique along with exposing to the right (ETTR). https://www.uglyhedgehog.com/user-page?upnum=1527
Now, the approach to this photograph was such. I spot metered the whitest part of the scene, which was part of the cloud. I wanted to make sure I didn't blow out this highlight. The area is marked with the red rectangle. Keeping in mind that almost every light meter reads a scene and indicates which exposure setting to use based on middle gray, or Zone V. Thus, if I were to use the indicated spot meter reading, the actual scene would have been underexposed.
Instead, I increased the exposure by three stops. This placed the whitest part of the cloud in Zone VIII. Due to the nature of digital images, this also dragged the darkest parts of the scene up by three stops, as well. But, this also had the benefit of increasing the details captured in the shadows of the bushes in the foreground. I then made the exposure, which looks like the SOOC image. My visualization of this was toward the dramatic, as one can easily imagine from the foreboding appearance of the storm cloud.
To achieve that drama, it's off to ACR for some initial development. During that stage of the process, I apply an auto WB which renders the colors to appear more natural. I adjust the exposure slider to accommodate the additional exposure during capture, the Shadows and Highlights sliders and the Whites and Blacks sliders to get close to my visualization of the scene. I imagine that ACR is similar to the development of a film. So, it's something like I now have my ideal negative.
Now to make the "print" in Photoshop. The first thing I do in photoshop is an image specific white balance. This utilizes the blacks and whites in the scene along with the Average of each of the R G and B values throughout the entire scene. I apply these corrections using adjustment layers.
Now that I have an accurate, but visualized version of the scene, I apply an appropriate conversion to black and white. I avoid specifying which conversion I use because I use various methods and choose which by the appearance I'm trying to achieve. Once that conversion is done, I make adjustments to each of the tonal ranges within the Zones of the image, along with burning and dodging and some sharpening.
It should be noted that I have NOT recovered any blown highlights. As, there were none. I had the details of those areas captured within the capabilities of the camera. Knowing those limits was achieved through testing.
I hope this answered your question. If not, please feel free to ask specifics that weren't explained.
--Bob
Selene03 wrote:
Ok, I will take the bait. Mark's comment made me g... (show quote)
Aug 1, 2018 18:42:59 #

tenny52 wrote:
Shoot and save in both, and edit both to see which you can come up with better result.
Sometimes, I have to struggle to make my raw>jpg better that the camera's jpg.
Raw editing requires some learning curve, but you could be familiar with most basic techniques in less than a week
Sometimes, I have to struggle to make my raw>jpg better that the camera's jpg.
Raw editing requires some learning curve, but you could be familiar with most basic techniques in less than a week
If you are responding to me, then here is my response - the illustration is primarily for those who refuse to acknowledge the superior dynamic range capture of raw files compared to camera-generated jpegs. In high contrast situations, like a very average cloud filled sky where the ground is under cloud cover - there is absolutely no way, no matter how expertly you set the camera - that you can get an SOOC image to even vaguely resemble an acceptable image. And it's not even close. You can download any of the bracketed jpegs and give it a shot. I know what the result will be, which is why I won't waste the time. But you are free to knock yourself out. BTW, the raw file was a single capture using ETTR. The jpegs were bracketed. There are some with a good sky but the street level looks like nighttime. And if I pushed the exposure to make the street look even barely passable, the clouds were lost to clipping. It just can't be done, unless you have a Fuji camera, which typically has much greater headroom for highlights in their jpegs - I don't understand how they do it, but a lot can be recovered.
In the future, try and remember to use "quote reply" so readers know who you are responding to.
Aug 1, 2018 18:43:16 #
Aug 1, 2018 18:46:06 #
rmalarz wrote:
Selene03, To start with, I have my camera set to u... (show quote)
I always like this shot when you post it - very Ansel Adams-ish.
Aug 1, 2018 18:59:38 #
Thank you very much, Gene. I really appreciate your compliment.
--Bob
--Bob
Gene51 wrote:
I always like this shot when you post it - very Ansel Adams-ish.
Aug 1, 2018 19:14:11 #
rmalarz wrote:
Thank you very much, Gene. I really appreciate your compliment.
--Bob
--Bob
To you Bob and Gene51, I thought this would be a very boring thread, but have learned quite a bit from both of you. Thanks!!!!
Aug 1, 2018 19:33:19 #

rmalarz wrote:
Allen, after giving some additional thought to you... (show quote)
Wow! That’s a most effective argument for processing raw. Congrats on a stunning B&W.
Aug 1, 2018 19:46:31 #

rmalarz wrote:
... I spot metered the whitest part of the scene, which was part of the cloud. I wanted to make sure I didn't blow out this highlight. ...
The exposure was ISO 400, 1/500 @ f/11. That's 2/3 stop brighter than Sunny 16. You could have done that without the spot meter.
Aug 1, 2018 20:03:58 #
tenny52
Loc: San Francisco
People not shooting raw may be due to one or more of the following reasons
. They prefer originality and claim their shots are unprocessed.
. They are satisfied with the post processing result with the simpler(free) software.
. They don't need to pay for fancy software (LR & PS, Topaz)
. They don't have to time to work on every shot.
While people shoot raw are more perfectionist and sometimes over doers.
I shoot jpg and raw but my wife says the original raw or jpg are better than my processed ones.
Aug 1, 2018 21:19:25 #
Aug 1, 2018 21:33:37 #
I probably could have. However, I prefer a more precise measurement of the scene than a guestimate. It works better that way.
--Bob
--Bob
selmslie wrote:
The exposure was ISO 400, 1/500 @ f/11. That's 2/3 stop brighter than Sunny 16. You could have done that without the spot meter.
Aug 1, 2018 21:34:42 #
Excellent choice. Not many folks are accomplished enough to work comfortably with pdf captures.
--Bob
--Bob
Angmo wrote:
I only shoot in PDF format.
:-)
:-)
Aug 1, 2018 21:42:29 #
rmalarz wrote:
Excellent choice. Not many folks are accomplished enough to work comfortably with pdf captures.
--Bob
--Bob
I’m in Chandler...!
Same questions came up with film. Negatives or positive slide films.
It all depends on requirements. Folks who have to ask simply do not understand their requirements.
They ask what solution they need but that’s wrong. Their requirements should drive the solution.
Aug 1, 2018 21:50:55 #
CA_CanonUser
Loc: Friendswood, TX
Allen hammer wrote:
Nope not a troll. Had a Canon 5Ti and shot in raw and processed photos just fine. Got the 5D mark iv and learned after I got it that Adobe OS and lightroom could not handle the photos that were collected in Raw format. Seems like a major oversight but that's OK . To me it's not a significant difference. My photos are just as good as anyone shot and processed with Raw settings. Thanks for comments to you and all else. Great forum here.
Odd. I have had a 5D Mark IV since late 2017 and have never had any trouble processing my raw files in Lightroom or Photoshop.
If you want to reply, then register here. Registration is free and your account is created instantly, so you can post right away.