Good news for my 6" Newtonian
Apr 19, 2018 19:18:33 #
I met with the Albuquerque Astronomy group last night at a telescope repair session.
This is the blurp that drew me in..
"Veteran TAAS members with decades of experience in telescope building are at each meeting to help. Meetings are informal affairs, just bring your scope, your questions or your ideas for lively discussion and serious help. "
I explained that I had tried to align everything and when I did a laser collimation, how I did it, and what my final results were.
I showed them the pictures I acquired with the major distortion of the vane spikes and 4 people started looking at different things.
One suggested that the laser wasn't in the center of the collimator but I explained it was..
20 minutes later one of the primary leaders of the group came over and started looking down the tube at the two mirrors and saw that the secondary wasn't close to aligning up on the primary and to me it looked like the primary was way out of kilter.
He suggested the issue was that the secondary hadn't been attached to the mount correctly and I might be able to cut it loose and remount it more in the center.
I came home and spent about an hour tweaking and moving the primary mirror until it aligned correctly with the collimator sight hole and then used the laser collimator to align the mirrors.
I have now achieved what I hope is a properly aligned telescope by knowing what I should see rather than just guessing.
Everything now looks like the pictures of a properly aligned Newtonian.
Tonight is windy as snot, (30MPH with 40MPH gusts) and clouds are moving in so I wont be able to test my results for a while.
I'll keep you all posted or at least the ones that have been following my struggle with this scope.
I am pretty darn optimistic however.
Jim
Apr 20, 2018 15:05:39 #
Albuqshutterbug wrote:
I met with the Albuquerque Astronomy group last ni... (show quote)
Always worth tinkering!
bwa
Apr 20, 2018 20:41:29 #
bwana wrote:
Always worth tinkering!
bwa
bwa
Right?
I wasn’t going to start cutting things apart before trying to fix what I saw.
Last night was Santa Anna winds windy. We hit mid 60’s MPH and tonight looks cloudy again. I might be able to play Sunday night.
Jim
Apr 21, 2018 01:29:16 #
Albuqshutterbug wrote:
Right?
I wasn’t going to start cutting things apart before trying to fix what I saw.
Last night was Santa Anna winds windy. We hit mid 60’s MPH and tonight looks cloudy again. I might be able to play Sunday night.
Jim
I wasn’t going to start cutting things apart before trying to fix what I saw.
Last night was Santa Anna winds windy. We hit mid 60’s MPH and tonight looks cloudy again. I might be able to play Sunday night.
Jim
A number of years ago I bought a used 8" Newt that the previous owner was quite honest about as having been dropped; also obvious from the big dint in the front corner. The price was right and I tackled the repair. Tore out the vanes and secondary. Rerolled the OTA and front ring to remove the dint; had to re-enforce the front ring to keep it round. Re-installed the vanes and secondary, and spent (it sure felt like) days getting the darn thing fully collimated! The fun of tinkering!
Time wise I would have been farther ahead to have scrapped the scope and bought a new one; however, I ultimately did get it working like it was meant to and learned a lot in the process. I used it for about a year and sold it to a fellow imager. He is still using it out of one of his observatories.
bwa
Apr 21, 2018 10:56:03 #
YEA!!! 
Great news Jim!
So, really, either the telescope was poorly assembled originally, or it got "fixed" wrong before you got it. (A check of the Inspector might reveal this was Assembled/Checked by Miss Sum Ting Wong. But ship it to those Dumb Lazy Americans anyway.)
Now, for your next assignment, should you choose to accept it, get those TAAS guys to help you make that giant leap into Auto Guiding.
See if Hugh Candoit is around at the next meetin.
https://youtu.be/tGSUjuSBt1A
Apr 21, 2018 12:56:11 #

Albuqshutterbug wrote:
Right?
I wasn’t going to start cutting things apart before trying to fix what I saw.
Last night was Santa Anna winds windy. We hit mid 60’s MPH and tonight looks cloudy again. I might be able to play Sunday night.
Jim
I wasn’t going to start cutting things apart before trying to fix what I saw.
Last night was Santa Anna winds windy. We hit mid 60’s MPH and tonight looks cloudy again. I might be able to play Sunday night.
Jim
Nicely done Jim, I am checking in to get updates. We had those winds and now it's calmed down. I hope to see some meteors tonight.
Craig
Apr 21, 2018 19:41:58 #
Apr 22, 2018 01:25:55 #
Baby steps.
I hope to first light it with the new adjustments tonight.
I have a new job that is now getting into the way but we shall see.
Jim
sheesh.. I put my response in the middle of your message.
Tired..
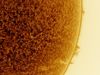
Here is my test shot with Arcturas tonight..
Closer and when I did the peeper check I am still off.. I tweaked and messed it up again.
Back to the drawing board..
Jim
I hope to first light it with the new adjustments tonight.
I have a new job that is now getting into the way but we shall see.
Jim
sheesh.. I put my response in the middle of your message.
Tired..
Here is my test shot with Arcturas tonight..
Closer and when I did the peeper check I am still off.. I tweaked and messed it up again.
Back to the drawing board..
Jim

Apr 22, 2018 12:11:22 #
Albuqshutterbug wrote:
Baby steps.
I hope to first light it with the new adjustments tonight.
I have a new job that is now getting into the way but we shall see.
Jim
sheesh.. I put my response in the middle of your message.
Tired..
Here is my test shot with Arcturas tonight..
Closer and when I did the peeper check I am still off.. I tweaked and messed it up again.
Back to the drawing board..
Jim
Well that's a great shot Jim. It really jumps out at you.
Craig
Apr 22, 2018 12:42:21 #
Albuqshutterbug wrote:
I met with the Albuquerque Astronomy group last ni... (show quote)
This is a lot of work, but it might help. After making sure my focus unit was aligned, I removed the Primary mirror. Using the four holes in the tube that hold the mirror, I ran black thread through them to make a center point ( X) . This allowed me to align the secondary mirror to the focusing unit. That gets the Secondary aligned with the center of the tube and focusing unit. Then it is a matter of making sure the Primary is centered in the tube, which is a real pain. I had to do it this way, as my Secondary is attached to the front lens element. But now everything should be aligned to the CL of the tube. I did measure the cross point of the thread to make sure it was centered.
Ron
Apr 23, 2018 10:40:01 #
CraigFair wrote:
Well that's a great shot Jim. It really jumps out at you.
Craig
Craig
Thanks Craig,
It really helps when you have a reference to look at before you start.
I redid everything yesterday and I may not have to mess with it much for awhile.
Jim
Apr 23, 2018 10:43:06 #
N4646W wrote:
This is a lot of work, but it might help. After m... (show quote)
Your right, it sounds like a lot of work.
What size of Newt did you do this with?
How much of a difference did it make in the final viewing?
Jim
Apr 23, 2018 12:22:58 #
Albuqshutterbug wrote:
Your right, it sounds like a lot of work.
What size of Newt did you do this with?
How much of a difference did it make in the final viewing?
Jim
What size of Newt did you do this with?
How much of a difference did it make in the final viewing?
Jim
10 inch. At least 50%, maybe better, did not know what to look for when we first got it. With the crude stock focusing unit it is hard to achieve critical focus, but, using the tree line on the mountains, I get details in the branches and clouds in the back ground have detail now. Being an f4, daylight makes it a little rough to focus also. One thing I did notice is that colluminating becomes so critical, that it is possible to flip the image when I set the primary mirror screws, but I'm thinking of modifying them. The other thing I'm not sure about is that the doughnut from the primary is always visible. Does not show up in camera image, but if you are just viewing, and eye is centered, there it is. Same with the mirror clips. Maybe I got too critical when reassembling and changing out parts or did something wrong. My Cheshire and laser are within 1/16 inch of each other at a 20 foot target distance when set in a V block and rotated.
Ron
Apr 23, 2018 13:23:14 #
N4646W wrote:
10 inch. At least 50%, maybe better, did not know... (show quote)
The mirror clips have been my guide to how close I am before fine tuning.
When I started I could only see two of them and the third was in left field somewhere.
It took a lot of tweaking and moving to get all three clips visable.
I had a bit of a challenge because 2 years ago when I received the AVX mount and this 6" scope, the spider was not secure and the secondary was flopping on the spider. I don't know if someone had returned it or if it was banged around during transport.
I have fought to get this scope aligned off and on since.
I took it to the local astronomy club and had 4 senior members baffled and a fifth member suggested I remove the secondary from the mount and reglue in a different position.
I decided against that advice and spent 1.5 hours at home tweaking and moving before getting the shots above.
Yesterday I redid everything and visually down the ocular alignment tube it finally looked great with the reflection in the mirror well center and even all around.
Laser collimation showed it was off by about a quarter inch and I adjusted the laser into the center hole.
Looking at the mirror after laser collimation has the center offset and I don't know if I should trust the laser or my eyes.
Currently working with it in laser mode and will probably go back and reset it to visual in case there is an issue with the laser.
I'm about to post some shots from last night.
Thanks for all the suggestions.
Jim
Apr 24, 2018 18:13:35 #
Albuqshutterbug wrote:
The mirror clips have been my guide to how close I... (show quote)
One of the other improvements I did was to replace every darn screw and bolt on the unit with machine screws instead of the cheap hardware screws. Makes a lot of difference when you have to adjust, especially the secondary mirror. If they are still too sloppy, a little plumbers putty wiped onto the threads and then wiped off will help, unless you want to drill and tap to the next size up.
Your shots you posted look pretty good.
Ron
If you want to reply, then register here. Registration is free and your account is created instantly, so you can post right away.