spot meter at the brightest area where you want to keep detail, then add 1 stop
Mar 24, 2018 19:44:19 #

If you spot meter on the brightest white in a scene the exposure should be set to 2 to 3 stops above mid grey. It all depends on how you judge the white. Normal white +2 stops and extreme whites +3 stops.
Mar 24, 2018 19:50:27 #

rmalarz wrote:
Not pointless, but limited in roll film ...
Limited indeed!
Unless you are taking multiple frames of the same subject, each frame has different requirements for exposure and development. You can do that with sheet film but it can be tedious as Adams applied it.
To use the same development for different subjects on roll film involves having to compromise. That usually means picking the development that reduces the contrast of the scene with the greatest DR to the detriment of the remaining frames. By the time you start to compromise you have pretty much abandoned the Zone System.
Imagine taking a series of digital images of different subjects and then applying the same contrast and tone curve adjustments to all of the images. It's just not going to work.
Yes, the Zone System is pointless for anything but sheet film. But learning about how it works is a useful educational process.
Mar 24, 2018 20:15:43 #

Whatever you want to believe is fine with me.
However, in my practice, knowing, through testing, the ideal ratio/time/temperature for each type of roll film definitely improves the outcome when applied to the real world. Yes, it requires some dedicated time to testing, etc. The results speak for themselves.
The compromise is basically system management. Yes, at the time of shooting questioning what is more important and exposing accordingly based on the knowledge derived from test data results in a very satisfactory negative. I do this rather often, most specifically with black and white 120 and 35mm film.
Ideally, with sheet film, this works almost effortlessly. As for digital, I apply pretty much the same initial adjustments to my RAW files. Though, those initial adjustments are made per image and vary slightly. Then, I do a bit of burning and dodging in PS. The system works, but a thorough understanding of one's camera and that system is required.
So, TZS is not pointless on roll film, it's application is just a bit different. The same can be said for digital, but with digital, it works 180 degrees differently.
--Bob
selmslie wrote:
Limited indeed! br br Unless you are taking mul... (show quote)
Mar 24, 2018 20:57:16 #
While I find this illuminating, on a certain level, I am more confused than ever, about how to capture the most usable data in my shots. I already try and push the exposure to the right, but with no real rhyme or reason Can someone detail a simple process by which we novices can ascertain where the actual limit is for a camera. The blinkies on my Nikon don’t reliably tell me where the “limit” is and I would love to figure out. How does one use the gray card and what does one do after shooting it? I know my ignorance is on full display, but would appreciate help from the forum.
Mar 24, 2018 21:02:00 #
You're in luck. I did just that earlier today. Stand by.
--Bob
--Bob
Einreb92 wrote:
While I find this illuminating, on a certain level... (show quote)
Mar 24, 2018 21:02:20 #
rfmaude41
Loc: Lancaster, Texas (DFW area)
blackest wrote:
Maybe this link would help. br https://photography... (show quote)
Yep; I have been using the "zone system" for about 45 - 50 years; suggest you go back to "the Negative" by Ansel, and "regroup" (Book 1), then take it from there, eh ?
Mar 24, 2018 21:13:52 #
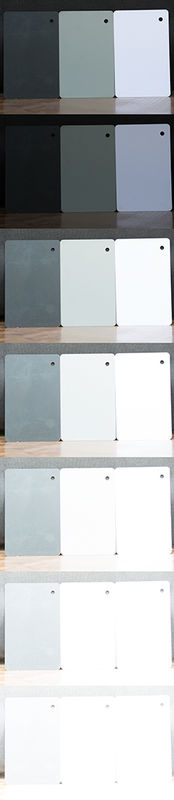
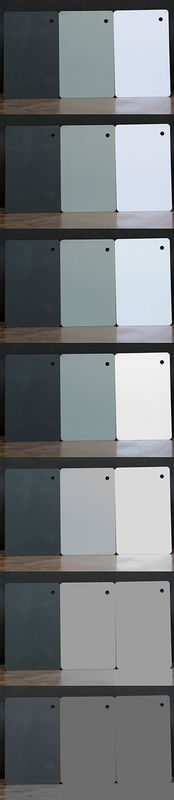
Ok, here's the images and the results of processing. Please, understand that this is a camera specific test result. From what I understand the responsiveness and results of pushing the exposure is unique to each camera, not just models. From the same model to the same model they may be close, but between models, all bets are off.
These two images contain 7 exposures each. The SOOC images show the images, as you guessed, straight out of the camera. The second set is the results of only adjusting the exposure slider in Adobe Camera RAW.
All of these were shot at ISO 100 f/8 The shutter speeds varied as follows (from top to bottom):
1- 1/30
2- 1/90
3- 1/10
4- 1/6
5- 3/10
6- 7/10
7- 1.5 seconds
Each of these exposures was intended to move the value of the white card one Zone upwards.
The intent is to move the white card up one zone per exposure. Adobe CS6 ACR was used to normalize the exposures, as best as possible. The amount of exposure slider adjustment was as follows:
1- 0
2- +1.5 (This was because the white card was spot metered for this exposure)
3- -1.5 Due to the added exposure
4- -2.5
5. -3.0 Now it's getting touchy about being just a bit too far, but could work.
6- -4.0 and looks like crap
7- -4.9 and looks even worse
A side note about the added benefit of ETTR. As you can see the black card's value was raised. As such, image subject matter was recorded. When final adjustments are made that subject matter is made darker, or as dark as one wishes. Just the recording of subject in that "dark" zone suppresses noise.
Raising exposure in processing will tend to accentuate the noise that is there. I hope this helps a bit. If you have any questions, please feel free to write and ask.
The card set used can be purchased from B and H. https://www.bhphotovideo.com/c/product/760199-REG/Dot_Line_DL_0520_Mini_Digital_Color_Balance.html
--Bob
Einreb92 wrote:
While I find this illuminating, on a certain level... (show quote)
Mar 24, 2018 21:44:54 #
rmalarz wrote:
Whatever you want to believe is fine with me. ... So, TZS is not pointless on roll film, it's application is just a bit different. The same can be said for digital, but with digital, it works 180 degrees differently.
--Bob
--Bob
It's not as if I have not also been doing a lot of testing over the past several decades.
You can see some of my recent tests in A Practical Guide to Film Characteristic Curves in which I explain my methodology. My latest tests were intended to find how to develop different films to the same normal contrast.
I made some interesting discoveries regarding a few unique films (most of which are not available in sheet form) that I talk about in the paper.
There is so much more flexibility available today in the post processing of scanned negatives that it is not really necessary to apply the Zone System controls to the negative itself.
I find it more practical simply to produce a decent negative with a useful range of densities for scanning purposes and then do the tone mapping on the computer.
Mar 24, 2018 22:22:44 #

rmalarz wrote:
Right. And then, fix it in processing.
--Bob
--Bob
Adjust for optimum result, not fix

Mar 24, 2018 22:25:44 #
Einreb92 wrote:
While I find this illuminating, on a certain level... (show quote)
measure highlights with detail you want to keep, and depending on your camera and testing, add from 1 stop to 1 2/3 stop to the reading. If it is too much, then add less. Trial and error will tell you where you need to be. Gray cards are fine for subjects of average contrast, useless when you have a really wide contrast range. I have a gray card in my ColorChecker Passport, never use it.
Mar 24, 2018 22:50:07 #
Geez, did I write that? I see that I did. That is so wrong and against my philosophy about processing. One never fixes things in photoshop, on optimizes their image, which was captured with the correct exposure in the first place.
Shame on me for that huge mistyped statement.
--Bob
Shame on me for that huge mistyped statement.
--Bob
Gene51 wrote:
Adjust for optimum result, not fix
Mar 25, 2018 02:32:39 #
rmalarz wrote:
Geez, did I write that? I see that I did. That is so wrong and against my philosophy about processing. One never fixes things in photoshop, on optimizes their image, which was captured with the correct exposure in the first place.
Shame on me for that huge mistyped statement.
--Bob
Shame on me for that huge mistyped statement.
--Bob
It's part of the plan, not a error, which "fix" implies. It sounds like you made a boo-boo and are using Photoshop as a Hail Mary - so I know you didn't mean that . . .
Mar 25, 2018 10:24:59 #
Gene, I feel a whole lot better now. Thanks.
--Bob
--Bob
Gene51 wrote:
It's part of the plan, not a error, which "fix" implies. It sounds like you made a boo-boo and are using Photoshop as a Hail Mary - so I know you didn't mean that . . .
It's part of the plan, not a error, which "fix" implies. It sounds like you made a boo-boo and are using Photoshop as a Hail Mary - so I know you didn't mean that . . .
Mar 26, 2018 16:54:24 #
Garyminor
Loc: Raleigh, NC
Thanks to all of you that responded. Obviously this was a springboard for discussion rather that a question. My original assertion was that metering of the lightest area, and adding only one stop was too conservative, and would sacrifice detail in the very dark areas.
Then Gene51 counters with an excellent photo of a Peregrine Falcon where he metered the bird’s breast and then added only one stop. The histogram shows that some of the brightest pixels were near the right edge. This does show that he knows what he’s talking about. However, he did mention that that with a different camera, he could have gone two or more stops over without blowing the highlights.
Thanks to rmalarz for sharing his test. What I take away from this experiment is the 5th and 6th shot in the second set.
• 5th shot, 3/10 sec, 3 stops overexposed. There is a difference between the medium grey card and the white card.
• 6th shot, 7/10 sec, 4 stops overexposed. There is not any difference.
It seems fairly easy to determine the limits of your camera.
1) Meter off of a grey card and take a shot at 1, 2, 3, and 4 stops over exposure.
2) Use Rawdigger to look for blown highlights on each shot.
3) If 2 over doesn’t blow the highlights but 3 does, then take more shots at 2-1/3 over and 2-2/3 over.
4) Again, look for blown highlights on each shot.
5) Now you know exactly how many stops to add to the metering of the brightest areas, in order to prevent blowing the highlights.
Is this exposing to the right or is it exposing to the left? It depends!
Let’s assume that you determine that your camera can expose three stops over middle grey without blowing the highlights.
If the scene has highlights that are three stops brighter than middle grey, then this technique will have the same results as metering off middle grey with no adjustments.
If the scene has highlights that are only one stop brighter than middle grey, then this technique will cause the scene to be overexposed (but no blown highlights) and is called ETTR (expose to the right). This will give the darkest of the darks a little more quality. Some would argue that this is insignificant.
If the scene has highlights that are four or five stops brighter than middle grey, then this technique will cause the scene to be underexposed (but no blown highlights) and is called ETTL (expose to the left). This will give the darkest of the darks a little less quality, but prevent blown highlights. This is generally agreed to be a good tradeoff.
Mar 26, 2018 17:19:01 #
By spot metering on the brightest "spot" in the scene and deciding that you would like that particular "spot" to be white, then giving three stops more exposure places that spot in the Zone you want. You would probably get the same result metering on a gray card, or middle zone place in the scene. However, controlling exposure in both film and digital is a matter of "place and fall". You place the part of the scene where you want it, exposure wise. Then, processing takes the other values and "moves" them to the level you want. This is ETTR and moving values to the right of the histogram.
One small correction, over exposure is when the highlights and near highlights are completely blown. Additional exposure is quite different in that it is not losing details. Your steps to determine are absolutely correct. They are ETTR. Though, one can forego the use of Rawdigger and simply use your own eyesight to determine if highlights are blown or not. Rawdigger is a luxury that is nice to have, but not a necessity.
BTW, these images were metered using the brightest part of the scene and adding exposure values to place that part in my chosen Zone.
http://static.uglyhedgehog.com/upload/2018/3/10/687376-d800_2017073101_013.jpg
http://static.uglyhedgehog.com/upload/2018/3/9/476454-d800_2018022801_005.jpg
--Bob
Garyminor wrote:
Thanks to all of you that responded. Obviously thi... (show quote)
If you want to reply, then register here. Registration is free and your account is created instantly, so you can post right away.