Check out Advice from the Pros section of our forum.
need help in combining two pictures to make one Thank you
Dec 4, 2017 23:20:40 #
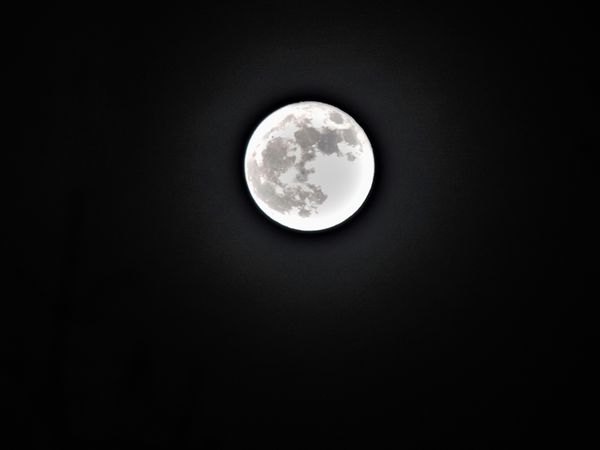
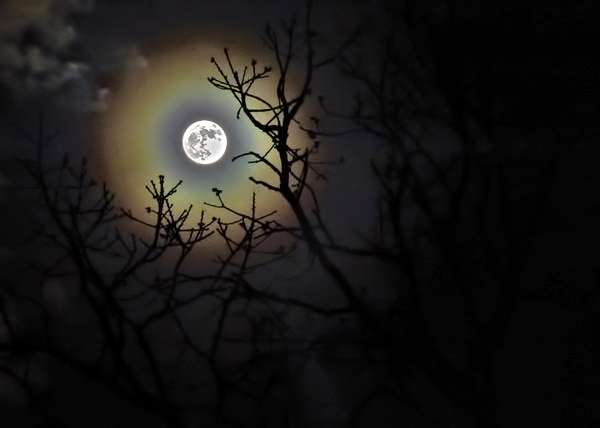
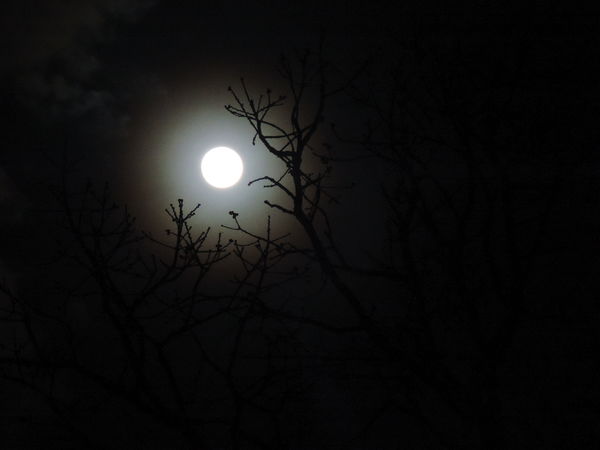
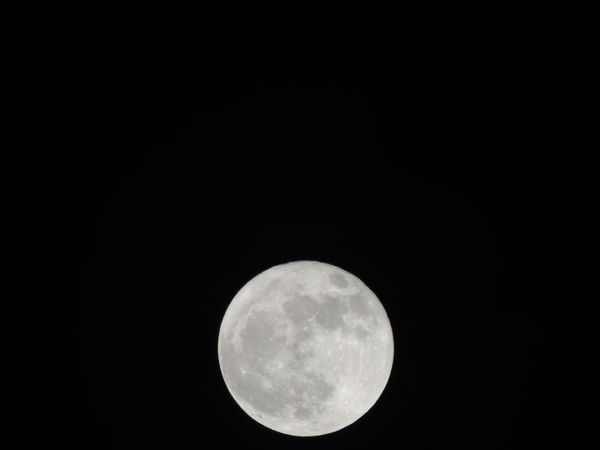
I have a couple of pictures, that I would love to be able to put together, to make a really nice picture of what it really is. But I don't know how, or have the resources to do so. Is there anyone that could help me on this? I want to take the picture of the moon that is focused, and put the focused moon in the place of the non focused moon in the second shot. Thank you.

Dec 5, 2017 02:28:31 #

Use the Post processing section for this type of request.
If you really want help, post the originals since you are at it.
'
If you really want help, post the originals since you are at it.
'

Dec 5, 2017 06:10:15 #

Use a program like Topaz ReMask then move the good masked moon to the sundog moon photo and use pic to change the size to fit.
Check out Software and Computer Support for Photographers section of our forum.
Dec 5, 2017 10:58:36 #
If you post these images in the post processing section and check the save the originals box, we would be able to help you better. Also, what kind of resources do you currently have available to you. It might be beneficial to get help from someone using the same PP software as yourself rather than trying to learn a new tool at the same time.
Combining them is a fairly straight forward task. Here's a quick example using the images you posted.
Combining them is a fairly straight forward task. Here's a quick example using the images you posted.
Taffie wrote:
I have a couple of pictures, that I would love to be able to put together, to make a really nice picture of what it really is. But I don't know how, or have the resources to do so. Is there anyone that could help me on this? I want to take the picture of the moon that is focused, and put the focused moon in the place of the non focused moon in the second shot. Thank you.
Dec 5, 2017 11:32:24 #
Thank you so much. I am so inexperienced in this stuff, and when it comes to my computer, I have such a difficult time understanding what I am doing, that I wonder if I will ever be able to do this. All I have that I understand is whatever came with my computer under pictures for Windows. I think. And I will have to look again for the "post processing section". I don't remember seeing it. But I will post to keep originals next time. Again, thank you so much for your help.
Dec 5, 2017 12:13:20 #

Dec 5, 2017 12:39:02 #
lsupremo
Loc: Palm Desert, CA
SalvageDiver wrote:
If you post these images in the post processing section and check the save the originals box, we would be able to help you better. Also, what kind of resources do you currently have available to you. It might be beneficial to get help from someone using the same PP software as yourself rather than trying to learn a new tool at the same time.
Combining them is a fairly straight forward task. Here's a quick example using the images you posted.
Combining them is a fairly straight forward task. Here's a quick example using the images you posted.
It would have been nice if you told him how you did it.
Dec 5, 2017 17:19:26 #
If Photoshop is available, playing with "Layers" should be able to get what you want.
Dec 5, 2017 17:59:19 #
Select just the moon with detail and put it on a layer. Put that layer on the top of the other background.
Dec 5, 2017 19:17:36 #
Dec 5, 2017 19:39:33 #
Scroll all the way to the bottom of the page. Click on "All Sections". That will take you the the various forums.
Check out Wedding Photography section of our forum.
Dec 5, 2017 23:58:22 #
SalvageDiver wrote:
If you post these images in the post processing section and check the save the originals box, we would be able to help you better. Also, what kind of resources do you currently have available to you. It might be beneficial to get help from someone using the same PP software as yourself rather than trying to learn a new tool at the same time.
Combining them is a fairly straight forward task. Here's a quick example using the images you posted.
Combining them is a fairly straight forward task. Here's a quick example using the images you posted.
It may seem straight forward to you, but for me, I get so frustrated, and can't seem to understand what I am doing. I think I am following the instructions, but it doesn't seem to work for me. I am going to try this again. I will post both pictures here before enhancing, and clicking store original, so that you can help me get this done. I have tried, but can't seem to get it. Thank you so much
Dec 6, 2017 02:49:56 #
Hi Taffie,
First let me apologize for a poor choice of words. I do understand that it isn't straight forward for you, since you were asking for help.
I did go through that article I sent you the link to. Using that article I was able to recreate the image I posted earlier using the post-processing tools you currently have available, i.e. MS Paint. It's basically correct but there are some additional steps you need to do before you can create the image you want using your tools.
It's late tonight, so I'll follow-up in the morning with some detailed instructions.
Mike
Taffie wrote:
It may seem straight forward to you, but for me, I get so frustrated, and can't seem to understand what I am doing. I think I am following the instructions, but it doesn't seem to work for me. I am going to try this again. I will post both pictures here before enhancing, and clicking store original, so that you can help me get this done. I have tried, but can't seem to get it. Thank you so much
Dec 6, 2017 12:16:16 #
SalvageDiver wrote:
Hi Taffie, br br First let me apologize for a poo... (show quote)
Thank you Mike. I didn't mean to sound ungrateful, or rude. I am sorry. I was just a bit frustrated because it wasn't working for me, and I couldn't figure it out. I hate these computers, because I can't seem to grasp what they are doing, or wanting me to do to get it to work.
I figure that I am doing good to get the pictures from my camera onto the computer, and then be able to enhance them. There are so many things that I would love to do with my pictures, but I don't have the patients, or the know how to do more than what simple things I do. I don't know how anyone can learn from the internet, because for me it is more confusing. I try, and sometimes I get lucky, and find something, but usually I have a difficult time figuring out what I did right! lol I really do appreciate your help. I hope you have a great day today.
Taffie.
Dec 6, 2017 12:53:22 #
Hi Taffie,
What we are going to do is cut out the moon from the detailed moon image. Then we'll paste, resize and move the moon cutout into your main image. And we'll use only the tools that you have available on your windows 10 installation.
MS Photo can't do this. MS Paint can, but not as easy as an app (such as photoshop or elements) that can use layers and masks. When we've completed adding the detailed moon into your main image, then you can adjust than image using MS Photo, just as before.
Step 1: Cutout the detailed moon.
a) Select the detailed moon image by right-clicking on the image file and selecting "Load using", "Paint". If necessary, zoom out until the moon is on your screen.
b) Select [Home], then ,<Select>, <Rectangle> from the drop-down menu. Draw a selection around the moon (Use ctrl-z to undo). Click outside the box and you should see only your selection with most of the black background gone.
c) Using the eraser in the <Tools> section, erase the remaining black backround from the image. This may take a little time. Make make that you remove all the black and don't leave a dark ring around the edge of the moon. It's okay to erase a little of the moons edge. It won't be noticed in the final image.
d) Once you're satisfied that the background has been adequately removed, save the image (such as "Img_3.jpg"). This is the file you'll use in the next step.
Step 2: Add moon cutout to your main image
a) From the [File] menu, find and load your main image into Paint. If necessary, zoom out until you can see the moon in your main image.
b) From the [Home] menu, select <Paste>, <Paste from> and select you moon cutout file (Ing_3.jpg). It should show up in the upper left corner of the image with a selection box around it and a white background.
c) Then click on the down arrow key under the <Select> menu and select <Transparent selection>. You should see the white background around the detailed moon disappear. This is the step that was missing from the article that I referenced to you.
d) Using the mouse, left-click on the lower-right corner of the section box around the detailed moon and resize by moving the corner inward toward the upper left corner. You should see a diagonal double arrow next to the cursor. Resize until the detailed moon is slightly larger that the moon in your main image. Also, make sure that the resized moon is round, that you haven't changed the aspect ratio.
e) Move the detailed moon by clicking inside the box and dragging it over the moon in your main image. Ensure that the detailed moon fully covers the underlying moon. If there's remnants of the dark background around the detailed moon from step 1c, it will show up here and you'll need to go back to step 1.
f) Once your satisfied with the size and placement of the detailed moon, save the image file (such as "Img_4.jpg"). You can now exit Paint.
Step 3: Enhance your image
a) Load your newly created file (Img_4.jpg) into MS Photo, then edit and enhance the file as needed.
If you plan on doing many more of these types of edits, I would suggest software that is designed to use layers and masks. It will make it easier in the end because they have tools for making the cutouts and masks much easier than what we've done here.
I hope this helps. Please feel free to PM me if you have any additional questions about these steps or just need additional help.
Mike
Final detailed moon cut-out
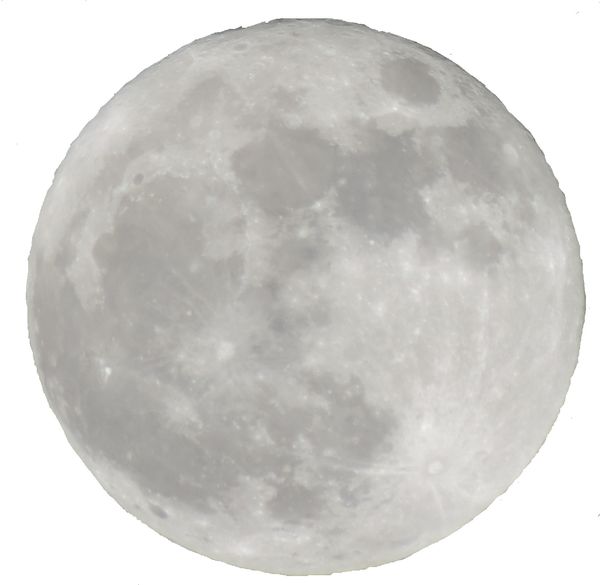
(Download)
Detailed moon pasted, resized and moved onto you main image

(Download)
Some editing using MS Photo
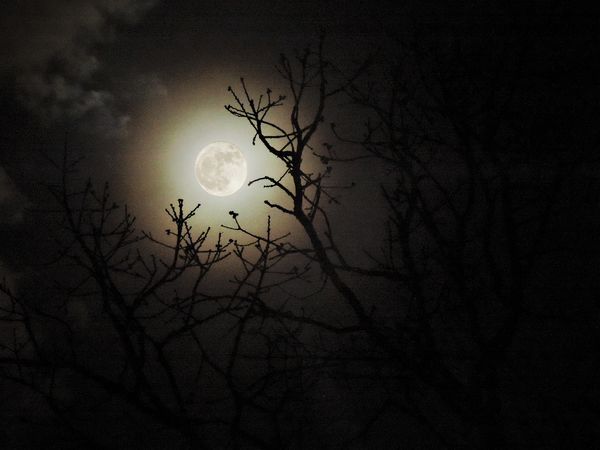
(Download)
If you want to reply, then register here. Registration is free and your account is created instantly, so you can post right away.
Check out Street Photography section of our forum.