Check out Photo Critique Section section of our forum.
The Best Tips Learnt, From Other Photographers?
Sep 30, 2017 23:37:11 #

If you want to be successful at anything.
Look at what everyone else is doing.....and don't do that thing......
I cheated. The advice wasn't from a photographer.....It applies to everything.....
PS.... If you decide to do what everyone else does, don't be disturbed if you come up empty.

Look at what everyone else is doing.....and don't do that thing......
I cheated. The advice wasn't from a photographer.....It applies to everything.....
PS.... If you decide to do what everyone else does, don't be disturbed if you come up empty.
Oct 1, 2017 00:44:46 #

rgrenaderphoto wrote:
1) Just shoot, pixels are free.
2) Sunny 16.
3) Back button focus.
2) Sunny 16.
3) Back button focus.

Oct 1, 2017 00:46:18 #
PalePictures wrote:
If you want to be successful at anything.
Look at what everyone else is doing.....and don't do that thing......
I cheated. The advice wasn't from a photographer.....It applies to everything.....
PS.... If you decide to do what everyone else does, don't be disturbed if you come up empty.
Look at what everyone else is doing.....and don't do that thing......
I cheated. The advice wasn't from a photographer.....It applies to everything.....
PS.... If you decide to do what everyone else does, don't be disturbed if you come up empty.
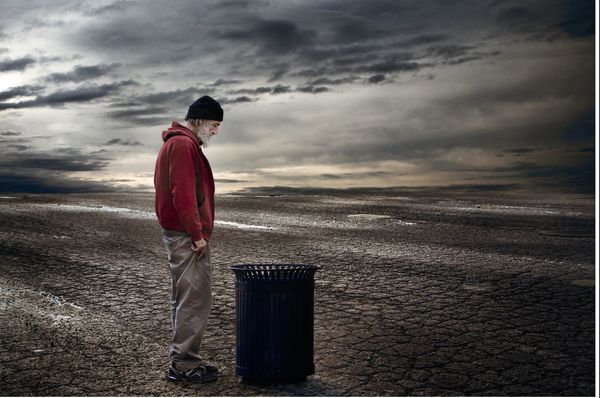
That's a tragic ending to the Story.
"Every Picture tells a story" sure fits this image.
Oct 1, 2017 01:39:16 #

No image is ever wasted.
Before you reject or delete, ask yourself what could have made it better. Much as I hate to admit it, I've sometimes gone an entire day without taking an acceptable shot. But I don't consider the day wasted, IF I can learn something.
Before you reject or delete, ask yourself what could have made it better. Much as I hate to admit it, I've sometimes gone an entire day without taking an acceptable shot. But I don't consider the day wasted, IF I can learn something.
Oct 1, 2017 07:51:00 #
insman1132 wrote:
"Learn your Camera! Learn your Camera! Learn your Camera!".
And don't be afraid to make mistakes, but learn from them, too. First shots I made from the camera I had were of fence posts because I didn't even know what button to push. If only I had read the manual first. Got some decent shots anyway after that, thank goodness, but was my face red!
Oct 1, 2017 09:29:46 #
Feiertag wrote:
When I first got into photography, five years ago,... (show quote)
Unless you are a professional only purchase ONE camera, learn it well. Research lenses and purchase the best you can afford. Read and watch lessons and get out there and practice, practice, practice!

Oct 1, 2017 10:50:00 #

I'm going to be the devil's advocate against the "rule" give it room to go. I sincerely thought this was an incontrovertible rule till I saw these images (from the internet). Now I'm more convinced then ever that guidelines only apply in the Majority of cases, not All.
skywolf wrote:
Some of the best advice I was given was from noted Indianapolis, Indiana wedding photographer Jerry Goldberg about composition: Always give the subject "Room to grow and room to go." Another bit came from John Alhauser, one of my college photography teachers: "There are no rules in photography...only guidelines."

Check out Bridge Camera Show Case section of our forum.
Oct 1, 2017 11:21:35 #

blackest wrote:
why? br br http://www.photopills.com/calculators/... (show quote)
My own tests of “full image area” prints at 8” on the short side show progressively visible diffraction at stops smaller than mentioned. I avoid f/8 and smaller on 16MP Micro 4/3. I avoid f/11 and smaller on 20MP APS-C. I avoid f/16 and smaller on 24MP full frame.
Oct 1, 2017 11:25:29 #
Fotoartist wrote:
I'm going to be the devil's advocate against the "rule" give it room to go. I sincerely thought this was an incontrovertible rule till I saw these images (from the internet). Now I'm more convinced then ever that guidelines only apply in the Majority of cases, not All.
It is absolutely true that there are no absolutes! Rules — at least in photography — are just guidelines. Knowing when they are irrelevant or fail is a matter of some experience and keen perception.
Great examples!
Oct 1, 2017 12:42:16 #
tdekany wrote:
...I can't believe that there are people, who, think that there are photographers out there who don't want to get it right in camera and rely on PP to "fix" things. I guess they don't understand what post processing is for.
I generally agree, but those of us who spent time in pro portrait labs have a little different perspective on this.
Back in the film/optical days, MOST photographers sent their color negative film to a lab to be printed. I worked in a professional portrait lab, where we didn't use automated color analysis equipment. We had a team of color technicians who used video color negative analyzers and various other strategies to adjust the color and brightness values used to print negatives. They fixed a multitude of sins coming in the front door from photographers who had NOT A CLUE how to use a light meter, or how to evaluate the tonal qualities of a scene and set a reasonable exposure. Unless the photographer really screwed up, (s)he never knew what we did to fix errors. They just had to get an exposure within the film's latitude. With a 2.5:1 lighting ratio, that was easy.
I can say from experience that the philosophy, "Let the lab worry about it," was most pervasive in our "portrait and social" segment of the professional photography market. Color negative films had as much as 3 stops of overexposure latitude and 2 stops of underexposure latitude. You could get an image that would "probably" sell, just by using a wet finger in the wind as a light meter! (Well, almost.)
When our industry switched from film capture of portraits to digital capture of portraits, the proverbial $#!t hit the fan!
In the early 2000s, there were no lab systems that could convert raw images from Nikons and Canons to JPEGs. There were no computers or networks with enough speed or bandwidth to do that --- on our massive scale, anyway. So we had to use JPEG capture at the camera. With +1/3 stop, -2/3 stop latitude, you could imagine what happened. NONE of our retail employee photographers or our wholesale customers had ever worked with color slide or transparency films. So NONE of our photographers had a real appreciation for a light meter, or its limitations!
The ensuing battle was to train our employees and customers about proper exposure and the tools used to achieve it. Our entire industry was based upon the idea that the systems downstream could ONLY work properly when the photographer followed disciplined procedures at the camera:
• set ALL the camera menus to specific settings used to simulate the standard "look" we were selling
• set proper exposure
• focus the lens on the subject's eyes (using the correct AF point)
• compose portraits properly within a viewfinder mask provided for that purpose
• pose the subject pleasingly for a natural look
• capture the peak expression
• choose the correct pose to link to the subject's order data (We worked with Canons tethered to PCs with proprietary order editing and database software.)
Not surprisingly, many of the old guard film photographers couldn't handle this. FIGURATIVELY, they were like rats, conditioned in a Skinner Box to tap a bar 25 times to get a pellet of food (i.e.; they followed old, blind, rule-of-thumb procedures they had used for years). Suddenly, they were tapping the bar ONCE, and getting an electric shock to their feet! (Their old ways were wrong, but the lab had compensated for their errors by using the latitude in the film.) In Skinner's experiment, shocked rats ran to the farthest corner of the box, and shook until they starved. In our case, a lot of photographers could not handle the discipline of JPEG capture technology, and didn't understand why it was different, so they quit. At least one customer I knew DID have a complete nervous breakdown. He sold his business and left the industry.
We replaced most of those folks with people who understood computers, procedure, discipline, and detail. Not surprisingly, most of them were much younger, and had grown up with a variety of technology.
So my advice is to *get what you CAN as right as you can get it at the camera.* Then, IF time and/or budget allows, do post-processing to improve it.
Many people here are hobbyists who work exclusively in raw mode. That's like working with color negative film, and doing your OWN developing and printing. You have *complete* creative control from start to finish. It provides the ultimate in quality and control.
Pro photo industry educator, Will Crockett, is fond of saying, "Raw is for rookies." He means NO disrespect by that statement! He is merely pointing to the advantages of having latitude with which to correct minor exposure errors, and dynamic range to compensate better for extreme scene brightness. He IMPLIES that JPEG is for pros, not because it provides better results, but because it requires far more control and discipline to achieve the desired results. JPEG is a distribution file standard, not a file format that was meant for image editing! It can be edited a little, but raw files can be edited a lot.
Some do prefer JPEG processing be done in their cameras, to save time. They are the people who most NEED to get everything as close to perfect at the camera as they possibly can. The irony of JPEG or color slide film capture is that the closer to perfect exposure you get, the more latitude you have to make creative adjustments. As a professional, I understand and use that discipline to my advantage for certain types of work. But it has serious limitations. I generally restrict it to controlled lighting situations, where I am making repeated exposures of similar subjects (i.e.; products, portraits, well-lit press conferences...).
Oct 1, 2017 12:44:34 #
wj cody
Loc: springfield illinois
remember, take chances
also no such thing as available light there is only available dark.
also no such thing as available light there is only available dark.
Check out True Macro-Photography Forum section of our forum.
Oct 1, 2017 12:50:41 #
wj cody wrote:
remember, take chances
also no such thing as available light there is only available dark.
also no such thing as available light there is only available dark.
Here's an example of "available dark." She's lit with a standard incandescent two-D cell flashlight, and a candle. Check the metadata. Hand-held exposure. Lumix GH4 in silent, electronic shutter mode (no mirror to slap, no mechanical shutter to open/close). Exposed raw, processed in Lightroom.

Oct 1, 2017 14:30:48 #
I enjoyed your recounting of the days when film gave way to digital. I was very active professionally in photography and I also did illustration on the board at that time when computers were coming in. You had to have an openness to what the future was becoming if you still wanted to make money in your field. I think this period is important to study and am glad for your reminences.
burkphoto wrote:
I generally agree, but those of us who spent time ... (show quote)
Oct 1, 2017 15:12:51 #
Fotoartist wrote:
I enjoyed your recounting of the days when film gave way to digital. I was very active professionally in photography and I also did illustration on the board at that time when computers were coming in. You had to have an openness to what the future was becoming if you still wanted to make money in your field. I think this period is important to study and am glad for your reminences.
Thanks. I was lucky to ride the computing wave from the early 1980s forward. I got to see it all unfold, learning as it all developed. The knowledge transfer from the film/optical world to the digital world was smooth if you stayed in the thick of it.
Oct 1, 2017 17:21:40 #
The transition was to shoot film and then scan it to print it digitally till at a certain point shooting directly digital became equal in quality to film. I could see it happening but never thought digital would turn out this much better than film.
If you want to reply, then register here. Registration is free and your account is created instantly, so you can post right away.
Check out Printers and Color Printing Forum section of our forum.