Mushroom
Aug 12, 2017 15:46:39 #
Your mushrooms never fail to please dsturr. Beautifully processed as always. Would you feel like describing your creative process for the image? I'm sure it would be of interest to many of us.
Aug 12, 2017 15:53:42 #
magnetoman wrote:
Your mushrooms never fail to please dsturr. Beautifully processed as always. Would you feel like describing your creative process for the image? I'm sure it would be of interest to many of us.
Seconded!
Aug 12, 2017 19:01:28 #

OUTSTANDING! In every way. The specimen, the lighting, your PP. Great work!
Aug 13, 2017 01:00:22 #
magnetoman wrote:
Your mushrooms never fail to please dsturr. Beautifully processed as always. Would you feel like describing your creative process for the image? I'm sure it would be of interest to many of us.
Sure.
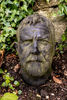
Taken in natural light; kitchen window, no direct sunlight falling on the mushroom. Shot 35 images focusing from front to back and focus stacked using Helicon Focus 6; method B, radius 1, smoothing 1. Used raw in, DNG out mode. Repeat using different radii (2-5) but leaving the smoothness at 1. Load the 5 DNG files into Camera Raw, select all and synchronize the settings. Processed in the normal manner. I use a high clarity (80-85) setting.
Load the 5 processed DNG files into Photoshop as layers and auto align. Duplicate the layers and auto blend (either duplicates or originals). Merge the blended layers and apply black layer masks to the remaining 5 layers; useful for painting out any blurred areas although there should be very few. If you use Photoshop only for the focus stacking be prepared for a lot of clone stamping to get rid of the blurred areas.
Select the foreground using the method of your choice; useful for background change, selective noise reduction or whatever.
Then Nik Silver Efex Pro 2 using the first option and increase the structure. Apply this filter again to the original image the underexposed (ev-1) setting. With the darker layer on top with a white layer mask, paint out parts the mushroom to reveal some of the lighter parts underneath.
Then a slght tint using Paper Toner (Nik Color Efex Pro 4), Paper tone (5) unaltered. Add a filter and select Pro Contrast. Increase Dynamic contrast.
I filled the background with black (5,5,5) and downsized to 1800 wide. Sharpened the foreground (slightly) using Camera Raw filter and checked that there was no highlight clipping.
Canon 5D Mark III, Canon 100 f2.8 Macro (non-L), Iso 100, aperture priority, f9.
Hope this helps and that I haven't forgotten any steps.
Aug 13, 2017 01:01:01 #
Aug 13, 2017 01:01:51 #
KTJohnson wrote:
OUTSTANDING! In every way. The specimen, the lighting, your PP. Great work!
Thanks KT.
Aug 13, 2017 01:26:08 #

Aug 13, 2017 03:06:08 #
dsturr wrote:
Sure. br Taken in natural light; kitchen window, n... (show quote)
Thank you for laying this out so clearly.
Reading it makes one appreciate the effort put into achieving such a lovely image and is fascinating.
In para three, you're selecting to make a layer mask for future use in background changes I guess? I have often forgotten to do this whilst having made a selection and then need to reselect, which can be laborious! I've only tried stacking in Ps and, as you say, it required a lot of after-work.
Aug 13, 2017 10:38:06 #
magnetoman wrote:
Thank you for laying this out so clearly.
Reading it makes one appreciate the effort put into achieving such a lovely image and is fascinating.
In para three, you're selecting to make a layer mask for future use in background changes I guess? I have often forgotten to do this whilst having made a selection and then need to reselect, which can be laborious! I've only tried stacking in Ps and, as you say, it required a lot of after-work.
Thanks.
And here's what I forgot:
Mirror lock up plus silent mode.
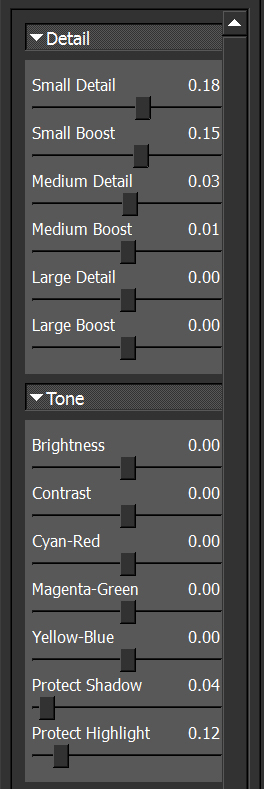
Topaz detail 2 with the settings shown below. I used this before the tint.
Also I have a cheap focusing rail which I never use. It's much quicker to just look through the finder and make small changes using the camera focus ring. Also the this rail is basically unusable looking straight down.
Aug 13, 2017 10:39:00 #
Aug 13, 2017 13:40:51 #
Sometimes I wish we could see thumbnails with the post titles. Nearly passed this one by (just don't have time to scan everything). Glad I didn't. Great treatment of an intriguing subject. Your composition emphasizes the rising, billowing form of the object (its mushrooming, to be obvious) as well as the object itself. Really nice!
Aug 13, 2017 19:57:59 #
dsturr wrote:
FYC.
Very creative and captivating. I find that I keep looking and seeing things I missed before. Did you use focus stacking to get such great dof?
Erich
Aug 13, 2017 21:18:42 #
cabunit wrote:
Sometimes I wish we could see thumbnails with the post titles. Nearly passed this one by (just don't have time to scan everything). Glad I didn't. Great treatment of an intriguing subject. Your composition emphasizes the rising, billowing form of the object (its mushrooming, to be obvious) as well as the object itself. Really nice!
Thanks cabunit.
Aug 13, 2017 21:25:35 #
ebrunner wrote:
Very creative and captivating. I find that I keep looking and seeing things I missed before. Did you use focus stacking to get such great dof?
Erich
Erich
Thanks Erich.
Yes I did; 35 shots.
Aug 14, 2017 07:35:11 #
dsturr wrote:
Thanks Erich.
Yes I did; 35 shots.
Yes I did; 35 shots.
Well worth the effort, I'd say.
Erich
If you want to reply, then register here. Registration is free and your account is created instantly, so you can post right away.