What is happening here?
May 18, 2017 12:48:30 #

For a great grounding in the use of flash I recommend this website
http://strobist.blogspot.ie/
actually you will probably be directed to the .com site. (its the same site anyway)
You may want to make sure you have a handle on the basics of exposure before moving on to flash.
http://strobist.blogspot.ie/
actually you will probably be directed to the .com site. (its the same site anyway)
You may want to make sure you have a handle on the basics of exposure before moving on to flash.
May 18, 2017 13:39:11 #

darrelm1967 wrote:
First thank you for this site. I am trying to get... (show quote)
It sounds to me like your difficulties are partially related to not understanding how your camera works. There are a lot of sources for learning about the exposure triangle, how each lens affects the expansion or contraction of a scene [related to depth of field], and composition. Hopefully you have also read through your camera's manual more than once to learn its different capabilities.
Since you have been blind in one eye since birth, you have not had to make the adjustments of those who are blinded in one eye later on in their lives. Perhaps it is subconscious, but you are using clues from your environment every waking minute, that tell you how far it is from one thing/place to the next. What you see is processed by your brain, so it is even possible that your brain is interpreting your surroundings three-dimensionally!
I adopted 2 kitties who each had one eye removed as kittens. Sometimes they misjudge distances when something new is introduced into their environment, but for the most part they have no problem. One thing I noticed, when one of them wants to jump up from the floor onto furniture or my lap, it will pause and look carefully [it looks to me like the one eye is looking at different parts of the situation quickly which provides visual depth of field information]. You undoubtedly do something similar, whether it is moving your eye or moving your head. So although it can be an inconvenience, being blind in one eye , but not truly a handicap.
One more thing is that photography is usually a one-eyed activity! We look through the viewfinder with one eye, adjust settings, compose our shot, and snap the picture. If your composition is good, and you get the aperture, exposure and shutter speed correctly set, the image will turn out well. So study your manual, the exposure triangle, and composition. Auto-focus is great for getting the subject in focus - for that you need to know how to decide which focusing mode to use, and how to move the primary focus point around.
As for getting out of Auto, that is an excellent way to help you learn how to use your camera's capabilities. Learn what each of the other modes will do, and their effects on the images, try them out to solidify your understanding. Each one is useful in different situations, so it is handy to be aware of their special characteristics. A lot of people rely on Aperture-priority for all picture-taking. And a lot of others prefer to use Manual. It all comes down to knowing which ones work for you, so experiment and practice and learn!
Oh, and have a lot of fun, too...
May 18, 2017 14:01:54 #
blackest wrote:
For a great grounding in the use of flash I recommend this website
http://strobist.blogspot.ie/
actually you will probably be directed to the .com site. (its the same site anyway)
You may want to make sure you have a handle on the basics of exposure before moving on to flash.
http://strobist.blogspot.ie/
actually you will probably be directed to the .com site. (its the same site anyway)
You may want to make sure you have a handle on the basics of exposure before moving on to flash.
=============
Yes.!! The understanding of "What" does "WHAT" is the best way. You can take a class at a local college or evening "adult classes" - OR you can just Read and DO.... (Do while you are Reading)....
The Attached [PDF] I usually hand out to my first-time students.... It is not really "in-depth" in the study of Photography.. But rather a well explained "This does This" -- Bryan Peterson's book of "Understanding Exposure" does a better job (I use it as a "Textbook" for most of my students) ... In that a link was provided earlier - I shall not post that ----- However....
Here is the [PDF] from National Geographic....
May 18, 2017 14:09:37 #
SusanFromVermont , first thank you for the response. Yes I do try to determine distances in various ways, I do want to mention that I don't consider it a handicap, I only mentioned it because I never see the pictures with depth to them. A tree that might be 10 feet behind a subject is all flat to me. It is this way in real life as well If I was looking at a subject that is 10 feet in front of a tree, the tree looks like it is touching the person. So I mentioned it to see if there were ways that would help to judge things like that. So I constantly try to guess what looks like a good composed shot (not with much luck) I will also be reading more on the exposure triangle. I agree with everyone so far and plan on purchasing the book by Brian Petterson that has been suggested. I also assume once I understand what happens with the different setting that the pictures will look better to my wife/friends. A good example and I have done this is I had my wife take a picture in Auto some ducks in a pond just floating around near a fallen tree. I then took the same picture with same camera. Showed both to my daughter and she can point out the one I take every time. Each time is it similar results mine seem flat hers does not (of course to me they are both flat) I do now think I know some of that resolve is my DOF. So I will study, read, practice, take all the advice I can get and keep on shooting.
Also you mentioned that you use one eye, but your brain knows how to fill in the blanks, it expects images from both eyes and will tend to try to fill in the missing points when it can. My brain does not know how to fill in the blanks. :)
Thanks again for the reply.
Also you mentioned that you use one eye, but your brain knows how to fill in the blanks, it expects images from both eyes and will tend to try to fill in the missing points when it can. My brain does not know how to fill in the blanks. :)
Thanks again for the reply.
May 18, 2017 14:38:24 #
darrelm1967 wrote:
SusanFromVermont , first thank you for the respons... (show quote)
I hope its not rude to ask but can you get depth cues from light and shadow? Generally good use of light and shadow will make a photograph, after all it is flat and only the visual cues in the image can hint towards depth.
May 18, 2017 15:44:05 #
Blackest, yes I can see shadows/lighting, and I do not find your question rude at all. I have not thought about that before, that could be my missing piece. Again thank you for the reply.
May 18, 2017 15:49:20 #
blackest wrote:
I hope its not rude to ask but can you get depth cues from light and shadow? Generally good use of light and shadow will make a photograph, after all it is flat and only the visual cues in the image can hint towards depth.
Light and shadow are one of many ways to get depth cues. Here is one way to experiment with that idea: Find a ball, smooth if possible. In a somewhat darkened room, shine a direct [not diffuse] light on it from different directions. From the front, it will make shadows on each side. From the side it will make a shadow on the other side. And there are also the ground shadows to see.
Never having had to deal with monocular vision myself, even temporarily, I cannot speak from experience. I am curious why your daughter's photo and your photo are different. With the same settings and from the same distance, with pretty much the same composition, what is happening that makes yours vary from hers?
When people are blind, they receive instruction in how to use other senses to explore the world around them and to cope with daily living. Perhaps your ophthalmologist can suggest ways to improve your perspective and ways to improve your way of seeing.
May 18, 2017 16:10:15 #
WayneT,
I am now the proud owner of "Understanding Exposure, Fourth Edition: How to Shoot Great Photographs with Any Camera" I will start my reading.
I am now the proud owner of "Understanding Exposure, Fourth Edition: How to Shoot Great Photographs with Any Camera" I will start my reading.
May 18, 2017 16:16:52 #
SusanFromVermont,
I will try that with the ball later tonight and see what comes of it. I have also purchased the book that many have recommended as well and will start my studying.
I will try that with the ball later tonight and see what comes of it. I have also purchased the book that many have recommended as well and will start my studying.
May 18, 2017 16:18:36 #
Ctrclckws,
I will attempt to recreate a similar shot and upload to the forum. Thank you great example.
I will attempt to recreate a similar shot and upload to the forum. Thank you great example.
May 18, 2017 16:20:15 #
blackest,
Thank you for the link, I have it book marked. I will do as others have suggested and concentrate on the basic first then the flash.
Thank you for the link, I have it book marked. I will do as others have suggested and concentrate on the basic first then the flash.
May 18, 2017 17:51:58 #
darrelm1967 wrote:
Ctrclckws,
I will attempt to recreate a similar shot and upload to the forum. Thank you great example.
I will attempt to recreate a similar shot and upload to the forum. Thank you great example.
Your welcome, it was done handheld and in a hurry, so there's probably some camera movement there.
Mostly it was done for me to see the effects of aperture.
Try new things, it's how we learn!
May 18, 2017 18:55:21 #
Ctrclckws;
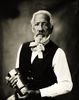
So this is a close as I can come to your example at this time.
Conditions:
D7100 50mm on tripod ISO-200 about 45 inches from lens to yellow car, no flash. I Adjust the shutter speed and using the exposure meter I kept it centered to try and maintain the same exposure. So I can diffidently see how the two need work together.
Time to start reading. :)
Picture 1 f/16 2.5 sec
(Download)
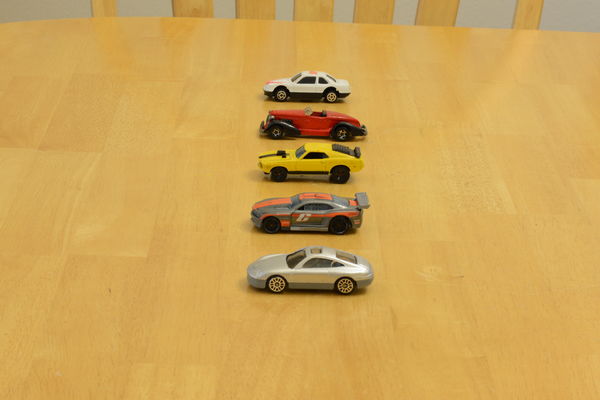
Picture 2 f/8 0.62 sec

(Download)
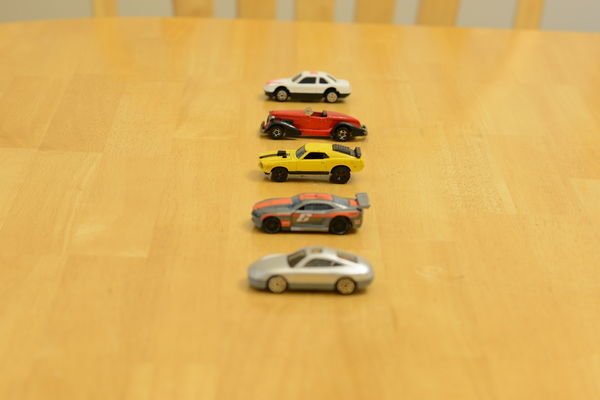
Picture 3 f/4 1/6 sec
(Download)
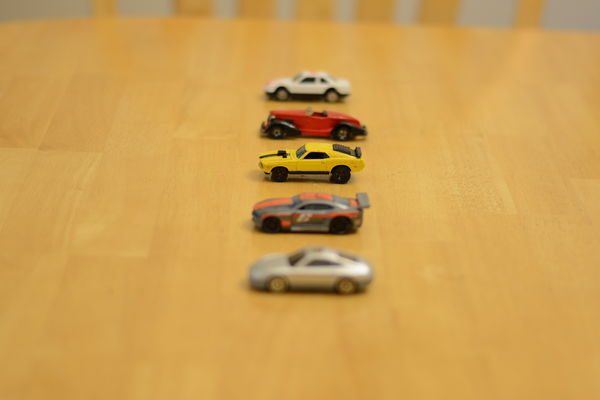
Picture 4 f/1.8 1/30 sec
(Download)
May 18, 2017 19:14:25 #
May 18, 2017 22:48:34 #
darrelm1967 wrote:
First thank you for this site. I am trying to get... (show quote)
Let me jump in here and hopefully clear up some of your definitions:
1. ISO sets the sensitivity of the sensor to light. In the film days, an ISO of 400 meant that the film (in digital cameras, it is now the sensor) had more silver grains in the emulsion than an ISO 200 film did. The extra grains were there to provide more sensitivity to the limited amount of light in darker conditions. However, if you used 400 in bright daylight, you could overexpose the film emulsion by hitting it with bright light. In a digital camera, the ISO is steadily increased when the shooting conditions are increasing darker. All you are doing is increasing the sensitivity of the sensor to light. Similarly if you increase the ISO to 400, 800, or 1,000 in bright sunlight, you are going to burn out the image where there is bright light. I'm not so sure that your definition of "how fast the sensor can capture the image" is correct. The sensor captures an image at the same rate, all the time, depending upon shutter speed and aperture. I am oversimplifying this and I am certain that some of our tech geek hogs can make it more scientific.
2. Shutter speed is how long the shutter stays open to capture the light coming through the lens. So your definition is correct.
3. Aperture is the amount of light that the lens allows. It has nothing to do with focus area or "how big the area is to focus on". The lens focuses at the same aperture all the time and does not change its setting until the moment of exposure. As a previous commenter mentioned, a smaller number 1.8, versus 16, for instance, is a ratio of lens length. f/1.8 will give you an extremely shallow depth of field because the lens is wide open. Depth of field with foreground subject and background in focus generally will not occur until you get to f/8. I realize this is also an oversimplification, but hopefully you can understand what I am trying to define for you.
I just wanted you to understand those 3 parts of the exposure triangle: ISO, shutter speed, and aperture.
If you want to reply, then register here. Registration is free and your account is created instantly, so you can post right away.