Check out Street Photography section of our forum.
Graduated Neutral Density Filters Question
Feb 9, 2017 19:24:52 #

Feb 9, 2017 19:31:51 #
TheDman
Loc: USA
mcveed wrote:
Maybe, like me, they would rather be in the field taking pictures than sitting indoors fiddling with a computer.
I'd rather be in the field taking pictures than in the field fiddling with unnecessary filters that I'm worried about scratching.
Feb 9, 2017 19:48:34 #

mcveed wrote:
Maybe, like me, they would rather be in the field taking pictures than sitting indoors fiddling with a computer.

Check out Commercial and Industrial Photography section of our forum.
Feb 9, 2017 19:52:41 #
mcveed wrote:
I use Lee GNDs as well as Singh Ray. They are resin and you have to be careful not to scratch them up. Glass filters basically have no effect on sharpness or contrast but they are fragile. They way I work in the field I would be so nervous about dropping an unframed piece of glass that I wouldn't have any fun.
Thank you. I am trying to get a decent filter without breaking the bank... Decided on the Singh Ray and ordered it tonight. The one I have came in a nice pouch and I just ordered the same size, just a different f-stop level.
Feb 9, 2017 22:32:58 #
Robert Bailey
Loc: Canada
And there we have it- the eternal divide-
those who try as much as possible to create the best possible image in the camera,
with minimal "computer work" required,
versus those who look to get a "basic" image in the camera,
and then love to do a multitude of adjustments with the computer.
those who try as much as possible to create the best possible image in the camera,
with minimal "computer work" required,
versus those who look to get a "basic" image in the camera,
and then love to do a multitude of adjustments with the computer.
Feb 9, 2017 22:36:17 #
TheDman
Loc: USA
Robert Bailey wrote:
And there we have it- the eternal divide-
those who try as much as possible to create the best possible image in the camera,
with minimal "computer work" required,
versus those who look to get a "basic" image in the camera,
and then love to do a multitude of adjustments with the computer.
those who try as much as possible to create the best possible image in the camera,
with minimal "computer work" required,
versus those who look to get a "basic" image in the camera,
and then love to do a multitude of adjustments with the computer.
No, it's the eternal divide between non-computer people who don't know what Photoshop can do and don't want to learn versus people who know that the task that grad NDs are designed for can be accomplished infinitely better in Photoshop.
Feb 9, 2017 23:55:12 #
Robert Bailey wrote:
And there we have it- the eternal divide-
those who try as much as possible to create the best possible image in the camera,
with minimal "computer work" required,
versus those who look to get a "basic" image in the camera,
and then love to do a multitude of adjustments with the computer.
those who try as much as possible to create the best possible image in the camera,
with minimal "computer work" required,
versus those who look to get a "basic" image in the camera,
and then love to do a multitude of adjustments with the computer.
I actually like it both ways! Get as good an image in the camera, and then edit so it looks the way I visualized it when shooting. Got to remember, the camera does not "see" the way our brain sees... And RAW can always do with some editing.
Check out Black and White Photography section of our forum.
Feb 10, 2017 00:07:35 #
TheDman wrote:
No, it's the eternal divide between non-computer people who don't know what Photoshop can do and don't want to learn versus people who know that the task that grad NDs are designed for can be accomplished infinitely better in Photoshop.
You are making assumptions about others without considering there might just be a desire to do as much as possible in PS. In my case, I have heard this already, that PS can do a better job. But only started using PS less than a year ago, still learning.
I am actually pretty handy with the computer and using LR and PS. But have not figured out how to bring back blown out highlights and shadows that have gone to black. This is why I am buying a grad ND filter, mostly for sunrise and sunset images.
Recently it was suggested to me that I always do bracketed shots and then put them into an HDR. I have done this, but do not always like the way things turn out. I end up editing the HDR! Also, depending on how slow I am, or how fast the clouds are moving, etc., an HDR would not necessarily work out too well. So while I often do bracketing, much of the time I will still only use the one shot with best exposure, dynamic range, etc. and edit that one.
If you would like to go into detail about how to do a better job just using PS and no grad ND filter, I would love to hear how it is done. Always trying to improve my skills.
Susan
Feb 10, 2017 00:52:34 #

SusanFromVermont wrote:
Actually, I am not looking for glass because it is too costly! The Singh Ray and most others are "CR-39 optical resin". Perhaps 20 years ago they were all glass, but technology has improved and most are made with the resin now. Also, I hand-hold them because putting the holder on and off is a pain... Just have to make sure they cover the entire lens!
Thanks for the comments.
Susan
Thanks for the comments.
Susan
With exception of a polarizer filter (glass), Cokin uses CR39 for all their "creative filters".
Because it is optically very good, CR39 is used to make many of the eyeglasses out there and happens to be much lighter than glass too.
Feb 10, 2017 02:25:24 #

mcveed wrote:
Maybe, like me, they would rather be in the field taking pictures than sitting indoors fiddling with a computer.
I would rather be taking pictures in the field, not fiddling with equipment (which I also have to carry in and out).
I prefer the pictures I take to be the very best possible; therefore I accept that part of the time will have to be spent on the computer--much better than the wet darkroom of yore!
That being said, it takes me about 10 minutes to do (much better) in Photoshop that which I would be spending 10 minutes on in the field with a grad. I check my scene and do a quick bracket.
Back home I use two as layers in PS. I add a layer mask to the top one, and just paint the transition exactly where I want it--following the contours of the mountains, for instance. No need to suffer with a straight transition, which always looks artificial except on a flat horizon. The brush can be any size and any softness, and if I make a mistake I just paint whatever was wrong back in.
Then the fun begins :)
Let's say I have a sunset over mountains. I now have absolute control over both the sky and the land--brightness, contrast, highlights, shadows, saturation, color--everything. Curves, exposure...I can get it exactly how I want it--both the sky and the land.
Grads were great in analog days, and I still have my set of 4"x5" Tiffens with matte box for shooting video. But now grads are about as useful as Wratten warming and cooling filters. With digital there is a so-much better way...
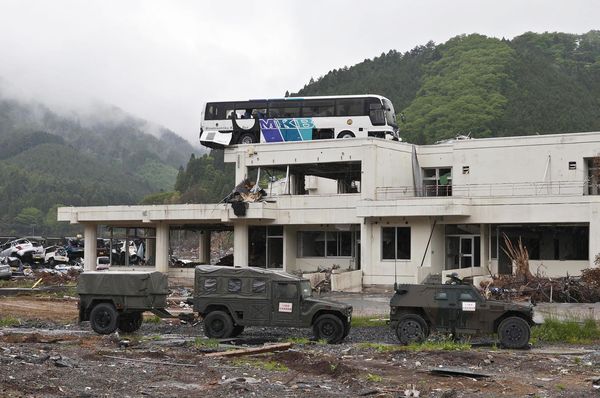
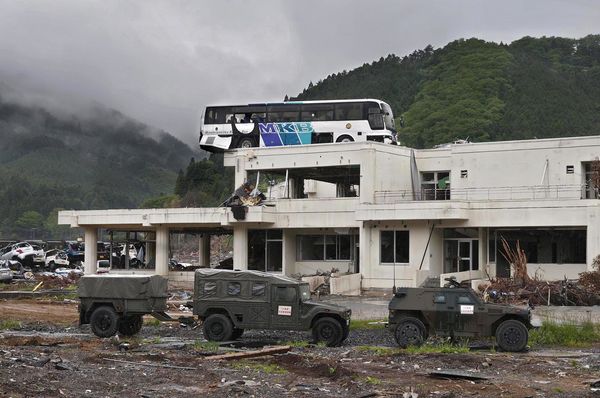
Here is a small and quick example. This was shot in 2011 in Tohoku after the tsunami. I had done a bracket series for HDR, but here I just took the normal exposure and the -2EV exposure and layered them together, then masked the sky from the latter to the former. It's not a perfect job (took five minutes), but it's a lot better than if I had used a .6 soft edge grad with its straight transition.
I understand the wish to take the picture all at once just as it will appear, and that is certainly valid insofar as it goes, but it is, I believe, worth knowing about the alternative, so that you can make an informed choice of tools to achieve your objective.
Feb 10, 2017 09:42:07 #
kymarto wrote:
...Back home I use two as layers in PS. I add a layer mask to the top one, and just paint the transition exactly where I want it--following the contours of the mountains, for instance. No need to suffer with a straight transition, which always looks artificial except on a flat horizon. The brush can be any size and any softness, and if I make a mistake I just paint whatever was wrong back in...
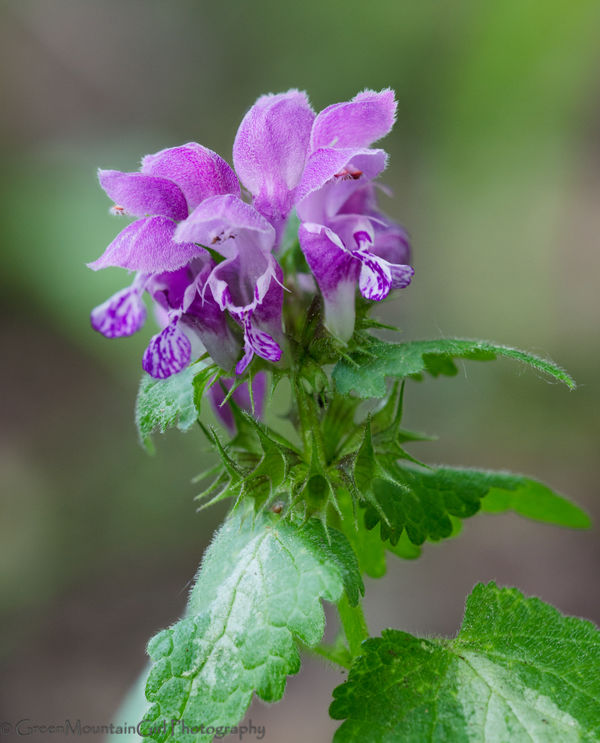
This is indeed a good way to do it, works very well for normally bright skies. I've even used more than two layers when the image has several areas that need to be adjusted. I took multiple shots of a very tiny flower - Purple Dragon (about 1/4") - with different focus points and then made a composite which turned out pretty well, so I do understand the process.
kymarto wrote:
Let's say I have a sunset over mountains. I now ha... (show quote)
A sunset or sunrise is a different kind of situation - no matter what you do in camera, that bright spot in the middle will be blown out. You can regain more details around that in the computer, which helps a lot. But the grad ND has worked so well for me, and saves a lot of time. I use the kind with the soft edge, so there is not that artificial-looking division only good with a straight horizon.
Perhaps as I increase my skills in PS, my opinion could change. And I do not mind the editing - in fact I enjoy it! So in the meantime, using both ND and editing, I am working the situation from both ends...
Composite image made up of 3 separate shots.
Feb 10, 2017 13:01:54 #
amfoto1
Loc: San Jose, Calif. USA
I'd recommend you first buy a Cokin Grad ND, to give using this type filter a try inexpensively first. The P-series are big enough for many lenses that use 77mm filters (I've used on lenses as wide as 17mm on full frame). You can either get the Cokin P-size filter holder and adapter ring... or just handhold the filter in front of the lens. Later if you find that Grad NDs work well for you, spend the money for better quality.
0.9 or three stop is a pretty strong Grad ND. For scenic shots, I don't think I've used stronger than 0.6 or two stop. Sometimes 0.3 or one stop is enough.
But, to be honest, I've got a set of Grad NDs that have been gathering dust for some years now....
I used them with film. But with digital, I've learned to do the same job with more precise control and better accuracy in post-processing (either using two in-camera exposures, when it's possible to make them, or with dual-processing of a single RAW file).
Filters can only do so much.... They basically all have a straight horizon line, right across the center. The circular screw-in type of Grad NDs are pretty much worthless because the horizon ends up the same place in every shot. The rectangular type are better because they can be slid up and down, adjusted to better match the horizon of an image. But even the rectangular type can't very well match up to a horizon that's not straight.... and I almost never take a photo where there's not a building or mountain or tree or whatever causing the horizon to be anything but perfectly straight.
Post-processing allows me to use layers and masks to more exactly "filter" select portions of an image. I also can change the color temp and tint, in the case of mixed light situations (such as sunlight and shadow).
As an example, there's absolutely no way a Grad ND could be used with this image....

Moving subject... so I couldn't make two different shots at different exposures and different White Balance, either.
Instead I "double processed" a RAW file in Lightroom and Photoshop to recover some of the background detail (both exposure and color temp & tint adjusted).... I first created a "virtual copy" in LR and adjusted it and the original differently... one for the shaded indoor subject, the other for the sunlit background... then passed both images off to Photoshop to use layers and masks to combine the "corrected" portion from each image. Here are the two different files used...

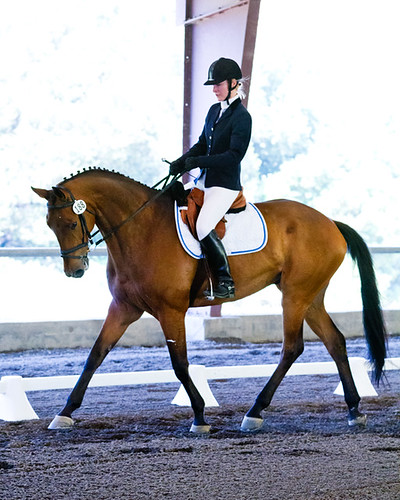
With some practice, depending upon the complexity of the image it might take longer to write out the process, than to actually do it.
At times I use almost exactly the same technique with scenic shots and other subjects...
Sure, I might have used a filter on the sky above, since it's a fairly straight horizon. But the result wouldn't have been the same and it was more easily done in post-processing. In this case, at the time the shot was taken I used a Circular Polarizer instead... Then I applied some graduated "filtering" from right to left during post-processing to better balance brightness of the sky... which was too strong on the right, too dark on the left (which a filter couldn't do without also effecting the fore- and middle-ground).
Yes, the process is similar to the "Focus Stacking" method you used for that flower example... but I think dual-processing for exposure and the color of light might be easier.
So, I recommend "buying cheap" Grad ND first and experimenting with using it, before fully committing to an expensive set. If you find it useful... great. Then buy a high quality set. Lee and Singh-Ray are good brands. Tiffen also makes a very high quality Grad ND (glass instead of optical plastic like the others). None of these are cheap though! If memory serves, Lee and Singh-Ray can be bought in Cokin P-series size (86mm), as well as 100mm, 150mm sizes (if needed).
NOTE: I just looked at the Cokin website.... they are under new ownership and have new sizes and lines of filters out... including some that are very high quality like the other brands. But, of course, they also cost a lot more.
Also... Grad ND not only come in different strengths... they also come with more or less sharp transition zones. Generally speaking, a "hard" transition is needed for longer focal lengths, while a "softer" one is typically needed with a wide angle lens. But you also might choose different transitions with different subjects.
0.9 or three stop is a pretty strong Grad ND. For scenic shots, I don't think I've used stronger than 0.6 or two stop. Sometimes 0.3 or one stop is enough.
But, to be honest, I've got a set of Grad NDs that have been gathering dust for some years now....
I used them with film. But with digital, I've learned to do the same job with more precise control and better accuracy in post-processing (either using two in-camera exposures, when it's possible to make them, or with dual-processing of a single RAW file).
Filters can only do so much.... They basically all have a straight horizon line, right across the center. The circular screw-in type of Grad NDs are pretty much worthless because the horizon ends up the same place in every shot. The rectangular type are better because they can be slid up and down, adjusted to better match the horizon of an image. But even the rectangular type can't very well match up to a horizon that's not straight.... and I almost never take a photo where there's not a building or mountain or tree or whatever causing the horizon to be anything but perfectly straight.
Post-processing allows me to use layers and masks to more exactly "filter" select portions of an image. I also can change the color temp and tint, in the case of mixed light situations (such as sunlight and shadow).
As an example, there's absolutely no way a Grad ND could be used with this image....
Moving subject... so I couldn't make two different shots at different exposures and different White Balance, either.
Instead I "double processed" a RAW file in Lightroom and Photoshop to recover some of the background detail (both exposure and color temp & tint adjusted).... I first created a "virtual copy" in LR and adjusted it and the original differently... one for the shaded indoor subject, the other for the sunlit background... then passed both images off to Photoshop to use layers and masks to combine the "corrected" portion from each image. Here are the two different files used...
With some practice, depending upon the complexity of the image it might take longer to write out the process, than to actually do it.
At times I use almost exactly the same technique with scenic shots and other subjects...
Sure, I might have used a filter on the sky above, since it's a fairly straight horizon. But the result wouldn't have been the same and it was more easily done in post-processing. In this case, at the time the shot was taken I used a Circular Polarizer instead... Then I applied some graduated "filtering" from right to left during post-processing to better balance brightness of the sky... which was too strong on the right, too dark on the left (which a filter couldn't do without also effecting the fore- and middle-ground).
Yes, the process is similar to the "Focus Stacking" method you used for that flower example... but I think dual-processing for exposure and the color of light might be easier.
So, I recommend "buying cheap" Grad ND first and experimenting with using it, before fully committing to an expensive set. If you find it useful... great. Then buy a high quality set. Lee and Singh-Ray are good brands. Tiffen also makes a very high quality Grad ND (glass instead of optical plastic like the others). None of these are cheap though! If memory serves, Lee and Singh-Ray can be bought in Cokin P-series size (86mm), as well as 100mm, 150mm sizes (if needed).
NOTE: I just looked at the Cokin website.... they are under new ownership and have new sizes and lines of filters out... including some that are very high quality like the other brands. But, of course, they also cost a lot more.
Also... Grad ND not only come in different strengths... they also come with more or less sharp transition zones. Generally speaking, a "hard" transition is needed for longer focal lengths, while a "softer" one is typically needed with a wide angle lens. But you also might choose different transitions with different subjects.
Feb 10, 2017 18:04:04 #
TheDman
Loc: USA
SusanFromVermont wrote:
A sunset or sunrise is a different kind of situation - no matter what you do in camera, that bright spot in the middle will be blown out.
That's the way it's supposed to be. The sun doesn't look like this to us, it looks like a blown out white spot. And no grad ND is going to change that.
SusanFromVermont wrote:
You can regain more details around that in the computer, which helps a lot. But the grad ND has worked so well for me, and saves a lot of time. I use the kind with the soft edge, so there is not that artificial-looking division only good with a straight horizon.
You can regain more details around that in the computer, which helps a lot. But the grad ND has worked so well for me, and saves a lot of time. I use the kind with the soft edge, so there is not that artificial-looking division only good with a straight horizon.
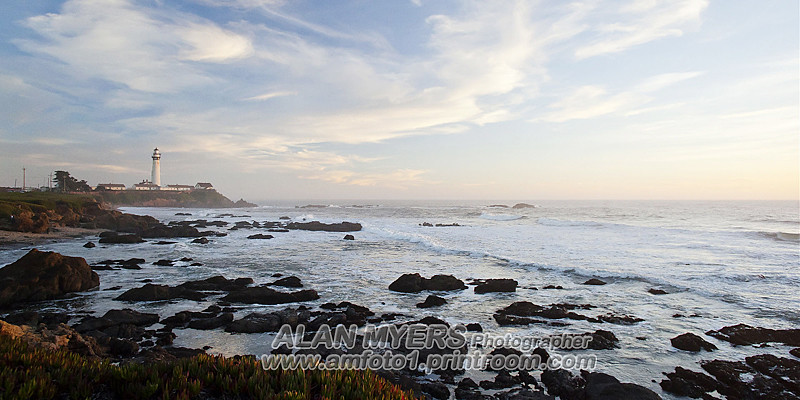
A soft grad is still straight, and how often is your horizon straight? Where would you have placed the grad line on this shot? Or this one ?
Once you understand the process you'll be able to replicate a grad ND in Photoshop in about 5 seconds, which would save you all that time fumbling around with filters.
Feb 10, 2017 18:07:11 #

TheDman wrote:
A soft grad is still straight, and how often is your horizon straight? Where would you have placed the grad line on this shot? Or this one ?
Once you understand the process you'll be able to replicate a grad ND in Photoshop in about 5 seconds, which would save you all that time fumbling around with filters.
Once you understand the process you'll be able to replicate a grad ND in Photoshop in about 5 seconds, which would save you all that time fumbling around with filters.
Nice examples, Dman...
Feb 10, 2017 18:33:33 #
If you want to reply, then register here. Registration is free and your account is created instantly, so you can post right away.
Check out Photo Critique Section section of our forum.