Dark photos, exposure correct
Sep 23, 2016 11:53:05 #
RWR
Loc: La Mesa, CA
Pablo8 wrote:
The OP was using an INCIDENT reading from a HAND-HELD METER. Another' advisor' who thinks the OP was using TTL readings through the camera. A little knowledge is a dangerous thing. Please read (and fully understand) what the OP was doing, AND USING, to achieve his exposure readings.
Incredible, isn’t it? In spite of what the OP, you, I and others have clearly stated, there are still some trying to pretend that the issue has something to do with the camera’s meter or that the subject is being metered. Oh! the absurdity of it all!! Methinks it’s a lost cause!

Sep 23, 2016 11:55:55 #

kenArchi wrote:
Why do digital photos come out dark. They look lik... (show quote)
I am a little confused. Is the first image done with the in camera meter at F8 and 1/400 sec, and the second image done with the incident meter, at 1/200? The second image is brighter, but you state that the first image was done with the incident meter.
I am assuming this is a typo and the reverse is true.
This may be a perfect example of when NOT to rely on an incident meter without making some adjustments based on your experience, camera's dynamic range and highlight headroom. The incident meter is correct for the light falling on the white building. However, the building's brightness is closer to the limit of what the camera's ability to record with any detail. The round object on the ground just to the right of the base of the chimney reads 249, 249, and 251 - R, G and B respectively when sampled in Adobe Camera Raw. Then you have the second lighting condition, the shade under the trees on the left and the foreground. Different light there. If you were to do an incident meter reading there, you'd find it would be a greater exposure.
The camera's meter is also correct. It does not know what is shade and what is white building walls. It does know that there is a large bright area, and a large dark area. It will try to expose the white area so as to retain detail but still show it as white, and let the shadows fall where they may. These are the rules generally built into matrix metering or evaluative metering. To me, the first image has more information to work with in the highlights.
Another approach might be to use the camera's spot meter function, read off that white round thing, and add 1-2/3 stop to the reading. This will likely place the tonal value of that object somewhere between your two exposures.
As the photographer, it is your choice how to meter, and later, how to handle this in post processing. You can get decent images from either. If you use the camera's interpretation, you would raise the exposure, perhaps the highlights, and may be the white level to clean up and brighten the walls, and adjust the shadow slider to lighten up the darker areas. Add a little clarity (microcontrast), and maybe a little dehaze, and you would have a reasonable image. If you were to use the second image, you still need to increase exposure, but maybe by half as much as the first image. Drop the highlights significantly and adjust the other areas as needed to realize your vision. Judging from the values represented int the small jpegs you posted, it does not appear that either image is over exposed.
The attached image has the adjustments that I suggested above.

Sep 23, 2016 12:02:57 #

Sep 23, 2016 12:03:53 #
kenArchi wrote:
Why do digital photos come out dark. They look lik... (show quote)
WHAT I SEE. The top one is underexposed, but shows detail in the wall stucco. The bottom one is overexposed, the wall is white with no detail, probably "burned out". And for what it is worth, my monitor has been calibrated and I get pretty good prints to my Canon PIXMA Pro 9000 printer and to commercial prints with out further adjustment.
Not sure why your two images look like more than 1 stop in difference (both wrong). Too bad you did not try one at f8 1/300 sec. I have had both a Gossen Luna Pro, Gossen Luna Six, and a Minolta Spot Meter. For a wide contrast shot like yours, you probably should have used Matrix metering, or used a Grey Card, or Manually set your expose "Zone System" style for where you want the most detail held in that scene.
One reason for not stopping at Raw with out processing, I'm sure I could get a "correct" looking image out of either of your two. They are not that bad, just need some photoshop work. I nearly all ways under expose about 1/2 stop and then bring the exposure or brightness up in PP. Good luck.
Sep 23, 2016 12:07:26 #

GENorkus wrote:
The Gossen meter is averaging everything. Try Spot Metering your camera on the "normally" light grass. Looks like your meter was averaging the bright wall. In my opinion, the wall of the first looks great where the wall in the 2nd one looks really close to being blown out. All that can be fixed to look good in post.
An INCIDENT reading is made through a translucent dome over the meter sensor, which is pointed at the light source, rather than the subject.
I'm pretty sure this scene is close to correctly exposed, given the reading, but a raw image would require quite a bit of adjustment in post-processing (or different camera menu settings for JPEG capture) to render it correctly. The brightness range of the scene exceeds what can be recorded, so some tonal compression of some sort is in order. HDR would come in handy.
Sep 23, 2016 12:10:35 #
Reinaldokool wrote:
Ignore previous post. I missed the word "incident". If he's skilled enough to use an incident light meter, the answer is likely not the usual simple ones like a missed ISO setting. My D7100 had a menu item to set a skewed exposure. Maybe???
The last resort I've used on a couple of occasions is to do a factory reset on the camera. It's a drag because you have to reset all the menu items, but it worked twice for me when I was tearing out my hair.
Sep 23, 2016 12:12:50 #
As mentioned before, you're looking at the difference between incident and reflected light. The handheld incident meter will give you the more accurate exposure since it's measuring the actual light falling on the scene. I always do this for landscape and portrait work. As a previous responder mentioned this is similar to the snowfall scenario where the camera meter will always underexpose the snow and make it gray just as what happened on the walls of the building in the 1st shot. The meter read the walls and underexposed. The 2nd exposure is more accurate and brings out more shadow detail because the incident light (sun) is not influenced by any reflectivity from a surface
Sep 23, 2016 12:14:33 #
Your camera is metering so the walls come out a mid tone grey, therefore the darker shadows will become even darker. If you use a hand held meter (as I do) you get more or less the same result. You need to do some test shots to see what the dynamic range of your camera is, don't go by what you see in the camera display and don't trust the histogram. Take your photos into lightroom or a similar program and see how many stops above "proper exposure" you can shoot before you get clipping on the right side of your histogram ( people call it shooting to the right), if you haven't "clipped" the highlights then all of the cameras info hasn't been blown away and you can use highlight, shadow, black, white along with clarity sliders to get a good photo. The shot will initially look washed out and flat but if you haven't clipped the highlights then things should work out. I use a sekonic light meter with a spot meter and the meter has been calibrated to my camera, in landscape I spot meter the brightest object and shoot about 2.5 stops open( more light), for example the meter spot meters the sky at f 5.6 at 1/1000 sec, so in manual mode I will shoot at f 5.6, three stops in shutter speed is 1/500, 1/250, 1/125 so 2.5 stops is around 1/180 sec. The sekonic 758 allows you to program a button for the poper exposure comensation. If you don't have a hand held spot meter, set you camera to spot meter take an exposure with your camera and the open up 2 to 3 stops using the manual shooting mode.
Sep 23, 2016 12:21:05 #

burkphoto wrote:
An INCIDENT reading is made through a translucent dome over the meter sensor, which is pointed at the light source, rather than the subject. ...
There has always been some ambiguity about where to point the incident meter, towards the light source or towards the camera.
According to Sekonic, "When you hold the meter near the subject, so that the dome is directed toward the camera position, it reads the ambient light and gives you incredibly precise exposure information regardless of the reflectivity of the subject."
I have also used it pointed towards the light source and this gives me a very slight reduction in highlights.
Sep 23, 2016 12:22:16 #
On top of everything, why are people making this harder than need be. Use a reluctance reading, spot, center weighted, matrix, what have you, hand held or in camera. Doing a mental zone system works well for me. Incident readings are popular with the movie industry, for cine cameras. Sure you might be able to calibrate your incident meter to your camera and monitor, but that could be a lot of work. What is 18% incident light? Ansel and company used reluctance metering.
"There has always been some ambiguity about where to point the incident meter". Only among those not understanding how or why to use the equipment.
If that confuses anyone, ever see a really ancient light meter calibrated in foot-candles or candles per square foot or in lumens? Truly confusing to convert to stops unless you are a scientist. As I recall the trick is at 64. 64 whats, I forget. I'm sure there is someone out there older than me that remembers how to work that old voodoo.
Sep 23, 2016 12:27:21 #
RWR
Loc: La Mesa, CA
Sludog wrote:
Your camera is metering so the walls come out a mid tone grey, therefore the darker shadows will become even darker. If you use a hand held meter ...
You don't have to prove me right, you know!
Sep 23, 2016 12:27:59 #
kenArchi wrote:
Why do digital photos come out dark. They look lik... (show quote)
What does "incident" mean? It is the light falling on a surface. "Reflected" light is the light reflected from a surface, the light the camera sees. You take reflected reading by aiming the meter at the subject. You take incident reading by aiming the meter at the light source. After 35 years it gets instinctive.
Sep 23, 2016 12:32:45 #
kenArchi
Loc: Seal Beach, CA
I never use and have never used reflected light readings. I have a Minolta, Sekonic flash meteres and a Gossin incedent meter.
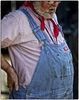
Here are samples of my work from film. Using natural light and multiple flashes where needed.
This work requires very accurate meter reading and exposures.
Imagine taking these photos without ANY test samples and all you have is your Minolta flash meter.
Here are samples of my work from film. Using natural light and multiple flashes where needed.
This work requires very accurate meter reading and exposures.
Imagine taking these photos without ANY test samples and all you have is your Minolta flash meter.

Sep 23, 2016 12:36:35 #
kenArchi wrote:
Why do digital photos come out dark. They look lik... (show quote)
How about this WAG:
Since you say that the 'dark' image is correct exposure and the 'bright' image is how you see it then perhaps you should consult an opthamalogist or an optomerist an confirm that you're 'seeing the world' in the 'correct light?'
The world was sure 'brighter' after I had cataract surgery.
Sep 23, 2016 12:39:01 #
kenArchi wrote:
Why do digital photos come out dark. They look lik... (show quote)
OK, am I just missing something? After reading 4 pages of back and forth, the OP states that the second picture was taken one full stop brighter (f8 @ 1/200 vs. f8 @ 1/400 for the first). Isn't that just the simple reason for brighter image?
If you want to reply, then register here. Registration is free and your account is created instantly, so you can post right away.