How to Make mountains stand out
Apr 1, 2016 12:28:49 #

rgrenaderphoto wrote:
In Lightroom, you can adjust the exposure and use the DeHaze filter to bring out detail in the sky. A horizontal gradient in blue tones can add to the image. That and a final tweak of contrast.
This and maybe add a little more contrast to the image at the top through the use of the Lightroom "Graduated Filter", which is mentioned.
Apr 1, 2016 12:31:35 #
Leppi_Tobe
Loc: Minnesota
[quote=Meives]
Thanks for the tip! And is there a setting on cameras to do HDR shots? I don't think mine has that feature.
Leppi_Tobe wrote:
Always post and click on "store original" when asking questions. This allows for a better download and the camera data will give tips to advise. Thank you. David You could re-post.
I would have taken this in HDR. One shot would be exposed for the mountains, one in the middle (like yours) and one for the forest.
I would have taken this in HDR. One shot would be exposed for the mountains, one in the middle (like yours) and one for the forest.
Thanks for the tip! And is there a setting on cameras to do HDR shots? I don't think mine has that feature.
Apr 1, 2016 12:32:12 #
Leppi_Tobe
Loc: Minnesota
flyguy wrote:
This and maybe add a little more contrast to the image at the top through the use of the Lightroom "Graduated Filter", which is mentioned.
Good idea, thank you!
Apr 1, 2016 12:33:07 #
Leppi_Tobe
Loc: Minnesota
bdo wrote:
DXO Optics Pro 10 has a feature called "ClearView". I use it fairly often to get rid of atmospheric haze. DXO OP 10 is a stand-alone program, and not inexpensive, but I use it both for haze reduction and noise reduction (PRIME), and I am very satisfied with the results.
Good to know! Thank you! I'll try to find that feature in other applications.
Apr 1, 2016 12:54:15 #

On days where the light is less than optimal, fix your images in post. The new Dehaze filter in Photoshop and in Lightroom works well on this kind of image. Best done on a raw image because the sky will get a banding effect if the image is a jpg sometimes.
Leppi_Tobe wrote:
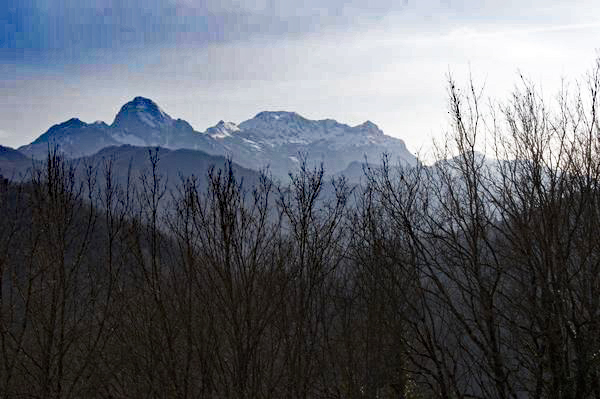
Hi everyone, Im wondering how people seem to get mountains in perfectly clearity. I could be there at the wrong time of day, the wrong clearness of the day, or do they simply use post editing techniques?
The photo was taken with my Nikon D3200 with...
ISO = 200
F stop = 20
Shutter Speed = 1/160
Shot with an 18-55 lens
The photo was taken with my Nikon D3200 with...
ISO = 200
F stop = 20
Shutter Speed = 1/160
Shot with an 18-55 lens
Apr 1, 2016 12:59:11 #

Leppi_Tobe wrote:
Hi everyone, Im wondering how people seem to get mountains in perfectly clearity. I could be there at the wrong time of day, the wrong clearness of the day, or do they simply use post editing techniques?
The photo was taken with my Nikon D3200 with...
ISO = 200
F stop = 20
Shutter Speed = 1/160
Shot with an 18-55 lens
The photo was taken with my Nikon D3200 with...
ISO = 200
F stop = 20
Shutter Speed = 1/160
Shot with an 18-55 lens
Leppi, I tried, but the image is actually a bit too small for me to use my technique.
In the future, when you post, click the store original "button" to the right of where you choose file. That'll post the original image, as well as the "thumbnail" view we all see. Additionally, there is a file size limit for posting. I'm not sure what it is. You'd best look that up in the Help selection at the top of the page.
--Bob
Apr 1, 2016 13:45:32 #
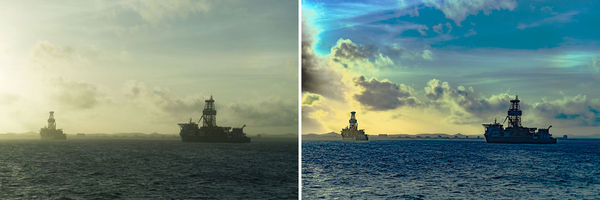
I agree that a raw files gives you a ton more information to work with. Here is a photo from a vacation off of St. Kitts that I took from a Cruise ship. The two views are, of course, directly from the camera as shot and post-processed which was mainly done in Adobe Camera Raw that comes with both lightroom and photoshop. Haze and clarity sliders were mainly used.
Apr 1, 2016 14:22:57 #

Atmospheric haze comes and goes, but one thing that hasn't been mentioned yet is distance. Even on relatively clear days, most distant objects are going to be noticeably hazier than the close stuff. Because of that, there's something to be said for staying wide angle and getting closer to the hills/mountains.
That won't always be an option, but when it is you should make the extra effort. And when you do, don't concentrate on getting just the mountain in the frame. Almost anything in the foreground will usually be better than nothing, but if you're willing to walk around and check out the area, you should be able to find something like a stream, lake, gate or some such to put in the foreground.
That won't always be an option, but when it is you should make the extra effort. And when you do, don't concentrate on getting just the mountain in the frame. Almost anything in the foreground will usually be better than nothing, but if you're willing to walk around and check out the area, you should be able to find something like a stream, lake, gate or some such to put in the foreground.
Apr 2, 2016 02:33:16 #
Leppi_Tobe
Loc: Minnesota
Jer wrote:
I agree that a raw files gives you a ton more information to work with. Here is a photo from a vacation off of St. Kitts that I took from a Cruise ship. The two views are, of course, directly from the camera as shot and post-processed which was mainly done in Adobe Camera Raw that comes with both lightroom and photoshop. Haze and clarity sliders were mainly used.
Wow! What a difference! I'll try that!
Apr 2, 2016 08:51:08 #
rogerl
Loc: UK (Harrogate, North Yorkshire)
I'm just learning Photoshop Elements 14 (Christmas present) so I took the liberty of running your photo through Auto Haze Removal. This is the result (I lightened it a little as Haze removal tends to darken a touch).
Apr 2, 2016 08:56:12 #
Leppi_Tobe wrote:
Thanks for the tip! And is there a setting on cameras to do HDR shots? I don't think mine has that feature.
It's best to have software such as Photomatix Pro. Many cameras have two settings that are needed. One is the burst. 3 shots in burst are enough. The second setting is the exposure for each shot. I usually to one -1 Ev, one even, and +1. The Photmatix combines them. It's a bit of learning to start, but worth it in the end. Good luck. David
Apr 2, 2016 12:00:43 #
rgrenaderphoto wrote:
In Lightroom, you can adjust the exposure and use the DeHaze filter to bring out detail in the sky. A horizontal gradient in blue tones can add to the image. That and a final tweak of contrast.
Ditto to this. :thumbup:
Apr 2, 2016 13:18:31 #
Time of day with a higher F-stop. The bare trees are an obstruction to the mountains....different time of green foliage could complement a dynamic orange and yellow sun lighting of the mountain range. With a higher F-stop you could have more depth of field to bring the forest into focus with the mountain range. Would love to be standing there!
Apr 5, 2016 17:15:53 #
Apr 6, 2016 10:36:49 #
Leppi_Tobe
Loc: Minnesota
bdk wrote:
A polarizing filter helps cut thru the haze.
Yes!! I didn't think about that!! I don't have one but I know some somebody who does so I'll try that next time!
If you want to reply, then register here. Registration is free and your account is created instantly, so you can post right away.