Tutorial - In Search of a Credible Color Pencil Sketch Effect
Mar 25, 2015 08:32:16 #

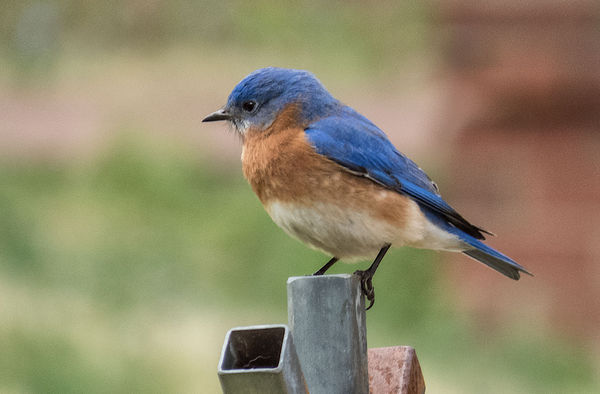
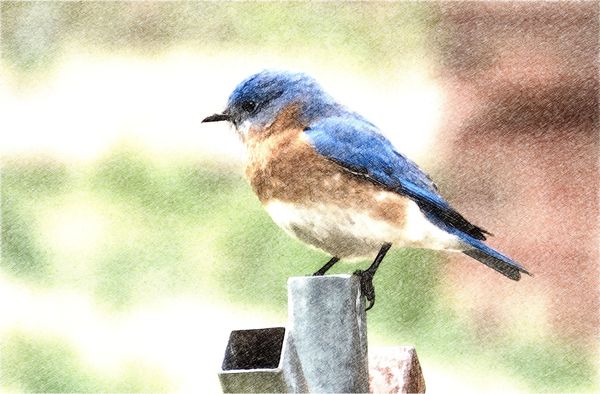
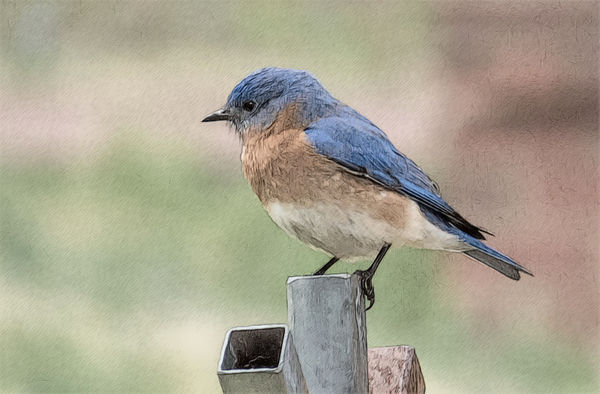
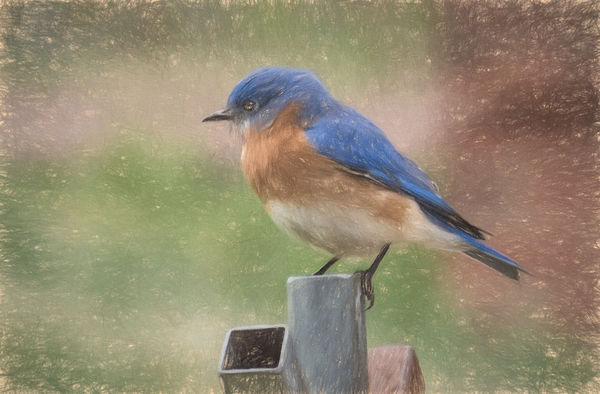
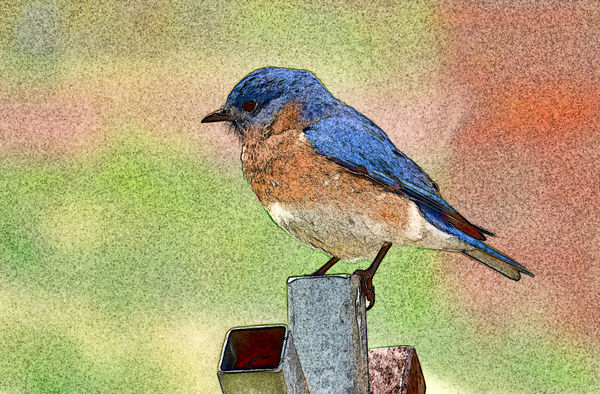
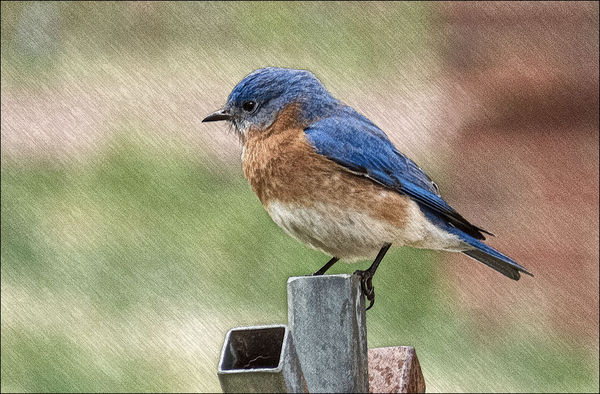
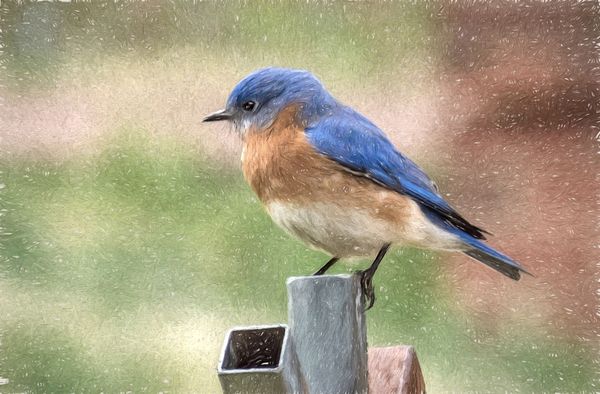
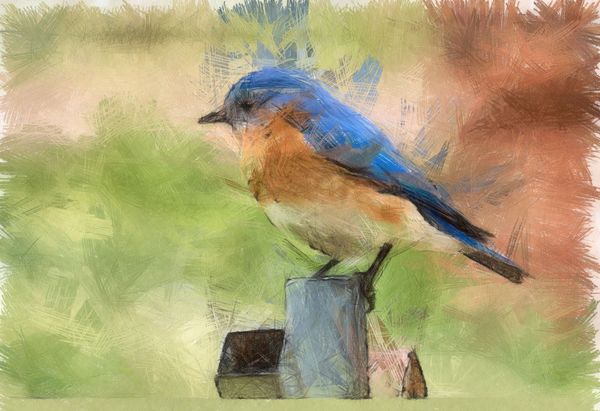
I have been searching for a good Color Pencil Sketch effect for some time now as a counterpart to the black and white sketches I have produced in my "Sketch Series". I have been largely disappointed with various software products attempt at producing such effects - photos 2 through 5 show examples of the results from 4 separate off-the-shelf plugin filters.
I wanted an effect that definitely looked like a sketch, but preserved original colors and intricate details. As I say, this is an ongoing search, and I actually changed this presentation as late as last night because it wasn't until then that I finally settled on a combination of layers from NIK Viveza, Smart Photo Editor, and Topaz Simplify that seem to work. I seemed to know from the start I would have to "create my own".
So, to the basics. In just about any sketch, you need to choose your subjects carefully. The background should be very simple, probably blurred, and with wide open expanses of the same color. The main subject, too, should have a fairly simple color scheme where colors stand apart from one another (not subtle changes in hue which are usually lost in translation).
My solution:
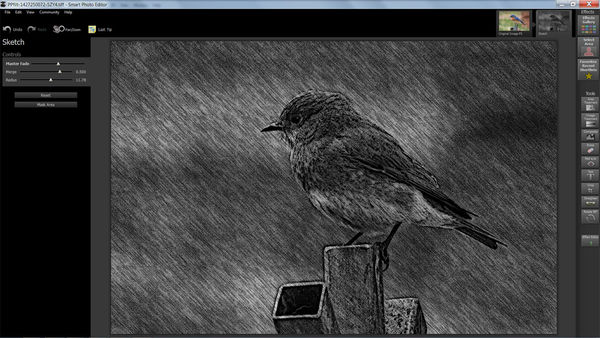
Photo 6: Starting with the original photograph, I created a Duplicate Layer, then opened Smart Photo Editor and invoked the preset called "Sketch". This creates a very stark sketch in Black and White.
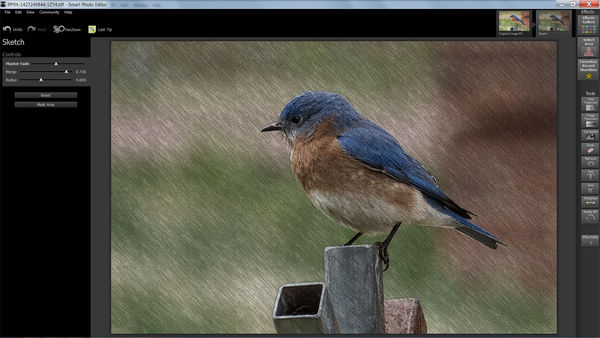
Photo 7: Used the Master Fade slider moved to the left to merge the color photo with its b&w overlay. Adjusted the Merge and Radius sliders until I got a fine "shading" effect, but in color. Saved the results.
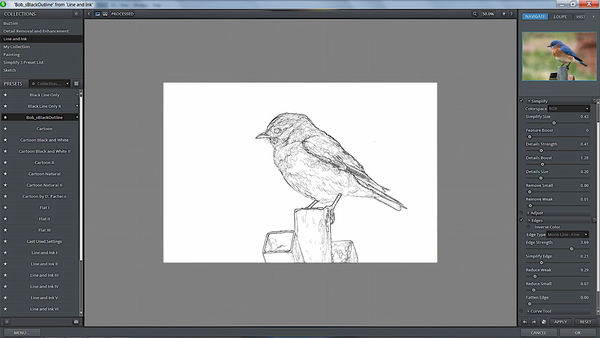
Photo 8: I selected the Background layer again, then created a new Duplicate Layer. This time I called Topaz Simplify and selected a Custom Preset I have named Bob_SBlackOutline. This creates a fine edged black outline of the subject on a pure white background. I use this to create a sharply defined subject, separated it from its background.
If any of you are interested I have uploaded a copy of this preset to this topic. If you click on the Download button next to "Bob_SBlackOutline Topaz Simplify (Line and Ink) Preset" you can download the preset then import it to Topaz Simplify.
Photo 9: I moved the Black Outline Layer above the Smart Photo Editor colored sketch, then used the "Multiply" blending mode to create a subtle outline around the sketch. I then made Opacity changes and Brightness/Contrast changes to blend the photo together.
I fully realize I have not exhausted all the possibilities that are out there for creating this effect. I have not tried Picasa, GIMP, or Corel Paintshop's filters. If any of you would like to modify the original photo and apply one of their filters, I'd love to see the results. I'm always open to suggestions for improvement.
I wanted an effect that definitely looked like a sketch, but preserved original colors and intricate details. As I say, this is an ongoing search, and I actually changed this presentation as late as last night because it wasn't until then that I finally settled on a combination of layers from NIK Viveza, Smart Photo Editor, and Topaz Simplify that seem to work. I seemed to know from the start I would have to "create my own".
So, to the basics. In just about any sketch, you need to choose your subjects carefully. The background should be very simple, probably blurred, and with wide open expanses of the same color. The main subject, too, should have a fairly simple color scheme where colors stand apart from one another (not subtle changes in hue which are usually lost in translation).
My solution:
Photo 6: Starting with the original photograph, I created a Duplicate Layer, then opened Smart Photo Editor and invoked the preset called "Sketch". This creates a very stark sketch in Black and White.
Photo 7: Used the Master Fade slider moved to the left to merge the color photo with its b&w overlay. Adjusted the Merge and Radius sliders until I got a fine "shading" effect, but in color. Saved the results.
Photo 8: I selected the Background layer again, then created a new Duplicate Layer. This time I called Topaz Simplify and selected a Custom Preset I have named Bob_SBlackOutline. This creates a fine edged black outline of the subject on a pure white background. I use this to create a sharply defined subject, separated it from its background.
If any of you are interested I have uploaded a copy of this preset to this topic. If you click on the Download button next to "Bob_SBlackOutline Topaz Simplify (Line and Ink) Preset" you can download the preset then import it to Topaz Simplify.
Photo 9: I moved the Black Outline Layer above the Smart Photo Editor colored sketch, then used the "Multiply" blending mode to create a subtle outline around the sketch. I then made Opacity changes and Brightness/Contrast changes to blend the photo together.
I fully realize I have not exhausted all the possibilities that are out there for creating this effect. I have not tried Picasa, GIMP, or Corel Paintshop's filters. If any of you would like to modify the original photo and apply one of their filters, I'd love to see the results. I'm always open to suggestions for improvement.
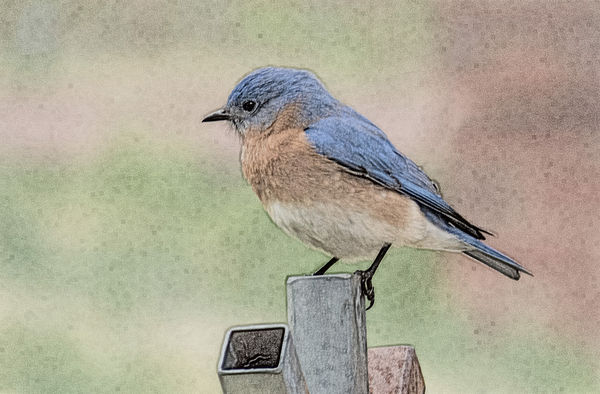
Original Photo
(Download)
FotoSketcher (Pencil Sketch 4)
(Download)
AKVIS Sketch (Default)
(Download)
Topaz Impression (Color Pencil Sketch 3)
(Download)
Topaz Simplify (Color Sketch 2)
(Download)
Smart Photo Editor (Sketch)
(Download)
Smart Photo Editor (Sketch with Master Fade and Merge modifications
(Download)
Topaz Simplify (Bob_SBlackOutline Custom Preset)
(Download)
Bob_SBlackOutline Topaz Simplify (Line and Ink) Preset
Attached file:
(Download)
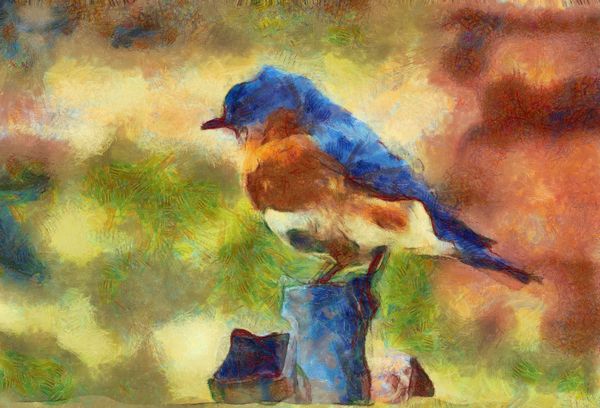
Color Pencil Sketch - Bluebird
(Download)
Mar 25, 2015 08:47:13 #

Bob Yankle wrote:
Place holder
Very nice Bob, the Avis Sketch Default & the SPE with master fade are the best in this group. I'm going by what a real colored pencil sketch looks like from a colored pencil artist. I think you are really on to something here my friend and I like it very much! I hope I haven't been too clumsy in my explanation, here is a link to colored pencil sketches from colored pencil artists. http://www.google.com/search?q=colored+pencil+sketches&espv=2&biw=1920&bih=895&tbm=isch&tbo=u&source=univ&sa=X&ei=p60SVZeNNJKOyATO5oDQBQ&ved=0CB0QsAQ
Mar 25, 2015 08:47:27 #
The 1st Topaz (color Sketch 2)is the one I like. But, you'll probably find opinions of what they "should" look like and everyone probably right.
Nice work and helpful for me to see the differences.
tks,
RegisG
Nice work and helpful for me to see the differences.
tks,
RegisG
Mar 25, 2015 08:56:09 #

Bob Yankle wrote:
Place holder
Thanks Bob...
I tried the Topaz Impression pencil method.
Here is my attempt.
Mar 25, 2015 09:02:06 #

Although it's a bit grainy, my vote is for Topaz Simplify (Color Sketch 2)
...but that's just me.
...but that's just me.
Mar 25, 2015 09:18:24 #
jwt wrote:
Thanks Jim. I was afraid everyone would jump the gun on this tutorial, and I was right. It took a while to write up the comment, so you didn't get the chance to read my explanation. At any rate, beauty is in the eye of the beholder, and this is just one among thousands of ways to process a photo. And yes, I'm fully cognizant that does not look remotely like what a color pencil artist produces. But no one so far has been able to reproduce that effect in software that I am aware of.Very nice Bob, the Avis Sketch Default & the S... (show quote)
Mar 25, 2015 09:19:43 #
RegisG wrote:
Thanks for your comments Regis. I thought it might be very helpful to show comparisons.The 1st Topaz (color Sketch 2)is the one I like. But, you'll probably find opinions of what they "should" look like and everyone probably right.
Nice work and helpful for me to see the differences.
tks,
RegisG
Nice work and helpful for me to see the differences.
tks,
RegisG
Mar 25, 2015 09:21:47 #
Moxie wrote:
Thanks Moxie. I knew you were interested in this topic. I've extended an open invitation for others to submit their renditions ..... thanks for showing me yours,Thanks Bob...
I tried the Topaz Impression pencil method.
Here is my attempt.
I tried the Topaz Impression pencil method.
Here is my attempt.
Mar 25, 2015 10:46:07 #
Ebbote did a pretty good job on his Aviation Sketch:
http://www.uglyhedgehog.com/t-293980-1.html
I think he told me he used your PhotoSketcher.
http://www.uglyhedgehog.com/t-293980-1.html
I think he told me he used your PhotoSketcher.
Mar 25, 2015 12:37:38 #
Indi wrote:
The day before yesterday, my solution actually incorporated FotoSketcher Indi. The drawback for me is that it stole a lot of color in the process, and I wanted to preserve as much as I couldEbbote did a pretty good job on his Aviation Sketch:
http://www.uglyhedgehog.com/t-293980-1.html
I think he told me he used your PhotoSketcher.
http://www.uglyhedgehog.com/t-293980-1.html
I think he told me he used your PhotoSketcher.
Mar 25, 2015 12:43:33 #

BOB, your bird has beautiful simplicity of form, shape, composition, and color. Below is one of your specification, a sketch retaining detail and color .... but I added one of my favorite as seen photographers...Vincent van Gogh....
DYNAMIC AUTOPAINTER PENCIL SKETCH REALISTIC
(Download)
BOB's BLUE BIRD PAINTED BY ONE EAR ARTIST
(Download)
Mar 25, 2015 13:04:19 #
dpullum wrote:
Thanks dpullum. I've been curious about DAP for a while, but haven't quite bitten the bullet on its purchase. I don't think a real good job as far a sketch effect goes, but I'm pretty sure it has some other good qualities I may be able to use later.BOB, your bird has beautiful simplicity of form, shape, composition, and color. Below is one of your specification, a sketch retaining detail and color .... but I added one of my favorite as seen photographers...Vincent van Gogh....
Mar 25, 2015 13:13:09 #

Bob Yankle wrote:
If any of you would like to modify the original photo and apply one of their filters, I'd love to see the results. I'm always open to suggestions for improvement.
Here's an amateur's attempt ... done in PSE 12.
Mar 25, 2015 13:19:37 #
dannac wrote:
Thanks for your rendition dannac. The steps I'd laid out about above could be repeated in PSE12/13 with very little modification.Here's an amateur's attempt ... done in PSE 12.
Mar 25, 2015 14:26:59 #
Bob Yankle wrote:
The day before yesterday, my solution actually incorporated FotoSketcher Indi. The drawback for me is that it stole a lot of color in the process, and I wanted to preserve as much as I could
I can see what you mean about losing color.
If you want to reply, then register here. Registration is free and your account is created instantly, so you can post right away.