Check out Sports Photography section of our forum.
Can the shadows on the faces be corrected?
Mar 18, 2015 08:08:11 #

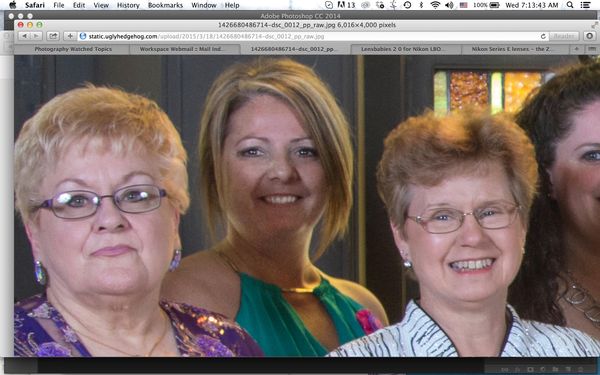
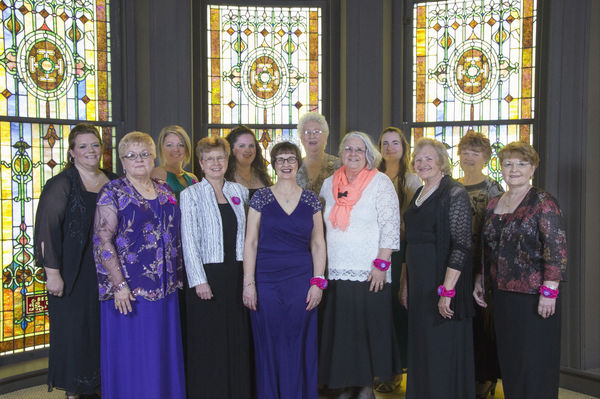
We used a Novatron Light set up and obviously did not get the correct positioning of the lights!
Is there any way the shadows can be removed or at least lightened up a bit?
Also, converted the photo from RAW to jpg.
Nothing else done to the file.
Any help is appreciated.
Is there any way the shadows can be removed or at least lightened up a bit?
Also, converted the photo from RAW to jpg.
Nothing else done to the file.
Any help is appreciated.

Mar 18, 2015 08:11:33 #
Work on the RAW file and use the spot healing tool in Lightroom. This should alleviate most of your problems... well at least with the photo. :D
Mar 18, 2015 08:14:12 #
SqBear wrote:
We used a Novatron Light set up and obviously did not get the correct positioning of the lights!
Is there any way the shadows can be removed or at least lightened up a bit?
Also, converted the photo from RAW to jpg.
Nothing else done to the file.
Any help is appreciated.
Is there any way the shadows can be removed or at least lightened up a bit?
Also, converted the photo from RAW to jpg.
Nothing else done to the file.
Any help is appreciated.
Lightroom has a Shadows slider that works wonders.
EDIT: I did a couple of quick modifications in LR 5.7 - increasing exposure and brightening the shadows. Bi-guy's idea of using the healing brush is a good suggestion for getting at individual areas.

Mar 18, 2015 08:16:01 #
big-guy wrote:
Work on the RAW file and use the spot healing tool in Lightroom. This should alleviate most of your problems... well at least with the photo. :D
Hope you don't mind. I did some editing in Corel and I think brightened it. If you do mind I apologise profusely.

Mar 18, 2015 08:22:20 #
Mar 18, 2015 09:12:15 #

Only some of the faces suffer from the shadows. If it were me, I might use the dodge and burn tool in PHOTOSHOP for just those faces. (I'm just dong a crappy job on my laptop, but you get the idea.)
Dunno how Lightroom's SPOT HEALING TOOL works. It might be even better.
Dunno how Lightroom's SPOT HEALING TOOL works. It might be even better.

Mar 18, 2015 09:19:29 #
big-guy wrote:
Work on the RAW file and use the spot healing tool in Lightroom. This should alleviate most of your problems... well at least with the photo. :D
big-guy, thanks, I'll try most anything.
Dave
Check out People Photography section of our forum.
Mar 18, 2015 09:21:01 #
jerryc41 wrote:
Lightroom has a Shadows slider that works wonders.
EDIT: I did a couple of quick modifications in LR 5.7 - increasing exposure and brightening the shadows. Bi-guy's idea of using the healing brush is a good suggestion for getting at individual areas.
EDIT: I did a couple of quick modifications in LR 5.7 - increasing exposure and brightening the shadows. Bi-guy's idea of using the healing brush is a good suggestion for getting at individual areas.
jerryc41, thanks for what you did to the photo.
I like it and will take yours and big-guys advise as well.
Mar 18, 2015 09:21:48 #
viscountdriver wrote:
Hope you don't mind. I did some editing in Corel and I think brightened it. If you do mind I apologise profusely.
viscountdriver, NO I appreciate any help for this correction!
Thanks again.
Dave
Mar 18, 2015 09:23:46 #
wolfiebear wrote:
Only some of the faces suffer from the shadows. If it were me, I might use the dodge and burn tool in PHOTOSHOP for just those faces. (I'm just dong a crappy job on my laptop, but you get the idea.)
wolfiebear, thanks for the show-me.
I'll try this as well. Need the learning aspect of PS too!
Thanks again!
Dave
Mar 18, 2015 09:26:58 #
Camera raw in photo shop. Shadow slider plus radial filter in select places. Same thing can be done in Lightroom.

Check out Software and Computer Support for Photographers section of our forum.
Mar 18, 2015 09:32:52 #
wolfiebear wrote:
Only some of the faces suffer from the shadows. If it were me, I might use the dodge and burn tool in PHOTOSHOP for just those faces. (I'm just dong a crappy job on my laptop, but you get the idea.)
Dunno how Lightroom's SPOT HEALING TOOL works. It might be even better.
Dunno how Lightroom's SPOT HEALING TOOL works. It might be even better.
I'm with you, Wolfie.
I just tried the Dodge Tool, at a fairly low percentage (15%).
You will have to experiment with size and percentage, and make sure your strokes don't overlap as the result will be accumulative.
So, keep the fingers of your left hand on the Ctrl and Z keys for quick undoes, your right hand on the mouse, and your mind on "be patient, be patient!"
But I believe it is entirely possible in any program that offers a Dodge Tool.
Mar 18, 2015 10:01:06 #
SqBear wrote:
We used a Novatron Light set up and obviously did not get the correct positioning of the lights!
Is there any way the shadows can be removed or at least lightened up a bit?
Also, converted the photo from RAW to jpg.
Nothing else done to the file.
Any help is appreciated.
Is there any way the shadows can be removed or at least lightened up a bit?
Also, converted the photo from RAW to jpg.
Nothing else done to the file.
Any help is appreciated.
SqBear!
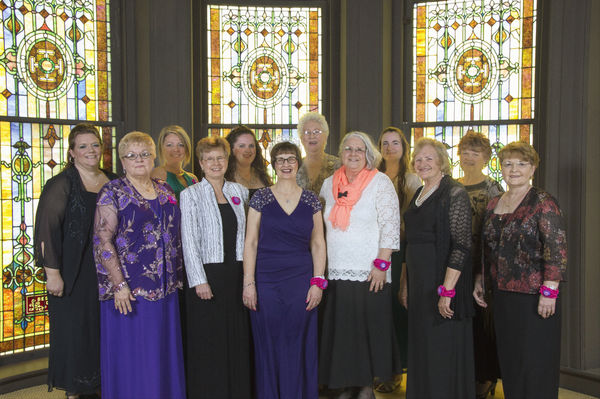
I have a variety of editing software besides PS, PSE, LR but one of my favorites is Nikon Capture NX2. It uses Nik U-point technology and you can make small area corrections such as the shadows in your image without making masks or trying to correct globally. The corrections I made took about 10 minutes. The third image I did a small color correction for skin tones with PS. U-point technology can also be found in the Nik plugins software.
I also found with my Speedotron strobes is to use one large head and umbrella very slightly right and above the camera position. This way the shadows will fall straight backwards and downwards. I know, I also learned from the school of hard knocks!
Best wishes. Ed
Shadow Corrections
Small Skin Tone Correction
Mar 18, 2015 10:15:40 #
Always try and get it right in the camera ..........
When you have a sizable group you always either ..........
1. Look for shade where light will be even and no flash needed
or ........
2. The row in front is lower than the row behind. Ie; a row of chairs in front
or ..........
Use multi flash/strobe units with umbrellas, one at 10 o'clock and the other at 2 o'clock ........ this will help eliminate shadows
This is why a photographer carries a ladder with him, just in case there is no even shade or chairs.
No need to add similar advise as others have already stated .......... bet you don't make that mistake again :)
Mar 18, 2015 10:20:51 #
SqBear!
There are only 2 images as I eliminated your original image to minimize the bandwidth of my reply.
Ed
There are only 2 images as I eliminated your original image to minimize the bandwidth of my reply.
Ed
If you want to reply, then register here. Registration is free and your account is created instantly, so you can post right away.
Check out Sports Photography section of our forum.