Photos on Photo-background
Mar 10, 2015 17:35:46 #

Swayne, and others: I hope I understood the question right; this is my rendition of photos on photo background:
Note that I have made this page using Photoshop Elements 12. But from what I've read about other photo editing programs, they should all be able to handle this.
Select the photo you want to use for the background, as well as the photos you want to place on that background.
1. Create a new document, the size of the page you want it to be, and a solid white colour.
2. Drag and drop the background photo onto the white document. Reduce the opacity of the background photo to 50% or less, I used 40%. (In PSE, keep the Blending Mode at Normal and select opacity).
(In PSE, as you drag and drop a photo, it will automatically be on its own layer).
At this point don't worry about the relative size of the photos or their location.
3. Select a photo (by highlighting its layer) to frame it with a stroke outline (in PSE: Edit, Stroke, select colour and width in pixels).
4. Select each of the photos, one at a time, use the corner handles to reduce or enlarge the size of the photo, and to rotate it. Grab the photo anywhere in the centre to move it to a different location on the background.
5. When you're happy with the location, you can add a drop-shadow (in PSE, FX Effects button on the lower right, then Styles -> Drop Shadows at the top right. Play with them to find one you like. On the menu line, Layer -> Layer Style -> Style settings, you can play with shadow opacity, direction and width).
6. Finally when you're happy with the results, merge all the layers and save.
- If it is important that the images on the background are exactly the same size, use a clipping mask. Make a new document, of the size you want the images to be (size in pixels is probably easier to work with than size in centimetres or inches). Fill the document with black, then copy and paste to the background as many times as you need. Copy and paste will also create a new layer for each "mask".
Highlight the layer where you want your photo, then drag and drop your photo to the document.
Press Ctrl+G and use the corner handles to resize the photo. Note that at this point only the part of the photo that is overlaying the mask, is visible. The mask will be stationary, the photo can still be moved around and its size changed. When you're happy with it, highlight both the mask layer and the photo layer and merge the two.
You can now still move the images around and/or rotate them, just be careful you don't change the size with the corner handles.
Done!
Mar 11, 2015 15:18:29 #

Mar 11, 2015 21:56:51 #
Mar 11, 2015 22:35:18 #

Thanks! This looks like a great project. Can't wait to give it a try :-)
Mar 16, 2015 09:58:11 #
I take it that is how you do pages for a wedding album. That's pretty much exactly the same as I do, except for using PS CC.
Believe it or not, I find CC easier to use than Elements, but I've been using it every since the first Photoshop CS came out.
Believe it or not, I find CC easier to use than Elements, but I've been using it every since the first Photoshop CS came out.
Mar 16, 2015 11:05:48 #
bkyser wrote:
I take it that is how you do pages for a wedding album. That's pretty much exactly the same as I do, except for using PS CC.
Believe it or not, I find CC easier to use than Elements, but I've been using it every since the first Photoshop CS came out.
Believe it or not, I find CC easier to use than Elements, but I've been using it every since the first Photoshop CS came out.
I've only ever used PSE, starting with version 7. My brother had PS at the time, but when he showed me how to do some things and I discovered I could do what he showed me in PSE, I stopped feeding my piggybank. Then got PSE 7 for a Christmas present ;^) Up to 12 now and hope to get 14 this Fall.
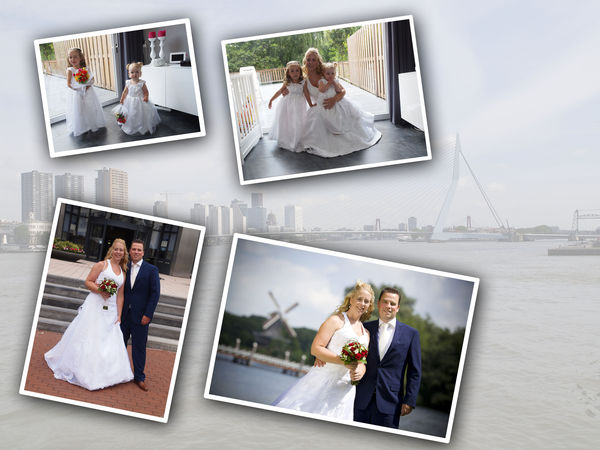
Yes, this is how I did the pages for a wedding album, except for the background I used a very, very pale colour, then picked the colour from the flowers to stroke each photo. And by request, they were all positioned perfectly straight. I got the variation by cropping the photos differently and putting a couple of oval and round ones in: the bouquet, hands with rings, raised glass for toast, that sort of thing.
Mar 16, 2015 11:30:35 #
Morning Star wrote:
I've only ever used PSE, starting with version 7. ... (show quote)
Yeah, my business partner likes to do angled photos on pages, but I usually keep mine with a straight orientation, but different crops to make them offset. Different styles. Neither one is "correct" One that I "used to do" was a heart shaped cut out, but for some reason, I stopped liking it, so I don't do it any more. Funny how our own tastes change, and how it affects our style.
I'm not saying there is anything wrong at all with Elements. I think it is just that I learned on PS, and moving to elements feels like starting over. I actually own Elements 13, I just haven't opened it back up since the day after I installed it. (too stubborn to learn something new??...probably)
If you want to reply, then register here. Registration is free and your account is created instantly, so you can post right away.