Resizing an image can change its character
Apr 26, 2024 13:03:10 #

profbowman wrote:
Here is a simplified illustration, an 8 x 1 pixel image, showing this loss of information from the reduction in the number off pixels. --Richard
I wish it were that simple, but it's not. It's not even a question of sharpening or ICC profile in the Export dialog.
If you toggle between these two images, the highlights in the leaves are brighter in the in the reduced (4096 wide) version.
What's more, when I display either of them in the Windows Photo Viewer, I can increase the magnification by small increments (rather than going directly to 100%) and at the first increase, the highlights in the leaves get brighter.
If it were a simple matter of averaging of the pixel values, as you suggest, the highlights should get duller, not brighter.
Since this happens in the Photo Viewer as well as in the C1 Export step, there is something else happening that I can't explain.
The only difference between the images is the Scale Width setting.
Full size at 6024 pixels wide
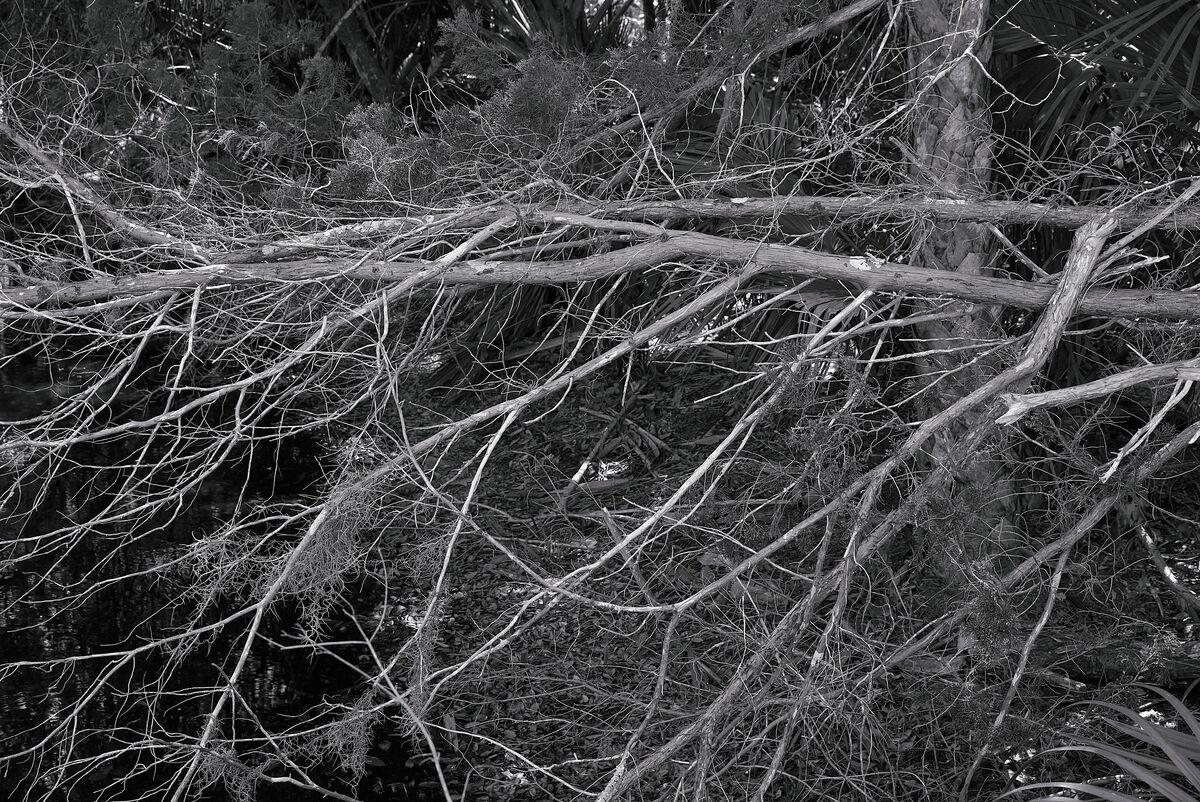
(Download)
Reduced to 4096 wide
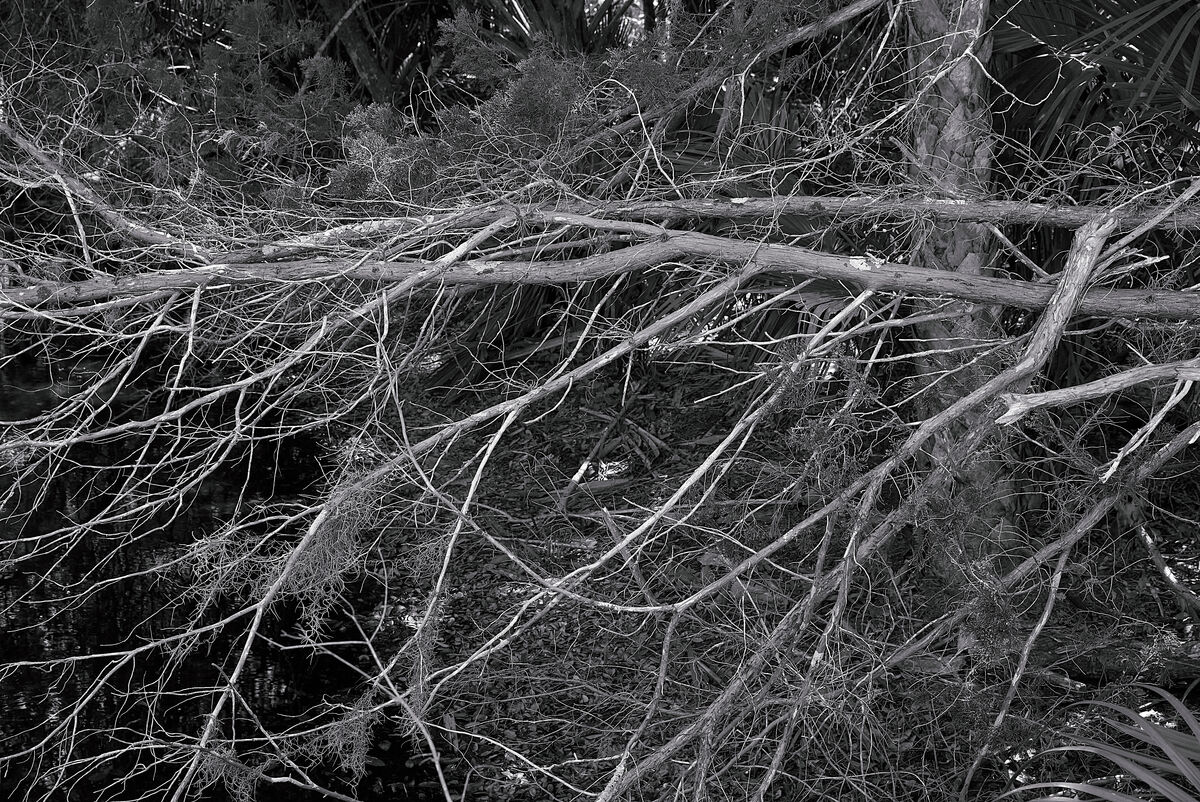
(Download)
Apr 26, 2024 13:43:23 #
Not sure why this is 'news' ? Anyone who has ever emailed a large image as a small attachment knows there are compromises. Sometimes severe.
If the Goal is a Print, the best large format pigment printers can print larger gamuts than your display (when sent as a 16b TIFF) which is good, but the display has a larger dynamic range than a paper print. So 'differences' abound in the process, controlling them for artistic intent is important
If the Goal is a Print, the best large format pigment printers can print larger gamuts than your display (when sent as a 16b TIFF) which is good, but the display has a larger dynamic range than a paper print. So 'differences' abound in the process, controlling them for artistic intent is important
Apr 26, 2024 14:13:44 #
selmslie wrote:
When you are looking at an image in your editor yo... (show quote)
I see a very minimal impact. Frequently I save images in PNG, relatively large files too large to email. I convert some to smaller JPG files that I can send but even in comparing them side by side on my PC I don't see much difference....?
Apr 26, 2024 15:19:37 #
ASTROBOO wrote:
I see a very minimal impact. Frequently I save images in PNG, relatively large files too large to email. I convert some to smaller JPG files that I can send but even in comparing them side by side on my PC I don't see much difference....?
Yes, there is not much difference but it's still enough to change the character of the image. If I had wanted the highlights to stand out, I would have made that happen within Capture One.
I can also see the same difference on my 4k monitor and on my iPhone.
I even tried exporting the image as a TIFF. Nothing visibly changed just the file size which was 70 megabytes for the 6024 wide image and 31 megabytes for the 4096 wide image.
I even printed the image with a Quality setting of 'Max Quality (Carbon Black)'. That just took a lot longer than 'Max Quality', but the print did not visibly change. Carbon Black might make a difference on a larger print but at 7x10.5".
The only solution seems to be to always print from the full-size image and only use the reduced size for sharing.
Apr 26, 2024 15:37:31 #
MJPerini wrote:
If the Goal is a Print, the best large format pigment printers can print larger gamuts than your display (when sent as a 16b TIFF) which is good, but the display has a larger dynamic range than a paper print. So 'differences' abound in the process, controlling them for artistic intent is important
A B&W image does not have a gamut, just a tonal range from maximum black (0 for Zone 0) to maximum white (255 at 8-bit or 65535 at 16-bit for Zone X).
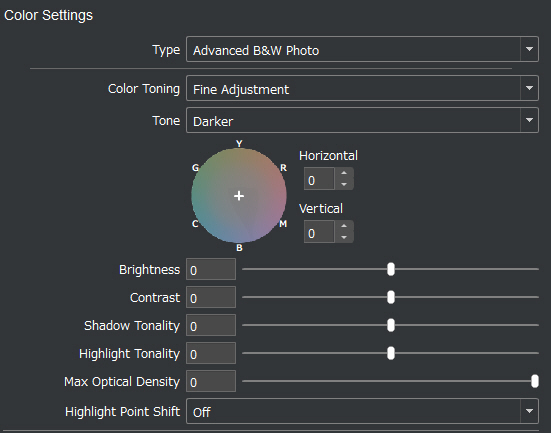
The Epson Print Layout program offers some additional control over the print but those settings cannot be conveniently saved like they are in Capture One, Lightroom, etc.
Color Setting dialog for the P900, the image can also be toned
Apr 26, 2024 16:37:55 #

selmslie wrote:
I wish it were that simple, but it's not. It's no... (show quote)
I was not espousing any particular method or filter to be used during resizing. I was demonstrating how downsizing from four-pixel groups to one-pixel groups will result in loss of information.
IrfanView, which I use because I it gives me a lot of analytical control over all of my editing functions, has a number of algorithms what the user can avail themselves of during resizing.
Hemite fastest)
Triangle (bilinear)
Bell
Mitchell (bicubic)
B-Spline
Lanczos (slowest)
I use Lanczos because it seems to give the best results and modern PCs are not haunted by slow processors.
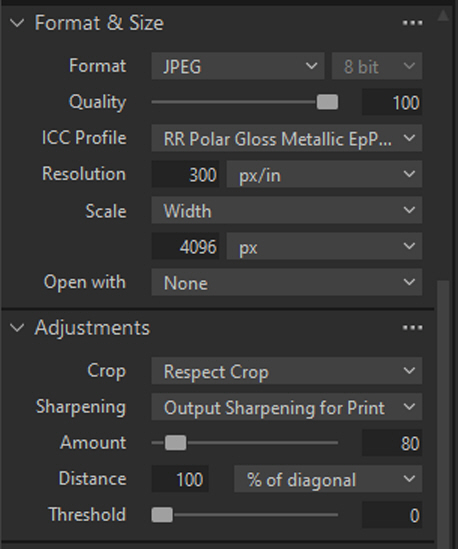
Looking at Capture 1, I noticed that it gave the user a lot of choices on exporting image files. So, it is important that you give us all of those parameters.
One that is most important to me is the 80% quality factor for JPEG exported images. As has often been noted here on UHH forums is that if this quality value is kept at 90-1000%, there will not be a noticeable reduction in visual quality. Using a value of 80 is guaranteed to give you artifacts and loss of sharpness and other data losses. Even though Capture 1 has 80 as the default, change it to 100 while you are editing or printing.
There are a number of other file formats that produce smaller size files without lossing any information in reduction. Two examples are JPEG-20000 and PNG. --Richard
Apr 26, 2024 17:09:29 #
profbowman wrote:
I was not espousing any particular method or filter to be used during resizing. I was demonstrating how downsizing from four-pixel groups to one-pixel groups will result in loss of information. ...
That is certainly true. And when you go beyond that to nine- or sixteen-pixel groups the loss will increase.
But as the information is lost, so does is sharpness. And as more pixels are compiled into a single pixels, we should see a darkening of highlights, even specular highlights. They should not get brighter, but they do.
It's not just happening in Capture One. It also happens in the Windows Photo Viewer on my Windows 10 desktop with two 2k monitors. It also happens on my other Windows 10 desktop with the 4k monitor on both the One Photo Viewer and the Windows Photo Viewer.
It may be something inherent in the digital image and display. And since the print is made of dots, not pixels, the printer is just passing on this phenomenon regardless of whether it's printing a TIFF, or a JPEG regardless of the level of compression.
Apr 27, 2024 06:07:02 #
selmslie wrote:
But as the information is lost, so does is sharpness. And as more pixels are compiled into a single pixel, we should see a darkening of highlights, even specular highlights. They should not get brighter, but they do.
It's not just happening in Capture One.
It's not just happening in Capture One.
I have figured out what is happening in the two photo viewers. It relates to the comment above.
When I view the full image on my 2k display (23½" wide, 82ppi) with the Windows Photo Viewer or in Capture One, the complete image covers a width of about 17", about 1390 pixels out of the 1920 for the full screen. The numbers are a little different for the 4k display but the same thing happens.
In order to get 6000 image pixels down to 1390, it has to be downsized by 1390/6000 or more than four times in each dimension. Detail and sharpness is lost during this downsizing and the highlights are darkened. But the image will actually have about the same tonality and sharpness of a 17" wide print.
As I zoom into the image, the highlights appear to get brighter because there is less downsizing.
But zooming in also shows how a larger print would look. I can only make a 16x24" with my P900. A print that size would mean that anyone looking at the print will probably view it a normal viewing distance slightly greater than the distance at which I view my desktop monitor. For a larger print a normal viewing distance would render about the same character and apparent highlight brightness.
The Capture One export is different issue. During export it offers the option for additional adjustments (Lightroom might also offer this):
But doubling down on the sharpness already baked into the image (I normally leave it at Capture One's default) may not be a good idea.
I tried several alternatives - No Output Sharpening, Output Sharpening for Screen, Output Sharpening for Print and Disable All. They all do something a little different. Output Sharpening for Screen works well when reducing the image size for viewing but Output Sharpening for Print does not work well for viewing.
It seems that the best alternative for printing is use the full image, JPEG or TIFF makes no difference. I will have to do some more prints to see if there is any difference between No Output Sharpening and Output Sharpening for Print.
Apr 27, 2024 07:07:51 #
Artcameraman
Loc: Springfield NH
selmslie wrote:
When you are looking at an image in your editor yo... (show quote)
Resizing gives the allusion of perspective.
Apr 27, 2024 08:50:36 #
selmslie wrote:
But doubling down on the sharpness already baked into the image (I normally leave it at Capture One's default) may not be a good idea.
I tried several alternatives - No Output Sharpening, Output Sharpening for Screen, Output Sharpening for Print and Disable All. They all do something a little different. Output Sharpening for Screen works well when reducing the image size for viewing ...
I tried several alternatives - No Output Sharpening, Output Sharpening for Screen, Output Sharpening for Print and Disable All. They all do something a little different. Output Sharpening for Screen works well when reducing the image size for viewing ...
As I suspected, when it comes to printing, at least for the 7x10.5" print, the option that comes closest to what I am seeing in Capture One is 'No Output Sharpening'.
The ideal choice when exporting a reduced size for a display remains 'Output Sharpening for Screen'.
Apr 27, 2024 08:55:34 #
Artcameraman
Loc: Springfield NH
I've been exporting from Capture One to Photoshop for printing when using my phase one studio equipment and for the life of me I don't remember why.
Apr 27, 2024 09:09:28 #
Artcameraman wrote:
I've been exporting from Capture One to Photoshop for printing when using my phase one studio equipment and for the life of me I don't remember why.
I can't imagine any reason to do that. There are a couple of good alternatives that are more straightforward.
I just export the image to a JPEG and use Epson Print Layout (simple and very capable) or Qimage Ultimate (more sophisticated but a little more difficult to use) to print it.
Apr 27, 2024 09:12:34 #
Bill_de wrote:
You did not take bananas into account. 
---
---
nor mangoes. ha, ha!
That is the problem with metaphors. Sometimes they don't work, and one only ends up with fruit salad. --Richard
Apr 27, 2024 09:26:28 #

profbowman wrote:
nor mangoes. ha, ha!
That is the problem with metaphors. Sometimes they don't work, and one only ends up with fruit salad. --Richard
That is the problem with metaphors. Sometimes they don't work, and one only ends up with fruit salad. --Richard


---
Apr 27, 2024 09:48:19 #
selmslie wrote:
I have figured out what is happening in the two ph... (show quote)
Thanks for this exploration of Capture One. It seems to me to verify my conclusion that when comparing two images, one should look at both at 100% size so that no downsizing occurs. This will show the true nature of any highlights or darks areas and any fuzziness that is present in the image as saved in the file. If one looks at an image at a larger size than 100%, then the software must make up pixels that are not there and present them on the screen. If downsizing, the software removes (or somehow averages out) some of the actual data to show less pixels on the screen.
As to printing, my sense is that one needs to experiment with dpi and desired size to "see" what is the best viewing situation--details seen at a given viewing distance. --Richard
If you want to reply, then register here. Registration is free and your account is created instantly, so you can post right away.