Using the LR Compare View in Culling
Sep 7, 2019 15:42:11 #

The Compare View is a useful tool when culling images, or whenever you need to look into the details of two similar images.
Within Adobe Lightroom this is done by:
1) Access LR in the Library Module
2) Select two images to be compared. The two images can be anywhere: collections, folders, etc. They don't have to be next to each other; just select both images at the same time, pressing your <Ctrl> key while mouse clicking the second image. (Apologies to Mac users, I don't have the symbol for your equivalent to the Windows 'control' key.)
Example 1 - Select two images to be compared

3) Press 'c' to initiate the compare. Or, use menu command: View / Compare
Example 2 - Adjust your desktop panels to maximize the space available for the two image compare
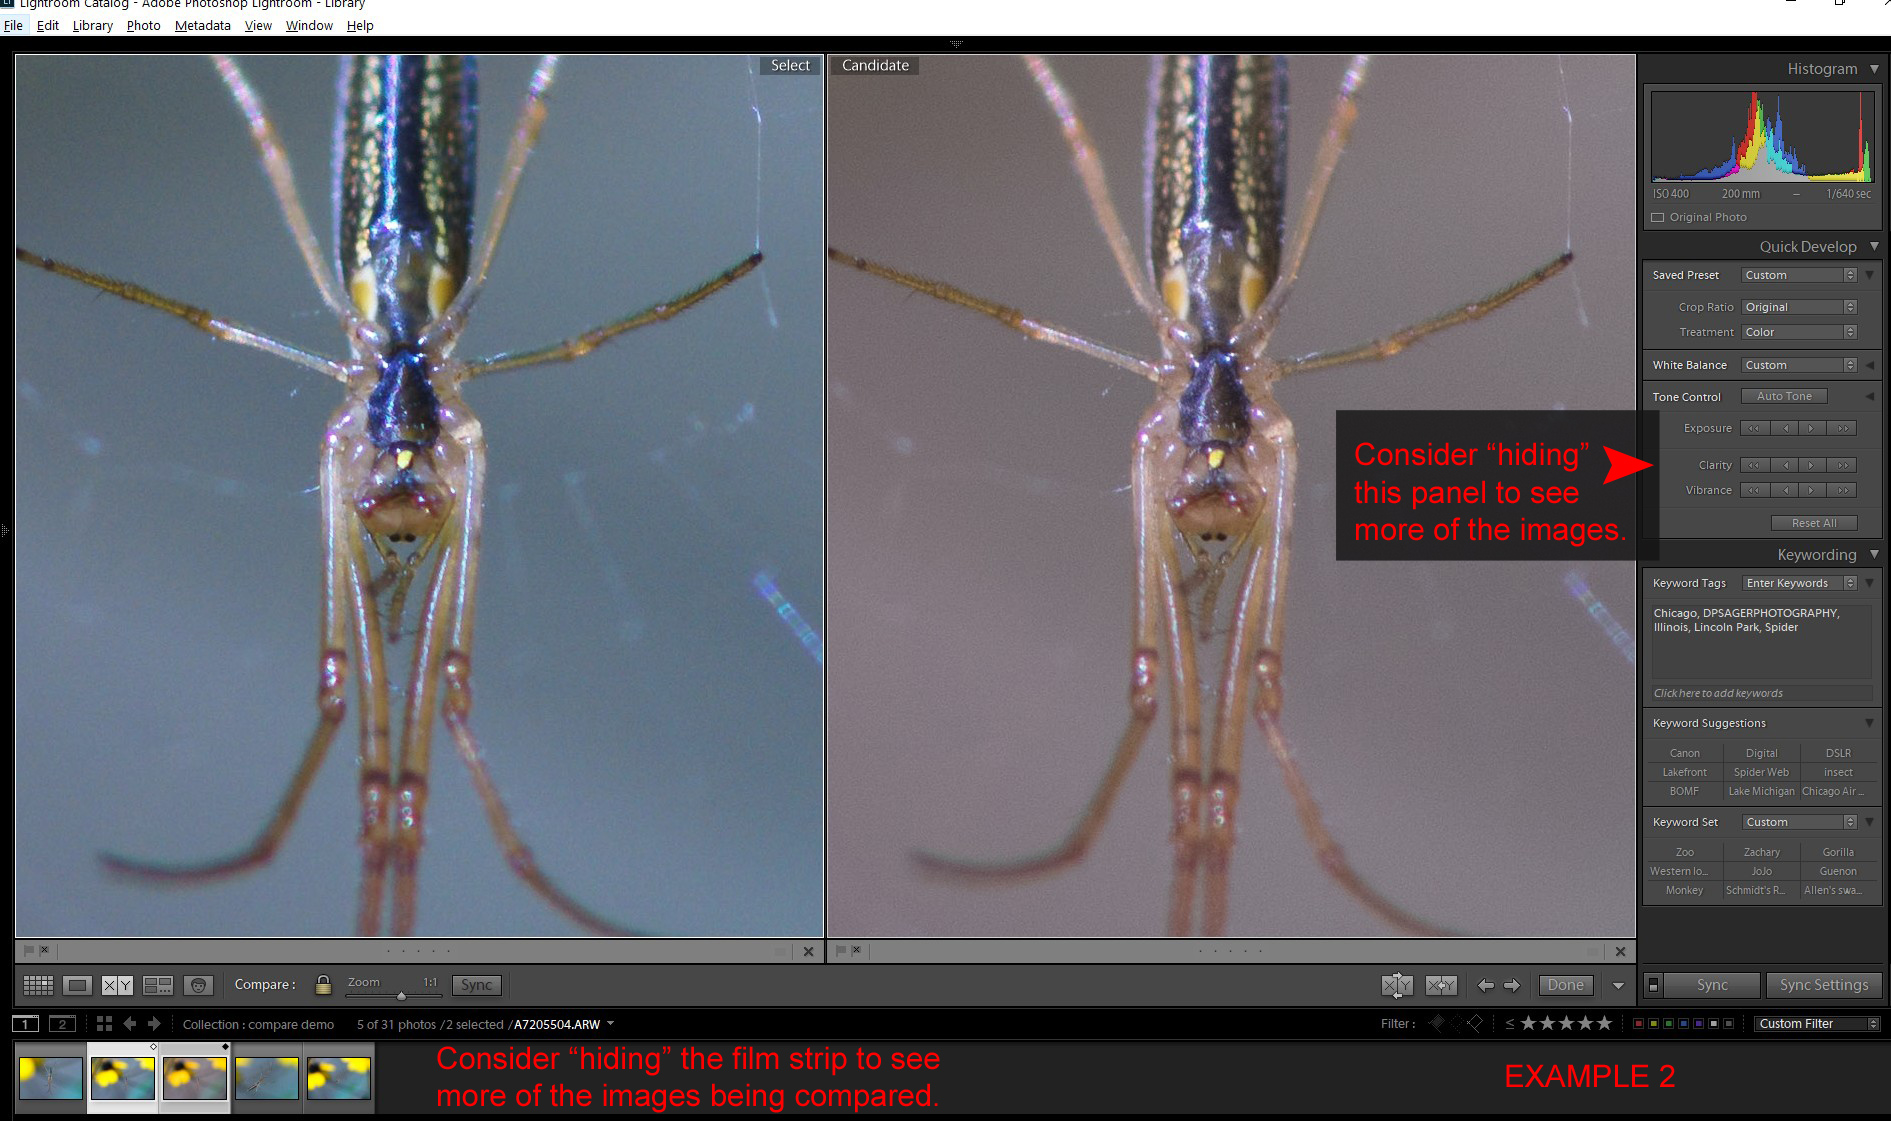
4) You can gain more 'geography' by hiding aspects of the LR desktop
Example 3 - Use Zoom and Navigation buttons

5) Use the 'z' key to zoom in and out of the details. Each time you press 'z', you toggle between the full-image and the zoom view. You can adjust the zoom level with the slider on the lower left of the Compare window. I find 1:1 (100%) to be the most useful.
6) Use 'c' or 'l' (l - library) or the <Done> button to exit or otherwise toggle out of the Compare view. Restore the hidden panels onto your desktop, as needed.
Using Compare as a culling tool
Consider the 26 images in Example 4. Which is the keeper?
Example 4 - Initial import of 26 versions of the same spider

You can use the Compare View to 'walk' the images seeking to identify the one (or few) that justify spending any additional time editing. Begin by picking (selecting) the first two images and press 'C' to access the Compare view.
a) If helpful, press 'z' and zoom into the details. Using the 1:1 Zoom to compare the images, the better of the two should be obvious. Use the Reject flag to identify the lesser of the two being compared. Be sure to reject the proper image. You might reject both, or move on keeping both.
b) When I'm walking images, I place the 'keeper' in the left window. Refer back to Example 3 and the navigation buttons to arrange images. Hover your mouse over the buttons for the pop-up descriptions. The 'make select' moves the right image to the left position. Just keep moving in sequence; you can come back and compare and select from the 'keepers' in a second round of culling.
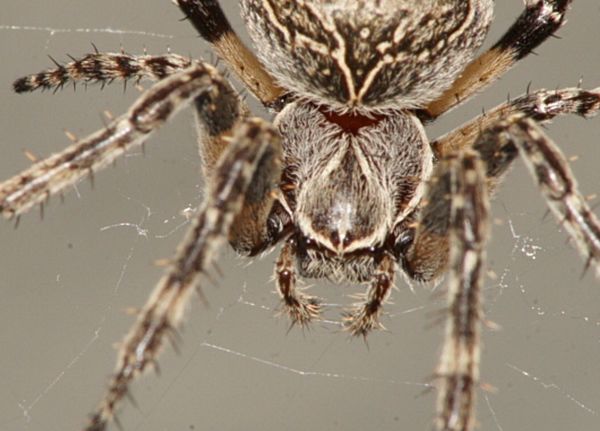
Example 5 - comparing the 100% details

c) With the current 'keeper' on the left side, use the 'select next' arrow to move the next sequential image into the right-side of the Compare view.
d) Compare the details again, if the new image is better than the old image, reject the left-side and use the 'make select' button to move the right side to the left side and continue to compare the next image in the sequence.
e) You're doing 1 to 1 image compares, looking at just two images at a time. At the end of this 26-image sequence, you might still have 13 images left from the individual 1 to 1 compares. Remove the rejected images (Example 6) and repeat, as needed, until you've identified only the best 1 (or few) to then bring as potential 'keepers' into the Develop module for processing.
SUMMARY
The harsher you become as a critic of your own work in culling, the better your resulting images should become. The Compare view at the 100% zoom lets you make critical assessments of your images. At the minimum, you'll become more efficient at editing where you begin to spend your time editing only your best work rather than all images from a session.
TIP-01: If you didn't build 1:1 previews during the import, these previews are dynamically built when you view each image at the 100% zoom. Alternatively, before the culling effort, select the images in the Library view and build the previews with Library / Previews / Build 1:1 Previews. Begin culling only after the previews are available. Building the previews first makes the Compare view more responsive as you navigate between images.
TIP-02: Use the filmstrip, if desired, to select individual images to compare rather than the 1 by 1 left to right sequence described in steps (b) thru (d). The filmstrip is easier to select two images when they are not in sequence and directly next to each other.
TIP-03: Use the Attribute filter to select the Rejects and remove from further consideration. Remove the attribute filter and continue the culling.
Example 6 - Using the Attribute filter to identify Rejected images. Select all the rejects and use your <Backspace> key to remove from the Collection or to Remove from the LR Catalog (and delete from disk, if desired) .

Within Adobe Lightroom this is done by:
1) Access LR in the Library Module
2) Select two images to be compared. The two images can be anywhere: collections, folders, etc. They don't have to be next to each other; just select both images at the same time, pressing your <Ctrl> key while mouse clicking the second image. (Apologies to Mac users, I don't have the symbol for your equivalent to the Windows 'control' key.)
Example 1 - Select two images to be compared
3) Press 'c' to initiate the compare. Or, use menu command: View / Compare
Example 2 - Adjust your desktop panels to maximize the space available for the two image compare
4) You can gain more 'geography' by hiding aspects of the LR desktop
Example 3 - Use Zoom and Navigation buttons
5) Use the 'z' key to zoom in and out of the details. Each time you press 'z', you toggle between the full-image and the zoom view. You can adjust the zoom level with the slider on the lower left of the Compare window. I find 1:1 (100%) to be the most useful.
6) Use 'c' or 'l' (l - library) or the <Done> button to exit or otherwise toggle out of the Compare view. Restore the hidden panels onto your desktop, as needed.
Using Compare as a culling tool
Consider the 26 images in Example 4. Which is the keeper?
Example 4 - Initial import of 26 versions of the same spider
You can use the Compare View to 'walk' the images seeking to identify the one (or few) that justify spending any additional time editing. Begin by picking (selecting) the first two images and press 'C' to access the Compare view.
a) If helpful, press 'z' and zoom into the details. Using the 1:1 Zoom to compare the images, the better of the two should be obvious. Use the Reject flag to identify the lesser of the two being compared. Be sure to reject the proper image. You might reject both, or move on keeping both.
b) When I'm walking images, I place the 'keeper' in the left window. Refer back to Example 3 and the navigation buttons to arrange images. Hover your mouse over the buttons for the pop-up descriptions. The 'make select' moves the right image to the left position. Just keep moving in sequence; you can come back and compare and select from the 'keepers' in a second round of culling.
Example 5 - comparing the 100% details
c) With the current 'keeper' on the left side, use the 'select next' arrow to move the next sequential image into the right-side of the Compare view.
d) Compare the details again, if the new image is better than the old image, reject the left-side and use the 'make select' button to move the right side to the left side and continue to compare the next image in the sequence.
e) You're doing 1 to 1 image compares, looking at just two images at a time. At the end of this 26-image sequence, you might still have 13 images left from the individual 1 to 1 compares. Remove the rejected images (Example 6) and repeat, as needed, until you've identified only the best 1 (or few) to then bring as potential 'keepers' into the Develop module for processing.
SUMMARY
The harsher you become as a critic of your own work in culling, the better your resulting images should become. The Compare view at the 100% zoom lets you make critical assessments of your images. At the minimum, you'll become more efficient at editing where you begin to spend your time editing only your best work rather than all images from a session.
TIP-01: If you didn't build 1:1 previews during the import, these previews are dynamically built when you view each image at the 100% zoom. Alternatively, before the culling effort, select the images in the Library view and build the previews with Library / Previews / Build 1:1 Previews. Begin culling only after the previews are available. Building the previews first makes the Compare view more responsive as you navigate between images.
TIP-02: Use the filmstrip, if desired, to select individual images to compare rather than the 1 by 1 left to right sequence described in steps (b) thru (d). The filmstrip is easier to select two images when they are not in sequence and directly next to each other.
TIP-03: Use the Attribute filter to select the Rejects and remove from further consideration. Remove the attribute filter and continue the culling.
Example 6 - Using the Attribute filter to identify Rejected images. Select all the rejects and use your <Backspace> key to remove from the Collection or to Remove from the LR Catalog (and delete from disk, if desired) .
Sep 7, 2019 15:46:25 #

Sep 7, 2019 16:43:32 #

Sep 7, 2019 16:51:00 #
R.G. wrote:
I've been doing my culling outside of Lr but I'll need to give this a try.
For full disclosure, I do too, using Fast Raw Viewer from FastRawViewer.com where I probably would have culled the 26 images in this example down to maybe 2 to 8. Only then would I import into LR. Once inside LR, I will try another cull via the Compare view before starting the Develop.
Sep 8, 2019 08:22:36 #

Sep 8, 2019 08:46:32 #

Sep 8, 2019 09:29:18 #

CHG_CANON wrote:
For full disclosure, I do too, using Fast Raw Viewer from FastRawViewer.com ...
I started using Fast Raw Viewer a couple of months back and wonder how I did without it in past. It saves me lots of time culling and I’ve set it up to take chosen raw files directly into either PS or Affinity Photo.
Nice tutorial!
Sep 8, 2019 09:42:07 #

Thanks for this reminder. I went to the St. Louis airshow yesterday and have a lot of photos to get through.
Sep 8, 2019 11:19:29 #

This is great Paul. I use Bridge for culling...I might give this a try and skip Bridge. Wildlife and those sharp eye quests are tedious, for sure.
Sep 8, 2019 11:39:15 #
Thank you Mike, RG, John, Patty, Elliott, joanloy, Kim! There's probably some addendum to the topic. As mentioned in another comment, a tool like FRV ($20 online) saves all the import and preview render time when you're just going to delete most of the images upon detailed review. Also, most of my spider pics in the example were deleted, like 17 of the initial 26, that were much easier to judge such as below. And finally, you may end up with a small group you can't judge before editing, rather than just the one. Culling post-edit is just as important, again where the Compare view is quite useful.
Sep 8, 2019 13:00:03 #
Sep 8, 2019 14:43:30 #

Paul,
Here I am with the same question - Is there anything comparable in Adobe PS?
Here I am with the same question - Is there anything comparable in Adobe PS?
Nov 14, 2022 11:05:48 #
CHG_CANON wrote:
Thank you b Mike, RG, John, Patty, Elliott, joanl... (show quote)
One of the few responses in this thread that makes sense to me. Thank you CHG_CANON.
Nov 14, 2022 18:23:16 #
wham121736 wrote:
Paul,
Here I am with the same question - Is there anything comparable in Adobe PS?
Here I am with the same question - Is there anything comparable in Adobe PS?
I'm 99% sure no, the Compare in this side by side implementation is unique to LR. You can arrange active windows in PS to somewhat mimic two images side by side, but that's cumbersome and not a rolling comparison across multiple images in a 'film strip' of images.
Nov 16, 2022 12:03:22 #
h0grider
Loc: Western MD
CHG_CANON wrote:
I'm 99% sure no, the Compare in this side by side implementation is unique to LR. You can arrange active windows in PS to somewhat mimic two images side by side, but that's cumbersome and not a rolling comparison across multiple images in a 'film strip' of images.
For those working in Photoshop Elements (in PSE 2021/PSE 19 at least), when in the Organizer function, selecting a picture there and then pressing the F11 key opens a "compare" function with very similar features as described above in the LR program, even down to including the 'film strip' function. Wouldn't have know about this in PSE without it being described in one of Scott Kelby's books on using PSE.
If you want to reply, then register here. Registration is free and your account is created instantly, so you can post right away.