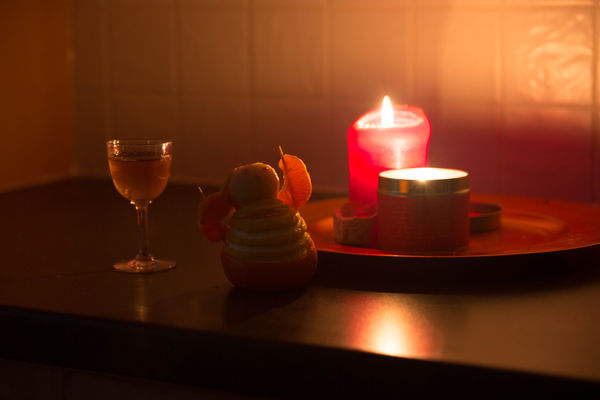
How to use Photoshop or ??? to brighten this shot
Oct 11, 2012 16:54:38 #
RichieC
Loc: Adirondacks
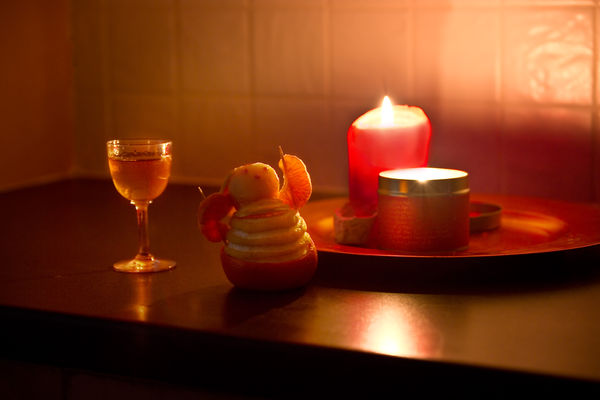
Funny, the glass, orange, background and reflections were all I fooled with. The highlights are blown out. Can't add detail from what isn't there. I see some double edges, so movement in exposure. Get a tripod, spend $250 or more... (as that is what it takes to get a decent one). Bracket exposures from too dark, to too light.
Layer all of them- dark on the bottom.
Give each upper layer a mask. Hide all (fill mask with 100% black to hide all that layer) . Now using a soft brush set to white IN THE MASK, paint in what you want to see from that layer. Pick what is exposed correctly on each layer in turn and slowly build it up. If you go too far, switch brush to black and IN THE MASK, paint it back out.
You can set the layer to interact with the base using different blending settings... you'll have to play with that.
Or in the best CR2 you have of this scene, open in bridge and adjust the same image several times, and save each new adjusted version and layer those. ie adjust one to get the candle right, another the glass, and layer and paint like described above. This is what I did with you CR2.. however that had some limitations. In the end I painted in your candle by hand... not perfect, but with the right reference, I could make it hard to notice unless you pointed it out. But then I do it every day.
Was fun..
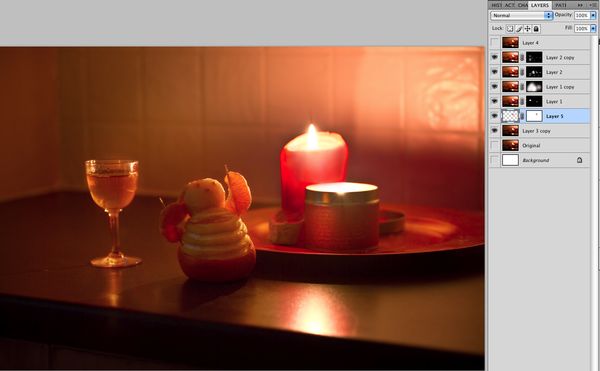
note layers and masks..
Oct 11, 2012 17:34:17 #
It was a tripod shot, one of the big Benbo No.1's
All shots were fired with a wireless remote, with 2 second delay, so not sure where movement came from
The technique you explained there is exactly the one I wad trying to use, but I have not been able to make it work
I add a new layer, add a mask, and then try and paint over in the opposite colour, but it never works. Sometimes you see the painted area appear direct on the image as pure black or white areas, other times nothing at all.
I am sure it is matter of selecting the correct type of mask and filll etc but have not yet achieved it. Sorry, sometimes I have ended up with the Layers workspace pallette as you show in your screen grab, but I can never reptoduce the steps again
Off on holiday for two weeks from Saturday so wont get a chance to try again till I get back
Oct 11, 2012 17:46:46 #
RichieC
Loc: Adirondacks
Ahh, note you have to tell Photoshop that you are working in the mask by clicking on it. Try it and you'll see a dark outline frame the mask thumbnail, then click on the image thumbnail and the border will appear around that- then you'll be working i on the image itself. Hard to spot it, AND it will drive you nuts when you find you were painting in the image rather then the mask and hope you have enough "undo's" set in history.
It is a paradigm shift and not always intuitive.
There is only one kind of mask, however the entire layer itself can be changed; screen, lighten, darken etc. etc.
Look at the toothpick and you'll see a double edge. perhaps a brand of toothpick i mistook... I had a professional friend that used to wait to shoot his $36,000 4x5 back till night to shoot because of the trucks rumbling by would blur the exposure, way out on the highway. Benbo should be fine! No insult intended.
Have a blast on holiday!
Oct 11, 2012 18:11:18 #
Oct 12, 2012 02:05:27 #
Another good edit
No insult taken!! :)
I had select the mask and not the layer, so that is not what I have done wrong. There is something else I must have done wrong. Mask selected, painting black with large brush on white mask, yet the last time I tried, nothing changes under the brush, and black marks do not appear on the mask in the stack of layers
Italy for two weeks, not been before.
Oct 12, 2012 02:53:22 #
Had a little play just now before work.my last few replies were from bed and the iPhone..excuse spelling and typo's etc
Got this technique to work this time...and found handy tip via Google to create a black mask rather than the default white mask..Alt Click the mask icon and it creates black rather than white.
Thanks for your help. This is a technique I remember being shown many many months ago, but could not get to work again, and wanted to ..which was the initial reason for this post ...to be shown how to do this again..The photo was just a handy tool to use it on.
Oct 12, 2012 12:13:19 #
RichieC wrote:
Funny, the glass, orange, background and reflectio... (show quote)
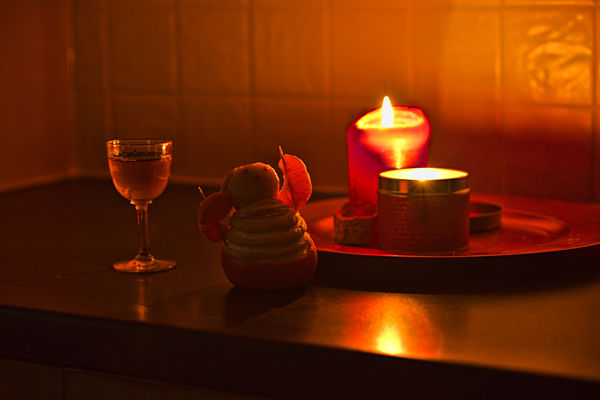
Well done RichieC. I really like this one. :thumbup:
Oct 12, 2012 12:30:50 #
Neilp wrote:
OK< second attempt at uploading this. tried fi... (show quote)
Not exactly clear on what your looking to do Neil but I played with it myself. This is just out of Picasa. Please submit a new pic when your done. I'd love to see what you had in mind.
Thanks
Sheryl
Oct 12, 2012 13:31:42 #
What I was actually trying to do that I did mention somewhere in the thread was use this photo as something to work with to try and find out how to use a technique that I could not remember how to do.
RichieC finally understood what I was asking and showed me exactly what I was trying to do and how to do it..the use of masks and painting over them, to bring out certain parts
Am off on holiday tomorrow morning, so trying to pack now and see what I actually need to take with me..leads, tripods, power adapters etc etc..bloody nightmare
Oct 12, 2012 13:33:26 #
I have been trying to upload another raw image for the last 10 hours, but it never uploads..I come back to it after a few hours and the progress bar across the top of the screen is still only half way across. Either the site or my connection is too slow
Oct 12, 2012 13:38:24 #
Neilp wrote:
What I was actually trying to do that I did mentio... (show quote)
Gotcha. Way advanced for me but can't wait to see your results. Thanks to all you guys I'm learning A LOT!! Have an awesome vacation buddy!!
Oct 12, 2012 13:56:41 #
may not get aroudn to actually doing this one, now I know what I wanted to find out.
I can see myself coming back with so many images of Italy that i am going to give myself months of work to sort them..very tempted to ditch the Raw and just go with medium camera jpeg..the though of processing many hundreds of images of the holiday is just horrendous
I can see myself coming back with so many images of Italy that i am going to give myself months of work to sort them..very tempted to ditch the Raw and just go with medium camera jpeg..the though of processing many hundreds of images of the holiday is just horrendous
Oct 13, 2012 00:13:09 #
Oct 13, 2012 00:14:06 #
If you want to reply, then register here. Registration is free and your account is created instantly, so you can post right away.