NIGHT PHOTO TECHNIQUES
Aug 9, 2020 18:07:30 #

LEWHITE7747 wrote:
The high iso's look good Nice work.
These are a few that I did when it was so dark I could not see my hand in front of my face. I do not do anything special - no mirror lockup, no cable release, no release delay. I have a decent tripod and head, and I gently "roll" my index finger over the shutter release. I use a Feisol CT3472 and an Arca-Swiss Z1 Ball head.
.
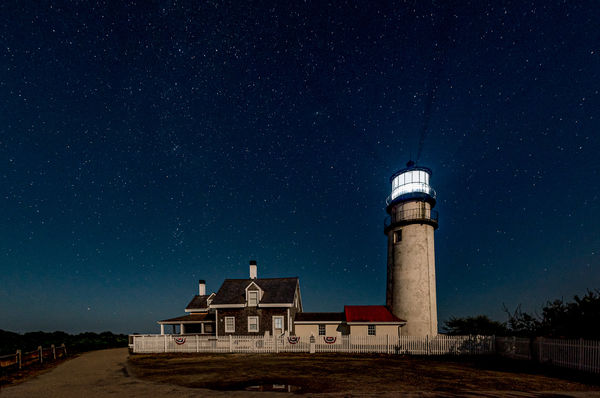
15 sec, F10, ISO 100, 200mm
(Download)
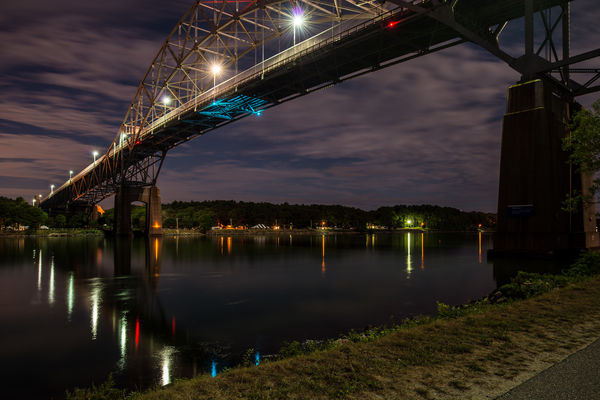
30 sec, F6.3, ISO 100, 80mm
(Download)
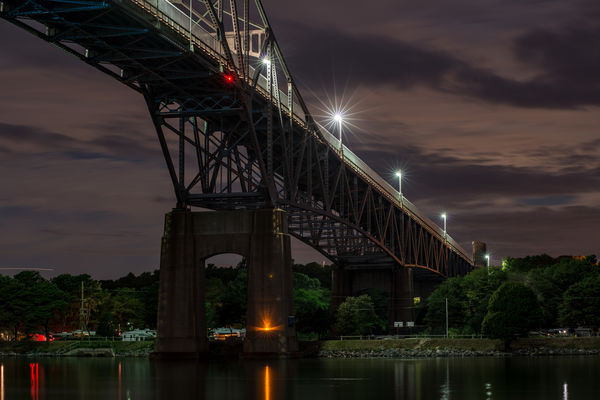
30 sec, F5.0, ISO 100, 24mm
(Download)
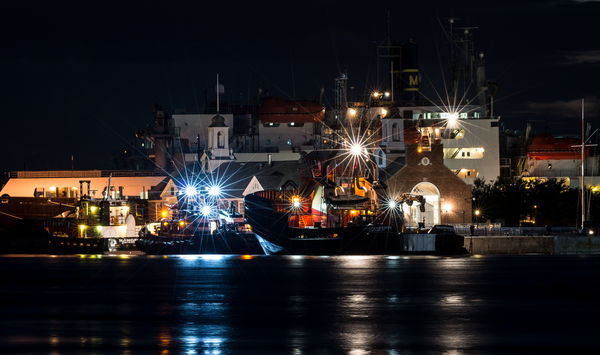
30 sec, F5.6, ISO 800 14mm

(Download)
20 sec, F5.6, ISO1600, 15mm
(Download)
Aug 9, 2020 18:15:54 #
Aug 9, 2020 21:06:55 #
LEWHITE7747 wrote:
Nice! I love the use of High F stops to get the starburst affect.

Aug 9, 2020 22:28:30 #
LEWHITE7747 wrote:
Would like to hear how others take night photo's . Different techniques etc.
This is a very open question as there are so many different scenarios and subjects that will require differing techniques and exposure 'priorities'. Rather than generalise I'll give an explanation of the methodology I used to take this specific "night photo" a few days ago. Hopefully it will cover those areas that you need to think about with most night shots. The image is one of a number of documentary images that I'm producing to highlight inappropriate coastal protection by the climate change warriors.
The image had been planned some months before for 'blue hour' with hoped for circumstances being clear sky with stars, no wind and the tide height just covering the foreground of the tree. I used the various apps available for the exact timing, got prepared and up at 4am twice only to find far too much wind but got this opportunity a few days ago. As always you don't always get what you hope for and in this case no stars due to cloud and a power cut in the area giving absolutely no ambient light on the tree putting it in full silhouette against the emerging dawn light. From experience I know that there will be around a 15 minute window before the background is too bright, there will be significant heron activity and the tide will hinder safe exit from the area so 'fast working' is a must.
The tripod used was a light one with the lower legs fully extended, against all advice we read. The reasons are that I suspect a heavy tripod will sink more in soft silty sand and thinner legs have less water resistance.
I use a head light and a torch that's easily kept in a pocket. I carry as little as possible to ensure one hand is always kept free should I trip whilst going to and from the location. The torch on this occasion was used to attempt to light paint the tree.
Setting up and framing is the hardest part when working in complete darkness and I do this by firstly focusing the camera, in this example by using the torch aimed at the trunk and using AF. I then take an overexposed shot that I can see easily on the lcd to determine I have all I want within the frame and the horizon is acceptably level. If I have to change FL to get the framing correct I again re-focus.
With the camera positioned and locked, in 'Manual' with Matrix metering I adjust settings to centre the needle and take my first shot. The cameras meter is your friend and I find it always gives a good start point. I check the RGB histograms to determine if I need to expose more or less and the exposure of further shots will be set by using the needle +/- position of the meter. I always use manual because with a scenario as this I will be making variations of speed, aperture and ISO to achieve my wanted exposure based on 'varying priorities' and it would be wasting time to be changing between different 'modes'. I don't waste time using remotes (if under 30s) or mirror up.
With respect to settings these vary and as an example, if there had of been stars slowest speed would have been determined by 500/FL or possibly breeze movement. For the lens I used (16-35mm) I know that at it's longest FL focusing on something 6m away at f/7.1 puts everything between 3m and infinity in focus. Any wider FL or smaller aperture improves the DoF. The lower you can maintain the ISO without compromising DoF and speed the better as with shooting at any time of day.
For long exposures it's essential to cover the viewfinder and whilst my camera, D800, has a viewfinder shutter, it's fiddly and I have a simple cover that drops over the rubber eye-cup.
Hope the above is useful to you.
27mm, f/9, 20s, ISO100, 35 minutes before sunrise

Aug 10, 2020 06:31:51 #
The contrast was so extreme here that I took 7 exposures, each 3-stops apart and merged them in Photomatix Pro.

Aug 10, 2020 06:49:30 #
Gene51 wrote:
I stay in manual mode, and I do review the exposur... (show quote)


Well you have made your point. I really like the second one.
Aug 10, 2020 06:52:11 #
billnikon
Loc: Pennsylvania/Ohio/Florida/Maui/Oregon/Vermont
LEWHITE7747 wrote:
Would like to hear how others take night photo's . Different techniques etc.
https://video.search.yahoo.com/search/video;_ylt=AwrJ61meJjFfe8wAxhlXNyoA;_ylu=X3oDMTEybTVsMjNsBGNvbG8DYmYxBHBvcwMxBHZ0aWQDQzAxNjBfMQRzZWMDc2M-?p=night+photo+techniques+youtube&fr=mcafee&guce_referrer=aHR0cHM6Ly9zZWFyY2gueWFob28uY29tL3NlYXJjaD9mcj1tY2FmZWUmdHlwZT1FMjExVVMwRzAmcD1uaWdodCtwaG90byt0ZWNobmlxdWVzK3lvdXR1YmU&guce_referrer_sig=AQAAAL8rTWVlErVdNvkx3pSJBFrns_LAHwySRmKEfnv82JzP_Z-MVxcOMEYyOoisxlm0OCsklTKbEcUrpayL1Df1WiKb6aJF2WhQBTvxhNaXHUjYb7P6OycuowH8BIcEvPTH6sh2l1wM-Bu0o25aV_ciXggJlb35EbUvzECaITq0vlgj&_guc_consent_skip=1597056704
Aug 10, 2020 06:55:00 #
Grahame wrote:
This is a very open question as there are so many ... (show quote)
It is interesting that by using longer exposures the fstop can be lower. I have noticed this from others. It is nice to learn this. I have been using lower iso's with live view(no mirror slap) and 2 second delay to activate the shutter. I use high f stops to get the starburst affect with a lot shorter shutter speed. Will try your technique.

Aug 10, 2020 07:50:06 #

[quote=Gene51]I stay in manual mode, and I do review the exposure after the fact. I use DSLRs and a bridge camera (a lot like a mirrorless camera). I can't really check the image, histogram or highlight clipping ahead of time with my current DSLR gear. But it is easy enough to check ahead with the Sony. Autoexposure modes are pretty useless in these situations. These are some examples taken with a Sony RX10M4 hand-held at night. ISO ranged from 100 to 800 - well within the capability of the camera for good clean images. I've shot it as high as 3200 and was satisfied.
Fantastic images Gene! I haven't done much night shooting, but will give it a try after seeing your post.
Fantastic images Gene! I haven't done much night shooting, but will give it a try after seeing your post.
Aug 10, 2020 11:44:39 #
larryepage
Loc: North Texas area
LEWHITE7747 wrote:
Would like to hear how others take night photo's . Different techniques etc.
Interesting discussion. One thing I have not seen mentioned is around image control choices in your camera. I don't see that you've told us what camera you are using, so can't know how easily and effectively you can do this, but I've found that it can be helpful if you can reduce the contrast in your captured image when shooting at night. This is true whether you are saving your images as JPEGs or raw. The first, and most immediate, is that reducing the contrast will allow display of much more usagle preview images on your camera's display. There tends to be a big distance between the highlights in the streetlights and (to a usually lesser extent) the building lights. Reducing contrast can usually make them a little more readily visible. It also may prevent pushing the shadows down so far that nothing helpful can be seen. Doesn't always work, but it can make a big difference. If you are shooting JPEGs (which is a pretty long way from ideal), it can preserve shadow detail while still allowing you to manage highlights.
Aug 10, 2020 11:51:45 #
Aug 10, 2020 12:35:45 #
Aug 10, 2020 12:44:06 #
RWR
Loc: La Mesa, CA
LEWHITE7747 wrote:
Would like to hear how others take night photo's. Different techniques etc.
You will find some good information in the Long Exposure Forum. Most of the folks there utilize long exposures.
Aug 10, 2020 12:48:03 #
Leitz
Loc: Solms
LEWHITE7747 wrote:
Thanks for you input?
.I have to adjust for a full frame and a crop sensor. The technique is quite different
.I have to adjust for a full frame and a crop sensor. The technique is quite different
Could you explain what sensor size has to do with exposure?
Aug 10, 2020 12:48:13 #

Best time to shoot nighttime photos is at dusk. The reason is you get better separation between subjects.
If you want to reply, then register here. Registration is free and your account is created instantly, so you can post right away.