Check out Close Up Photography section of our forum.
ETTR/EBTR vs. Auto exposure
Jun 24, 2020 12:31:25 #

Perhaps there's a lot being thrown at you in a short amount of time. I'm working on a project that will help clear this up.
The EBTR of the techniques is simply Exposing Beyond The Right. The right refers to the right of the camera-generated jpg which you see on the back of your camera. The RAW file contains more useful information beyond what the right of the jpg may show. This information can be used when processing the RAW file. Where the jpg may, conservatively, indicate overexposure, the RAW file can contain useful and not overexposed information. I hope this helps.
--Bob
lhardister wrote:
This whole discussion is so over my head that I cannot even begin to follow it. Perhaps a definition or two would be a beginning--I understand the general meaning of "ETTR", but would someone please enlighten me (briefly, please) about the meaning of "EBTR"?
Jun 24, 2020 13:33:02 #
Even with SOOC jpegs, you have control over level of contrast, saturation, sharpening, etc. through the camera's menu. At least most of my digital cameras do - even the simple, inexpensive pocket cameras! These camera settings often will effect blown out areas within a given image. Without informing us how you set the parameters in your camera, displaying examples of SOOC images doesn't really say all that much. For all we know, the contrast level could have been set really high, resulting in severely over-exposed highlights within the image.
Jun 24, 2020 13:56:41 #

rmalarz wrote:
Perhaps there's a lot being thrown at you in a sho... (show quote)
Thank you, rmalarz. That response was very kind and helpful.
Check out Digital Artistry section of our forum.
Jun 24, 2020 14:00:00 #
Jun 24, 2020 14:06:54 #
selmslie wrote:
That's my fault for assuming people are familiar with the term.
See Exposing to the Right Explained.
See Exposing to the Right Explained.
Thank you selmslie. The article was very interesting and helpful.
Jun 24, 2020 14:10:15 #

rmalarz wrote:
These are some of the nicest images you've posted. At least of those I've seen.
I see, though, that you changed some parameters, aperture priority, black and white (little difference that makes), and applying filters (yellow). The discussions, to this point and at least from my side, have involved manually setting ISO, shutter speed, and aperture.
--Bob
I see, though, that you changed some parameters, aperture priority, black and white (little difference that makes), and applying filters (yellow). The discussions, to this point and at least from my side, have involved manually setting ISO, shutter speed, and aperture.
--Bob
Thank you. I knew that the clouds would appeal to you.
The JPEG settings in the camera are irrelevant. They are just there to show that Auto exposure can get close to the objective.
The heavy lifting was all done during the raw conversion in CO:

All of the effect was produced in the B&W conversion dialog (lower left corner). I moved the red and yellow sliders to +50 and the blue and cyan sliders to -50. The green and magenta sliders were left at 0. The only other adjustment was to move the shadow slider to the right.
The other three images got exactly the same adjustments except that I moved the Exposure slider to get them to match the brightness of the first image.
There is no noise visible in the images, even #4, because they were exposed at base ISO. Not bad considering that this is an APS-C 16MP camera.
The bottom line is that the drama in the clouds was a matter of luck - getting just the right weather. The post processing was a piece of cake.
The exposure (except for #3 where the raw highlights are blown slightly) didn't really make any difference at all.
Jun 24, 2020 14:19:58 #
rook2c4 wrote:
Even with SOOC jpegs, you have control over level of contrast, saturation, sharpening, etc. through the camera's menu. At least most of my digital cameras do - even the simple, inexpensive pocket cameras! ....
Although this is possible there is a fundamental problem with relying on the camera's adjustments. You can't really judge the results looking at the small LCD, especially when it's daylight or very dark. If you don't like what you see you will need to make a change and retake the image.
But you can edit a reasonably exposed raw file (just don't blow the raw highlights) during conversion and apply all sorts of adjustments until you get what you want. With a decent raw editor (many good ones are free) you can apply adjustments in any order and alter them at any time.
Check out Smartphone Photography section of our forum.
Jun 25, 2020 07:31:52 #
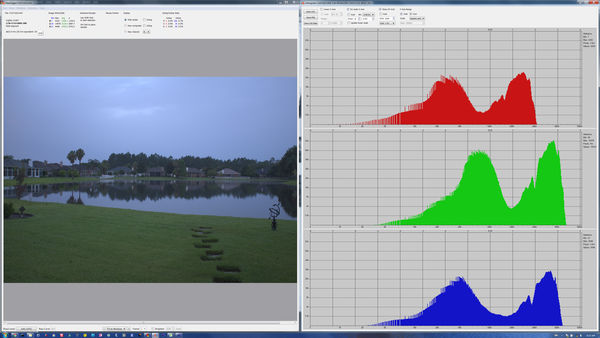
Without harsh lighting you are less likely to get a dramatic image, even if the DR is wide.
The light value (LV) was about 9 stops darker than broad daylight. The dynamic range was about seven stops.
These two images were taken at about 6:30 AM using Auto exposure and two different ISO settings. The two images on the left are SOOC, the two on the right are the same images from the raw file with no adjustments. Nothing could be done using a B&W conversion to make them more dramatic.
The both images are about half a stop from the maximum raw value so there is nothing that ETTR could have contributed.

Jun 25, 2020 07:47:29 #

selmslie wrote:
At about noon today I took four quick shots with a... (show quote)
XXXXXXXXXXXXXXXXXXXX
A helpful thread on ETTR and EBTR was posted eight years ago and is totally as valid in all its salient points today as it was then.
https://www.uglyhedgehog.com/t-262533-1.html
A good, slow, relaxed, and thoughtful read of that thread should dispel any lingering misunderstandings on the matter of EBTR.
Dave
Jun 25, 2020 09:32:00 #
Uuglypher wrote:
XXXXXXXXXXXXXXXXXXXX
A helpful thread on ETTR and EBTR was posted eight years ago and is totally as valid in all its salient points today as it was then.
https://www.uglyhedgehog.com/t-262533-1.html
A good, slow, relaxed, and thoughtful read of that thread should dispel any lingering misunderstandings on the matter of EBTR.
Dave
The link I posted earlier, Exposing to the Right Explained (LAST UPDATED ON APRIL 4, 2018), does a much better job of explaining it than you did. It comes from a reputable source that really understands the subject and it contains high quality examples.
Pay particular attention to 9) When to Avoid ETTR, "If you aren’t shooting at your camera’s base ISO, ETTR is all but useless. For example, you wouldn’t want to shoot a scene at ISO 1600 and then decrease the exposure by one stop in Lightroom — it’s just as good to shoot the scene at ISO 800 in the first place, and that is less likely to blow out the highlights in your image anyway."
Your invention of EBTR and ERADR do not add clarity.
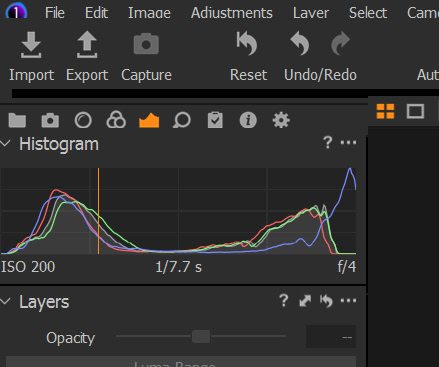
The term ETTR is applicable to the camera's JPEG or its raw file depending on which one you use. However it's normally used in the context of the raw file to be developed on the computer. The camera will only display the JPEG histogram. The only way to get a clear understanding of the raw file is to look directly at that histogram, not the histogram displayed in your raw converter or on the back of your camera.
You an see the distinction here:
Jun 25, 2020 10:28:15 #

I will point out again that If you’re a Canon shooter and your camera is supported, Magic Lantern (free) will provide a raw histogram in real-time, among it’s many useful features.
Scotty, I thought we were in agreement on the use of ETTR, but I in NO WAY agree with bolded statement number 9 above. Limiting ETTR use to base ISO essentially eliminates the on-sensor amplification which IS needed for low light imagery. I’ve made my arguments above, and they have not been refuted. Agreeing with number 9 means that ETTR isn’t useful in exactly the situations when you need it most. Why throw away a stop or more of DR which you can easily obtain by using the full range of the A/D when you’re already down to fewer stops above the noise - it’s the last thing you want to do.
Scotty, I thought we were in agreement on the use of ETTR, but I in NO WAY agree with bolded statement number 9 above. Limiting ETTR use to base ISO essentially eliminates the on-sensor amplification which IS needed for low light imagery. I’ve made my arguments above, and they have not been refuted. Agreeing with number 9 means that ETTR isn’t useful in exactly the situations when you need it most. Why throw away a stop or more of DR which you can easily obtain by using the full range of the A/D when you’re already down to fewer stops above the noise - it’s the last thing you want to do.
Check out Infrared Photography section of our forum.
Jun 25, 2020 10:38:36 #
a6k
Loc: Detroit & Sanibel
selmslie wrote:
The link I posted earlier, url=https://photograph... (show quote)
In your examples, the blue channel is OE in the CaptureOne histogram but has plenty of room left in RawDigger. I agree but I'd like to add an observation that if you use "Linear Response" in CaptureOne's "Base Characteristics" you will see more headroom. My examples here don't show it well because the image was just an exposure test of my monitor screen - so no highlights. But these examples do show that the Linear Response curve is much different.
Looking at the graph, if you look at the extreme right side of the two curves you will see that except for the final 1/3 stop, there are more useful tone values at the right end using Linear Response.


Jun 25, 2020 10:57:25 #
TriX wrote:
... Scotty, I thought we were in agreement on the use of ETTR, but I in NO WAY agree with bolded statement number 9 above. Limiting ETTR use to base ISO essentially eliminates the on-sensor amplification which IS needed for low light imagery. ....
Of course you need higher ISO for low light images. But then you need to live with the fact that you will be giving up DR. You might end up with some noise and have to find a way to remove it like I showed here.
But you just need a way to avoid blowing the raw highlights. You can do this with highlight warnings, trial and error or bracketing. You might end up with a raw capture close to the raw limit. If you want to call that ETTR that's fine. I would just call it careful exposure with the raw limit in mind, not ETTR or EBTR.
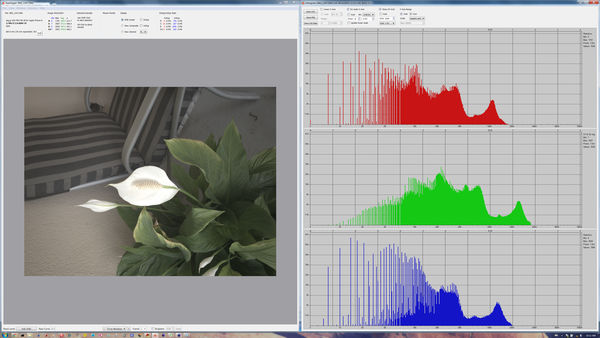
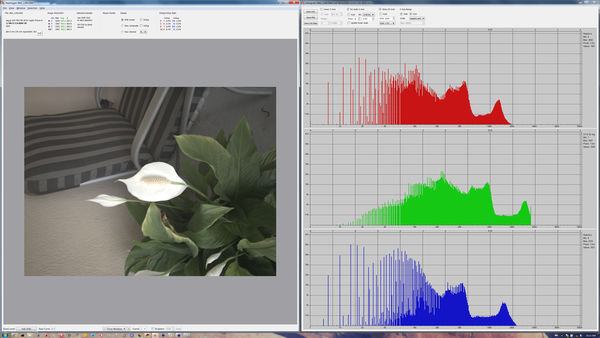
Here is an example in reduce lighting (OK, it's not really dark). Auto exposure worked fine using 645 Pro on an iPhone 8.
But when I tried to press my luck by adding 1/3 stop while ignoring the highlight warnings I blew the green channel.
Jun 25, 2020 11:01:56 #
The oft repeated statement "If you aren’t shooting at your camera’s base ISO, EBTR is all but useless.” is unequivocally untrue!
It is true that as ISO is increased there is an increase in captured noise, but regardless of how high the ISO, less noise will be captured with use of EBTR than without EBTR.
To prove it you have but perform that simple comparative exposure experiment. Scotty must have forgotten the image pair shot at ... ISO 16,000 as I recall.. One with and one without EBTR ... that clearly demonstrated the fact that regardless of ISO, EBTR clearly reduces captured noise. I’m on my way out right now. But if the point is still being argued when I get back I’ll dig out the pictorial evidence and post it!
Best regards,
Dave
Jun 25, 2020 11:08:28 #
a6k wrote:
In your examples, the blue channel is OE in the CaptureOne histogram but has plenty of room left in RawDigger. I agree but I'd like to add an observation that if you use "Linear Response" in CaptureOne's "Base Characteristics" you will see more headroom. ...
You might think you have more headroom when you don't.
If you use Logarithm rather than either of the other two you get a better idea. When I did it looked like maybe even the Auto exposure image is past the raw limit.
To be certain I looked at the maximum raw value in the other panel. The green channel is actually blown out in both images because the maximum value is 3567. That's the maximum value that this iPhone will record. It's 0.2 stops lower than the theoretical maximum of 4095 for a 12-bit raw file.

If you want to reply, then register here. Registration is free and your account is created instantly, so you can post right away.
Check out Astronomical Photography Forum section of our forum.