Photostacking
Jul 4, 2019 08:24:47 #
dhroberts
Loc: Boston, MA, USA
Have you tried HeliconFocus as an alternative to Zerene? I have done extensive tests of the two (and of Photoshop), and found that Helicon is superior. You can try it out for 30 days free.
Jul 4, 2019 08:53:41 #
Jul 4, 2019 09:14:57 #
cactuspic
Loc: Dallas, TX
dhroberts wrote:
Have you tried HeliconFocus as an alternative to Zerene? I have done extensive tests of the two (and of Photoshop), and found that Helicon is superior. You can try it out for 30 days free.
I have used both extensively and stacked thousand of images. On any particular image, one may work better than the other. Overall, however, I found Zerene to be superior for my needs, primarily for its retouching capability that allow me to process the image in multiple modes and choose different development for different parts of the image. It also allows for slabbing. I get far fewer halos and can eliminate more artifacts with Zerene. Helicon seems to work substantially faster though. Without a doubt, I process most of my images in Zerene. As in many things, individual opinions will vary.
Jul 4, 2019 09:23:16 #
Jul 4, 2019 09:23:43 #
I have both Zerene and Helicon as dedicated focus stacking software and I use them both although I tend to use Zerene most often.
Another very convenient program that I use to control my camera is Digicam which is a "freeware" open source program that controls Nikon and Canon cameras (others I'm sure would work also). It is a wonderful interface to control the camera via a PC (MAC or Windows) and you can shoot focus stacked images and control the shutter release. Of course it is a way of viewing your subject on screen. I can't speak more highly of it. Yes, Helicon can do it also but for a true no cost program I actually like it better.
Another very convenient program that I use to control my camera is Digicam which is a "freeware" open source program that controls Nikon and Canon cameras (others I'm sure would work also). It is a wonderful interface to control the camera via a PC (MAC or Windows) and you can shoot focus stacked images and control the shutter release. Of course it is a way of viewing your subject on screen. I can't speak more highly of it. Yes, Helicon can do it also but for a true no cost program I actually like it better.
Jul 4, 2019 09:38:48 #
will47 wrote:
What are the best f stops to use to start practicing photostacking? I use a Canon 7D Mark ll and a 6D mark ll, processed in PS CC 2019. Thanks.
I would suggest using an aperture that is good for the particular lens you are using. Whatever lens you use, avoid the largest or the smallest.
Jul 4, 2019 09:57:38 #
chuckla
Loc: Kennesaw, GA USA
sippyjug104 wrote:
I used a $35 enlarger lens coupled onto a $65 Raynox lens mounted on extension tubes that were $25 so you need not make a large investment to do this.
Could you provide more detail on this equipment setup? How do you couple an enlarger lens to a Raynox, for example. Which Raynox? I've been trying focus stacking with Helicon Focus and a Nikon 105 macro lens on a D850, but I'd like to try smaller subjects like that black ant without breaking the bank!
Jul 4, 2019 10:46:36 #
juan_uy
Loc: Uruguay
sippyjug104 wrote:
Here's a focus stacked image of a black ant that I... (show quote)
The hard part is convincing the ant to stay steady I guess

How do you get and prepare the ant?
Jul 4, 2019 11:14:45 #

juan_uy wrote:
The hard part is convincing the ant to stay steady I guess
How do you get and prepare the ant?
How do you get and prepare the ant?
You freeze dry it.
Superglue works too.
Then if you kill enough of them you can deep fry them and serve them over rice with a bit of soja sauce.
Jul 4, 2019 11:30:00 #
Thanks for asking about the macro/micro setup that I use and I've attached some pictures of it that were requested.
The first item is simply a set of inexpensive extension tubes. I chose size M42 for they are the most common thread size and fit many of the vintage lenses and accessories that can easily be found. I use a Nikon "F" mount to M42 adapter ($8.00) to attach it to the camera.
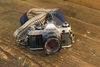
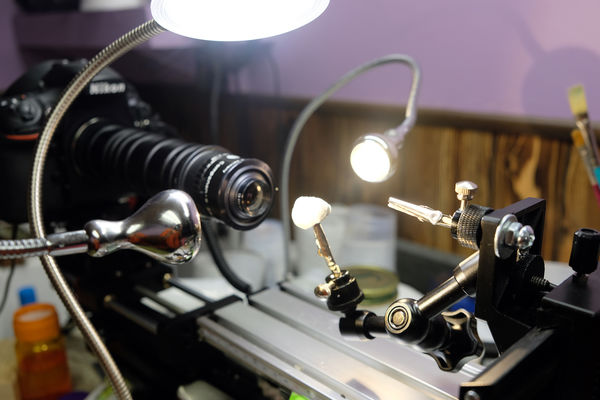
The next image is what it looks like when fully assembled followed by a picture of it mounted on my camera.
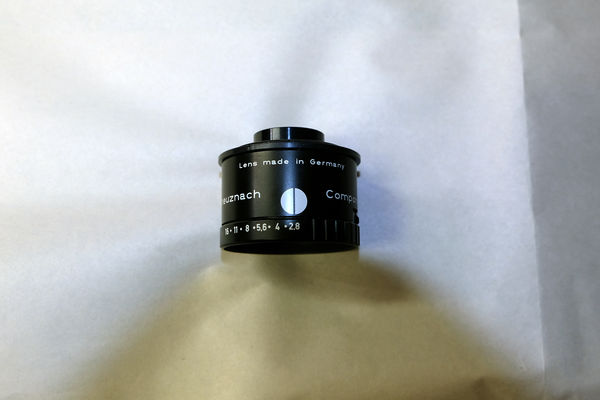
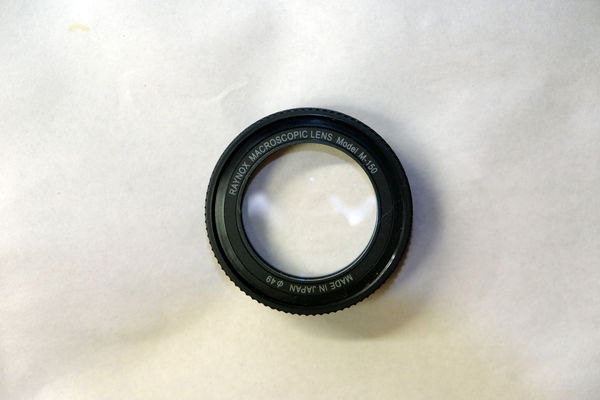
This is my enlarger lens. Nikon El-Nikkor 50mm f/2.8 are excellent lenses and can be had for under $40.00. I attach it to a Raynox DCR-150 although it is not necessary for the enlarger lens alone provides high magnified images with an extension tube or bellows alone. Consider it to be a 'nice to have' option.
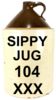
Diffusing light is absolutely necessary and I use translucent drink cups (good excuse to get a cold beer or mixed drink at the bar!). I place colored paper in the bottom of the cups to provide a variety of pastel backgrounds for my images.
These are the IKEA LED work lamps and I can't not recommend them more highly for $12.00. The flat LED lamp is simply a work lamp that I use to help me set things up.
The sliding work table was $36.00. It works great as an "X" and "Y" axis adjustment for staging. Beware that there are many exact same sliding work tables for crazy prices. They are intended to be used for drilling and milling although no real machinist would ever use one but they are great for this work.
I mounted a cheap plastic 4-way focus rail on it for final adjustment and attached an $8.00 magic arm to hold diffusers or other items as you can see in these photos.
The first item is simply a set of inexpensive extension tubes. I chose size M42 for they are the most common thread size and fit many of the vintage lenses and accessories that can easily be found. I use a Nikon "F" mount to M42 adapter ($8.00) to attach it to the camera.
The next image is what it looks like when fully assembled followed by a picture of it mounted on my camera.
This is my enlarger lens. Nikon El-Nikkor 50mm f/2.8 are excellent lenses and can be had for under $40.00. I attach it to a Raynox DCR-150 although it is not necessary for the enlarger lens alone provides high magnified images with an extension tube or bellows alone. Consider it to be a 'nice to have' option.
Diffusing light is absolutely necessary and I use translucent drink cups (good excuse to get a cold beer or mixed drink at the bar!). I place colored paper in the bottom of the cups to provide a variety of pastel backgrounds for my images.
These are the IKEA LED work lamps and I can't not recommend them more highly for $12.00. The flat LED lamp is simply a work lamp that I use to help me set things up.
The sliding work table was $36.00. It works great as an "X" and "Y" axis adjustment for staging. Beware that there are many exact same sliding work tables for crazy prices. They are intended to be used for drilling and milling although no real machinist would ever use one but they are great for this work.
I mounted a cheap plastic 4-way focus rail on it for final adjustment and attached an $8.00 magic arm to hold diffusers or other items as you can see in these photos.


Jul 4, 2019 11:47:01 #
lsupremo
Loc: Palm Desert, CA
How did you keep the ant from squirming around? Seriously, I applaud your creativity in getting what you wanted w/o emptying you wallet. Great work!
quote=sippyjug104]Here's a focus stacked image of a black ant that I processed. I used a $35 enlarger lens coupled onto a $65 Raynox lens mounted on extension tubes that were $25 so you need not make a large investment to do this.
Mounting the camera on a rock-solid base is extremely important. I used a piece of 3/4-inch plywood 12-inches wide by 30-inches long with weights on both end setting flat on a countertop. My initial focus rail was a 'screw type' manually turned rail that I attached to the plywood so the camera would be securely still mounted.
I'd place the specimen in front of the camera and while in "Live View" move the subject forward and back until the closest point of the specimen was in sharp view. I shoot in the Mirror Up mode and I close the eye viewfinder to keep unwanted light from entering the camera. I use a remote shutter release and I move the focus rail ever so slightly, stop, and take a shot, wait a second, move forward, and repeat, repeat, repeat until I've reached the farthest point in focus of the subject.
My lighting setup is two IKEA LED desk work lamps that are $12 each and I use translucent drink cups with white paper towel to diffuse the light.
Eventually I purchased a motorized focus rail so I no longer turn a crank.[/quote]
Jul 4, 2019 11:50:43 #
The OP shooting Canon could try the DPP software that came free with the camera, focus merge menu.
Jul 4, 2019 12:20:51 #
I use several methods to still a specimen.
For those that I want to "catch and release", I place them in the freezer for a bit to put them into hibernation. With everything set up in advance and test shots taken I can place the subject in position and I will get several minutes of it still. I do mostly side or face view sessions which require less frames.
For those that I want to preserve (those considered to be a pest, that sting or bite with venom, invasive or highly populous) I place in a glass jar with cotton balls and paper towels saturated with Ethyl Acetate (or Acetone) to dispatch them. I preserve some in denatured alcohol and the hairy and fuzzy ones dry in a container with mothballs. Grub soft bodied ones I place in scalding water for a few minutes to kill any bacteria in the gut elsewise they turn black in a few days.
The ant that I posted is one that I have preserved. Working with deceased insects is like a cross between being a mortician and a taxidermist.
Jul 4, 2019 13:43:23 #
sippyjug104 wrote:
... Working with deceased insects is like a cross between being a mortician and a taxidermist.
What a concept! Ant taxidermy. A new hobby opportunity.
Jul 4, 2019 14:32:30 #
ldhflyguy
Loc: near Chicago
dhroberts wrote:
Have you tried HeliconFocus as an alternative to Zerene? I have done extensive tests of the two (and of Photoshop), and found that Helicon is superior. You can try it out for 30 days free.
Hi dhroberts.
I've been experimenting with focus stacking using Photoshop and I'm happy with the results. "Auto-Align Layers" and "Auto-Blend Layers" in PS seem to be pretty time consuming. I am wondering if HeliconFocus or Zerene would get the job done faster. I probably don't need any special features other than what I have in PS. I typically stack about 25-40 images.
If you want to reply, then register here. Registration is free and your account is created instantly, so you can post right away.