I want to do better.
Jan 10, 2013 15:46:14 #
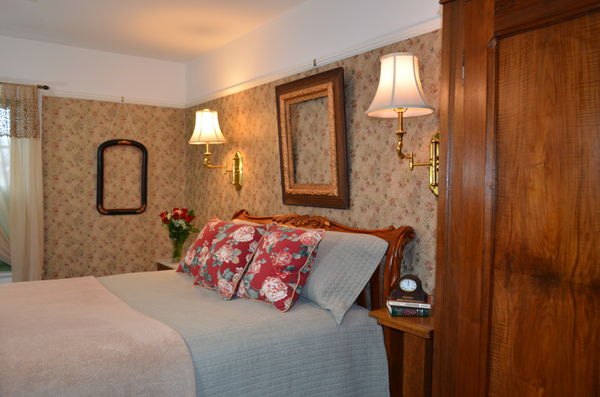
I know the first one is not tack sharp, but why. Maybe faster?
The ISO was 500 and speed was at 1/60.
The others are pretty sharp but how can I do better? I must have taken 150 shots for this project.
The ISO was 500 and speed was at 1/60.
The others are pretty sharp but how can I do better? I must have taken 150 shots for this project.
Jan 10, 2013 16:09:13 #

Just my opinion, but #1 needs a shorter focal length. It feels crowded. On a FF sensor I would go towards 20mm or shorter (I'd pull my 16-35 all the way back and get at least a few extra wide ones). Then I would bring in all the available light I could and close my F stop for a big DoF. Maybe even a speedlight with a scrim to help with the light, but only soft light, and not too much to overpower the hourglass shaped cast from the bedside lamps.
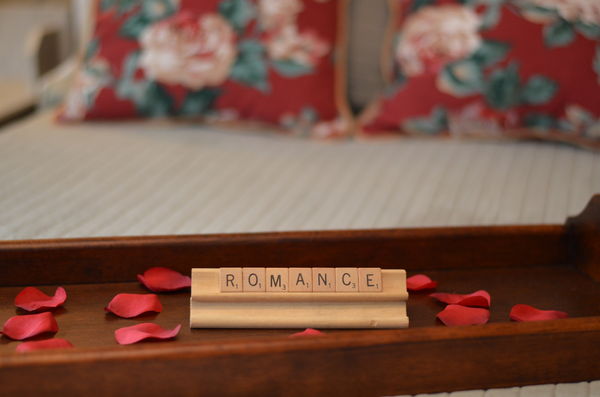
For #2, I would arrange the petals more random. They seem in rows, and my mind wants to find a pattern it cant see all of (probably a hint of OCD on my part). To me, the front rail seems to divide me from the picture, I would probably frame that out, or turn whatever that is 90 deg and get some blurry wood grain leading up to the tiles to force even more perspective.
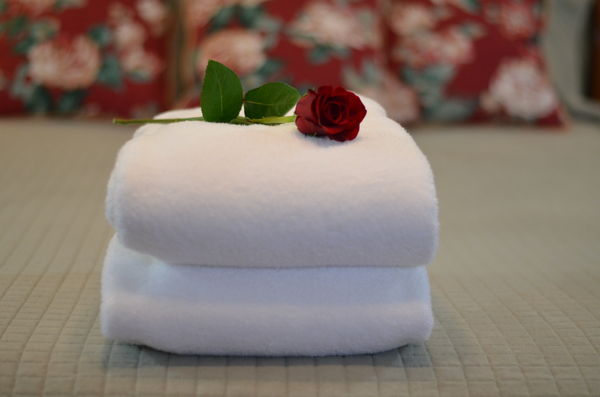
#3, the only critique I might have, is I would have tried a slightly lower angle as well and see if I thought it looked more dramatic.
Again, these are all such minor things, great work, I love the creativity on 2 &3! Wow, how easy it is to pick on someone elses work. Oh well, it's my honest opinion, but just an opinion. They are like belly buttons, everyone has one.
For #2, I would arrange the petals more random. They seem in rows, and my mind wants to find a pattern it cant see all of (probably a hint of OCD on my part). To me, the front rail seems to divide me from the picture, I would probably frame that out, or turn whatever that is 90 deg and get some blurry wood grain leading up to the tiles to force even more perspective.
#3, the only critique I might have, is I would have tried a slightly lower angle as well and see if I thought it looked more dramatic.
Again, these are all such minor things, great work, I love the creativity on 2 &3! Wow, how easy it is to pick on someone elses work. Oh well, it's my honest opinion, but just an opinion. They are like belly buttons, everyone has one.
Jan 10, 2013 16:36:45 #
Out of the Fog
Loc: Eastern Edge of North America
lindann wrote:
I know the first one is not tack sharp, but why. Maybe faster?
The ISO was 500 and speed was at 1/60.
The others are pretty sharp but how can I do better? I must have taken 150 shots for this project.
The ISO was 500 and speed was at 1/60.
The others are pretty sharp but how can I do better? I must have taken 150 shots for this project.
Hi, it's really easy to criticize the work of others so please only take my comments as suggestions to try. 1/60sec is the minimum shutter speed for handheld. Even at this speed it is easy to introduce some camera movement into pics. I'm not sure what you focused on in no1 but to maximize you depth of field, try focusing on a point 1/3 into the depth of your subject.
I like no 2&3 best. You might try making the lines in 2 more parallel or more askew. No 3 maybe try propping the top towel against the bottom one (on an angle) placing more emphasis on the rose.
Don't be afraid to try different things in you images, especially things you can control.
Jan 10, 2013 22:07:58 #

Good suggestions above. It looks as though the focus point in the first one was on the wood wall on the right instead of the pillows. You didn't mention the f-stop you used. Also, UHH seems to darken and softens posted images so you might want to check the "Download" box when posting so we can see the uncompressed image (as you loaded it).
May I ask, what are you using the images for? A commissioned job? Personal?
May I ask, what are you using the images for? A commissioned job? Personal?
Jan 11, 2013 08:48:18 #
Thank you to everyone. I love this forum. I am going to try again. I did think I focus the pillows but seeing it again maybe you are right. Oh I am using the photos for my website. I own a bed and breakfast. I have had professions come and do them. When looking back I am shocked the first one didn't use a tripod or lights. She didn't do bad but she didn't know anything about the feel of bed and breakfasts. The second does bed and breakfasts she used a tripod and lights and that is a long story. I feel after buying my own camera taking classes and practicing for a long long time I can do my own. My web person is going to put new pictures up for me. That is my story. :) Oh the F stop was 3.8
Jan 11, 2013 10:24:52 #
Interesting story, thanks. I am glad you can reshoot with some degree of leisure. Consider what depth of field you want in your images and adjust your f-stop appropriately.
Jan 13, 2013 03:51:25 #

I'm glad to hear you're going to tackle this project again, Linda. The more times you do it, the better it will get.
I must suggest you use a tripod, there are several reasons, and I will mention a couple of them:
1. It will allow you to use smaller lens apertures(f-8 or f-11), at longer shutter durations. Smaller apertures will allow for more of your picture to be in sharp focus.
2. Once you are "set-up" on a shot, you can leave the camera and rearrange elements of your picture, and come back to the camera, still set up on the scene.
3. You can level your camera! You MUST level your camera and NOT allow any deviation from level. When you tilt your camera up or down to frame your picture, vertical lines in your picture (doors, windows, etc.) become distorted. Look on the right-hand side of your 1st picture. It's important to avoid this.
So...when you put your camera on your tripod, level it to perfection, and then only raise or lower your tripod to frame your photo, do not tilt the camera.
I agree you are the one to take the photos, you have a great eye for what looks good, and how to present the room and environment. Just keep on trying, you're going to get better and better with experience! You're doing great!
Jan 13, 2013 10:26:22 #
Danilo wrote:
I'm glad to hear you're going to tackle this proje... (show quote)
This is all good advice and that is what I am looking for. I really appreciate it. I will post some others after all the advice. Should I just post them on this feed?
Jan 13, 2013 12:28:04 #
lindann wrote:
This is all good advice and that is what I am looking for. I really appreciate it. I will post some others after all the advice. Should I just post them on this feed?
This is all good advice and that is what I am looking for. I really appreciate it. I will post some others after all the advice. Should I just post them on this feed?
I probably won't know you posted unless you do so here. You mentioned that you thought the previous photographers didn't get the "feel' of your lodging on "film". I assume you know the mood you are trying to show. May I suggest, you might want to include people as a very minor element. You probably ought to have pictures in the picture frames on the wall. Just like all photography, you want the viewer to linger on the image, so good composition, cropping and post processing are important.
Good luck
Jan 15, 2013 14:47:14 #
lindann wrote:
quote=Danilo I'm glad to hear you're going to tac... (show quote)
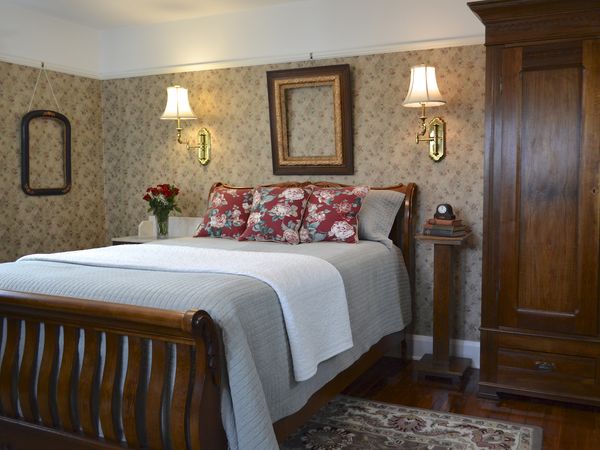
Ok here are more. How am I doing? This really to everyone.
Jan 15, 2013 16:40:10 #
jdubu
Loc: San Jose, CA
These are better, I agree with other posters that a tripod is essential.
The mood you create is made from the details of the photo, once you have decided the best point of view. Get that point of view when you move around and take test shots, remember moving just a few inches, a foot in any direction can make a photo sing.
In your first photo, a tripod would allow you to set your camera correctly to avoid the convergance you have where the upper half of your photo is wider than the bottom half.If you have the lighting on dimmers, dial them down to a very low setting, it will enhance the mood of the picture and not be a stark white spot. Move around to eliminate the armoire reflection if possible.
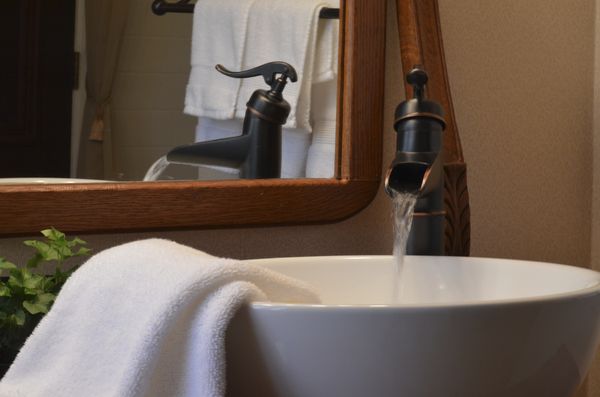
The second shot doesn't work for me. There isn't a reason for the water to be running to wet the towel. The actual faucet is lost in the mirror framing, where to me, the reflection should be the subdued part of the image. The contrast of the white towels in the reflection are what draws my eye and then I see the reflection of the door frame and other things I want to identify.
Perhaps an angle camera left, pulled back to show the vanity top with the towel folded, steam from warm water curling up (warm and inviting) and this time a shallow DOF to blur out the mirror reflection and recede it into the background.
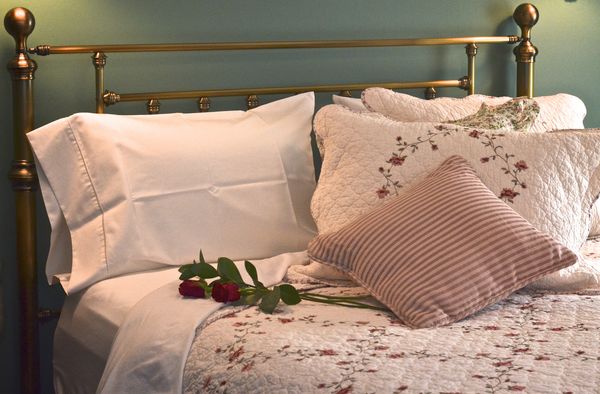
The last one is good, but it's the details again. I would iron the pillowcase so it doesn't have the distracting creases. Crop in tighter to the left, to make that part of the bed more intimate and inviting.
On all the pics, using controlled lighting will help set the mood you want, and not be so flat or reflective. Lower incandescent lighting and focus additional light where you need it.
Imagine the last shot cropped in, the main light spot focused on the roses, the sconces turned down or off. Maybe the bed is turned down a bit more to be more inviting? Try the pillows in different positions, see what you like. I would have eliminated the striped pillow, as it is a bit structured for the rose motif you have going. Maybe a red box of chocolates if you wanted to repeat the red? lots of things to try.
The mood you create is made from the details of the photo, once you have decided the best point of view. Get that point of view when you move around and take test shots, remember moving just a few inches, a foot in any direction can make a photo sing.
In your first photo, a tripod would allow you to set your camera correctly to avoid the convergance you have where the upper half of your photo is wider than the bottom half.If you have the lighting on dimmers, dial them down to a very low setting, it will enhance the mood of the picture and not be a stark white spot. Move around to eliminate the armoire reflection if possible.
The second shot doesn't work for me. There isn't a reason for the water to be running to wet the towel. The actual faucet is lost in the mirror framing, where to me, the reflection should be the subdued part of the image. The contrast of the white towels in the reflection are what draws my eye and then I see the reflection of the door frame and other things I want to identify.
Perhaps an angle camera left, pulled back to show the vanity top with the towel folded, steam from warm water curling up (warm and inviting) and this time a shallow DOF to blur out the mirror reflection and recede it into the background.
The last one is good, but it's the details again. I would iron the pillowcase so it doesn't have the distracting creases. Crop in tighter to the left, to make that part of the bed more intimate and inviting.
On all the pics, using controlled lighting will help set the mood you want, and not be so flat or reflective. Lower incandescent lighting and focus additional light where you need it.
Imagine the last shot cropped in, the main light spot focused on the roses, the sconces turned down or off. Maybe the bed is turned down a bit more to be more inviting? Try the pillows in different positions, see what you like. I would have eliminated the striped pillow, as it is a bit structured for the rose motif you have going. Maybe a red box of chocolates if you wanted to repeat the red? lots of things to try.
Jan 17, 2013 15:30:22 #
Jan 23, 2013 22:49:29 #

Jan 25, 2013 21:43:03 #

lindann wrote:
Ok here are more. How am I doing? This really to everyone.
Ok here are more. How am I doing? This really to everyone.
Very nice. Much better. First photo makes the room look much larger. All photos are more inviting. Scrabble photo in the first set was very inventive and I liked it but the sink is much more bed and breakfast as well as classy. The rose on the towels was nice but on the bed it looks more like a place I would want to go for a romantic getaway or honeymoon.
Jan 26, 2013 22:40:59 #
docrob
Loc: Durango, Colorado
lindann wrote:
I know the first one is not tack sharp, but why. Maybe faster?
The ISO was 500 and speed was at 1/60.
The others are pretty sharp but how can I do better? I must have taken 150 shots for this project.
The ISO was 500 and speed was at 1/60.
The others are pretty sharp but how can I do better? I must have taken 150 shots for this project.
low contrast
If you want to reply, then register here. Registration is free and your account is created instantly, so you can post right away.