Eliminate Oversharping
Dec 5, 2012 18:34:15 #

Very Interesting artical
Eliminate Oversharpening
Get the benefits of creative sharpening without the drawbacks
Sharpening is one of the most- un-glamorous, yet totally essential, digital imaging edits you can make to your photographs. Sharpening is a must if you want to make your images look their best; RAW files require sharpening to make them look like JPEGs, and JPEGs (as well as RAW, TIFFs and every other image file format) require specific sharpening based on the output of the finished image. Not to mention the creative sharpening that dramatically affects the style of a photograph, which is all subjective based on creative license
But this post isn't about how to sharpen. It's about the downside of sharpeningthe artifacts and problems that you can create in your digital image files by sharpening too much. So keep reading to find out how to minimize sharpening problems and keep from oversharpening in the first place.
The best way to eliminate sharpening artifacts is to keep from oversharpening in the first place. How do you do this? You sharpen deliberately. The Threshold slider in Photoshop's Unsharp Mask filter (a favorite sharpening tool for many photographers, myself included) is a powerful tool. With it you can dictate what types of edges are sharpened in a photograph. To understand this fully, I'll back up for a second and explain how sharpening works.
Digital image sharpening is essentially a function of accentuating the contrast between edges of light and dark within a scene. A portrait subject's dark shoulder against a light background, for instance, is an example of a large edge that can be accentuated (or artificially "sharpened") in a digital image. But so is the contrast edge between a highlight in the eye and the dark part of the iris, and the edge between a hair and skin, and the edge between a pore's highlight and shadow. All of those edges of contrast can be sharpened, so it's up to you to dictate which ones and how much. That brings us back to Threshold.
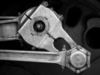
The Amount and Radius controls in sharpening tools like Unsharp Mask dictate, as you can tell, the amount of sharpening and the radius (measured in pixels from the contrast edge) of the affect. But it's the Threshold that determines which edges will be affected. A higher threshold limits sharpening to the biggest, boldest edges in a scene (like shoulders in a portrait), whereas a lower threshold allows every edge to be affectedincluding all those hairs and pores. The problem this illustrates is the added sharpness in things like pores and hairs (not to mention blemishes and flaws) is almost never desirable. The faux sharpness exaggerates problems and creates one type of sharpening artifact: the added appearance of noise-like texture that comes from giving more pixels more defined edges. To eliminate this, start with a higher threshold and lessen the amount of the sharpening. Concentrate on sharpening more significant contrast edges to minimize this grainy, noisy, hypertextured variety of oversharpening.
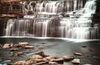
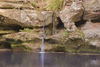
The other telltale sign of oversharpening is a halo effect around major contrast edges. This appears most often as a dark shadowed outline that spills into bright areas, and it can be very distracting. To eliminate it, of course you could start by sharpening a lesser amount, or adjusting the Radius to be slightly smaller, but this type of sharpening artifact is usually a side effect from creative sharpening that is desirable elsewhere in the frame. I find it happens a lot when I'm fairly aggressive with the Clarity slider in Lightroom; it crops up if I'm really accentuating the sharpness of a scene to give it an edgier look. But I want to eliminate this telltale sign of oversharpening without eliminating the rest of the "good" sharpness in the scene. To do that in Lightroom I use the Adjustment Brush in the Develop module and adjust the clarity slider way down toward -100. Then I simply paint away the oversharpened halo wherever it's evident in the frame. In Photoshop, a simple layer mask on the oversharpened layer allows you to selectively paint away artifacts. This level of selective control, whether you wield it in Photoshop or Lightroom, is a great way to get the benefits of dynamic sharpening without the drawbacks.
Eliminate Oversharpening
Get the benefits of creative sharpening without the drawbacks
Sharpening is one of the most- un-glamorous, yet totally essential, digital imaging edits you can make to your photographs. Sharpening is a must if you want to make your images look their best; RAW files require sharpening to make them look like JPEGs, and JPEGs (as well as RAW, TIFFs and every other image file format) require specific sharpening based on the output of the finished image. Not to mention the creative sharpening that dramatically affects the style of a photograph, which is all subjective based on creative license
But this post isn't about how to sharpen. It's about the downside of sharpeningthe artifacts and problems that you can create in your digital image files by sharpening too much. So keep reading to find out how to minimize sharpening problems and keep from oversharpening in the first place.
The best way to eliminate sharpening artifacts is to keep from oversharpening in the first place. How do you do this? You sharpen deliberately. The Threshold slider in Photoshop's Unsharp Mask filter (a favorite sharpening tool for many photographers, myself included) is a powerful tool. With it you can dictate what types of edges are sharpened in a photograph. To understand this fully, I'll back up for a second and explain how sharpening works.
Digital image sharpening is essentially a function of accentuating the contrast between edges of light and dark within a scene. A portrait subject's dark shoulder against a light background, for instance, is an example of a large edge that can be accentuated (or artificially "sharpened") in a digital image. But so is the contrast edge between a highlight in the eye and the dark part of the iris, and the edge between a hair and skin, and the edge between a pore's highlight and shadow. All of those edges of contrast can be sharpened, so it's up to you to dictate which ones and how much. That brings us back to Threshold.
The Amount and Radius controls in sharpening tools like Unsharp Mask dictate, as you can tell, the amount of sharpening and the radius (measured in pixels from the contrast edge) of the affect. But it's the Threshold that determines which edges will be affected. A higher threshold limits sharpening to the biggest, boldest edges in a scene (like shoulders in a portrait), whereas a lower threshold allows every edge to be affectedincluding all those hairs and pores. The problem this illustrates is the added sharpness in things like pores and hairs (not to mention blemishes and flaws) is almost never desirable. The faux sharpness exaggerates problems and creates one type of sharpening artifact: the added appearance of noise-like texture that comes from giving more pixels more defined edges. To eliminate this, start with a higher threshold and lessen the amount of the sharpening. Concentrate on sharpening more significant contrast edges to minimize this grainy, noisy, hypertextured variety of oversharpening.
The other telltale sign of oversharpening is a halo effect around major contrast edges. This appears most often as a dark shadowed outline that spills into bright areas, and it can be very distracting. To eliminate it, of course you could start by sharpening a lesser amount, or adjusting the Radius to be slightly smaller, but this type of sharpening artifact is usually a side effect from creative sharpening that is desirable elsewhere in the frame. I find it happens a lot when I'm fairly aggressive with the Clarity slider in Lightroom; it crops up if I'm really accentuating the sharpness of a scene to give it an edgier look. But I want to eliminate this telltale sign of oversharpening without eliminating the rest of the "good" sharpness in the scene. To do that in Lightroom I use the Adjustment Brush in the Develop module and adjust the clarity slider way down toward -100. Then I simply paint away the oversharpened halo wherever it's evident in the frame. In Photoshop, a simple layer mask on the oversharpened layer allows you to selectively paint away artifacts. This level of selective control, whether you wield it in Photoshop or Lightroom, is a great way to get the benefits of dynamic sharpening without the drawbacks.
Dec 6, 2012 07:19:34 #
Wow! I needed that! As a newbie to dslr and Lightroom, I have really been struggling with all that. I never really understood "radius" and "threshold" completely. Thank you so much for the help!
Dec 6, 2012 08:45:39 #

Dec 6, 2012 09:05:33 #
Dec 6, 2012 10:16:21 #

Excellent most excellent article - thanks for posting.
Would that general advice be also applicable to users, like myself, of Photoshop Elements?
It certainly gave me a whole new appreciation how to use this technique to best advantage.
Would that general advice be also applicable to users, like myself, of Photoshop Elements?
It certainly gave me a whole new appreciation how to use this technique to best advantage.
Dec 6, 2012 10:24:16 #

Dec 6, 2012 10:29:23 #
Dec 6, 2012 10:29:33 #
Photos submitted to stock agencies should not, as a general rule, be sharpened. However, the default sharpening in Camera Raw may be acceptable if any resulting increase in noise is eliminated.
Dec 6, 2012 10:48:31 #
peterg
Loc: Santa Rosa, CA
Great summary! Also, there's usually no need to sharpen the entire photo. I sharpen only the areas that need it.
Dec 6, 2012 11:15:14 #
Dec 6, 2012 11:26:01 #
Hi Festina Lente, The article on "Oversharpening" was written by William Sawalich, it was in Digital Photo this week.
Kenny
Kenny
Dec 6, 2012 12:39:17 #
Photo One wrote:
Thanks. It clearly met a need here. Thanks again for shaing it.Hi Festina Lente, The article on "Oversharpening" was written by William Sawalich, it was in Digital Photo this week.
Kenny
Kenny
Dec 6, 2012 12:57:57 #

Thanks for the informative article. I've "printed" it off to add to my reference material. Thanks for your input.
Dec 6, 2012 17:21:40 #
saichiez
Loc: Beautiful Central Oregon
That is a very good article... thank you. it's archived in My Documents already.
Another point about sharpening is that some of the camera manufacturers... Fuji, Olympus, Nikon, others? are starting to deal with the direct influence of lack of sharpness in images.
They are starting to finally work with weaker AA or "low pass" filters. Some to the extent of taking it out entirely. Sharper images result.
OTOH, the reason for AA filtering in the first place arises "sometimes". Moire patterns. However, pixel density on current sensors helps offset this, and Moire can be relatively well dealt with in software.
Check out this aspect of your next (at a camera store near you) purchase. You can almost hear the "GAS" developing as you read this. ;-)
Dec 6, 2012 18:23:10 #
One of the main reasons I "went digital", either with scanned negatives or digital capture, was that I was doing unsharp masking in the darkroom using film. Don't know how many of you have tried this, but it is a very tedious and time consuming process. But once you get the process down, a standard non-sharpened print is just no longer acceptable.
Once I saw that unsharp masking could be done in PhotoShop, the enlarger became an expensive coat hanger and started growing cobwebs.
Once I saw that unsharp masking could be done in PhotoShop, the enlarger became an expensive coat hanger and started growing cobwebs.
If you want to reply, then register here. Registration is free and your account is created instantly, so you can post right away.