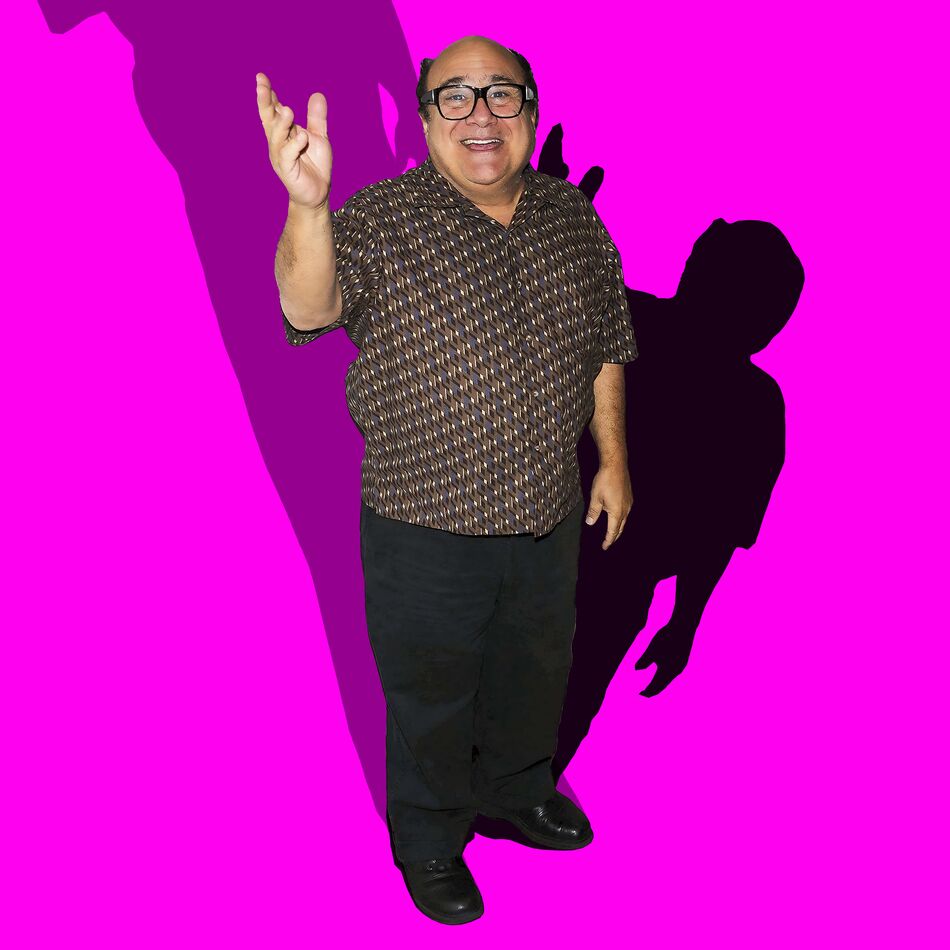
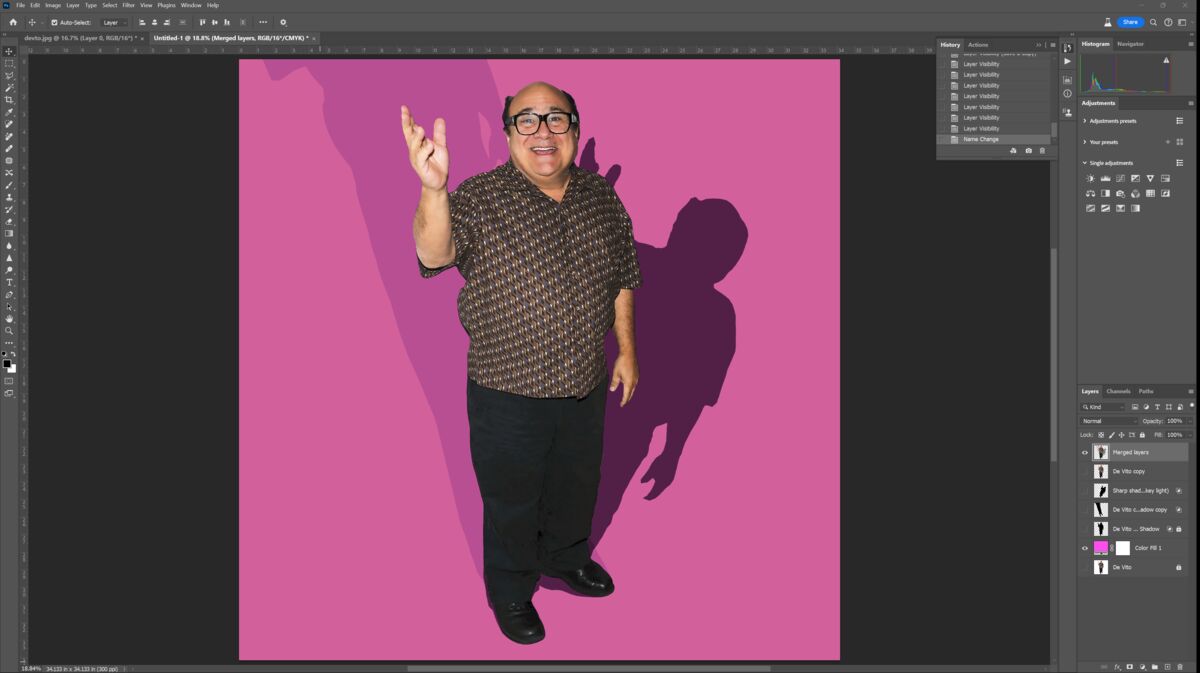
Creating shadows (PS CC)
Apr 11, 2024 01:42:45 #

Preparing the image to create one or more shadow...
Open your image.
Duplicate the base layer.
Create a selection (Magic wand in this case)
If you are not using my image, invert the selection. (Ctrl-Shift-I)
Adjust the selection (shrink)
Select Filter ⇾ Modify ⇾ Grow (The amount depends on your image size and possible fringing)
Press delete to remove the background.
IF your selection is deleted...
Use Ctrl-Z then Ctrl-Shift-I then delete.
(press Ctrl-D to remove the selection - To avoid confusion)
Create a color fill layer (Magenta is the best color to use)
Move this layer below the cut-out.
Uncheck the base layer visibility.
Click on image layer
Ctrl-click on it to create a selection.
Double-click on the right of the layer to create a layer style.
Click on drop shadow to activate it.
Change the Distance, Spread and size slider value to '0'.
Click OK.
Set the opacity to 100%
Right-click on the layer EFFECTS (specific)
Click OK.
Lock the new layer, remove its visibility. This in case you want to create multiple shadows....
Duplicate the locked layer and activate the visibility.
Ctrl-Click on the icon. A selection will be created.
Using the EDIT drop down menu, Select puppet warp.
Create a couple of locks (Points in the feet)
Create a point at the top and drag it in the opposite direction from the light.
Now you can adjust the shadow fill (not the opacity), the blur, whatever.
When using other selection method, you will have to adjust the lock points as needed.
I am considering creating a slow, mute video.
-----------------
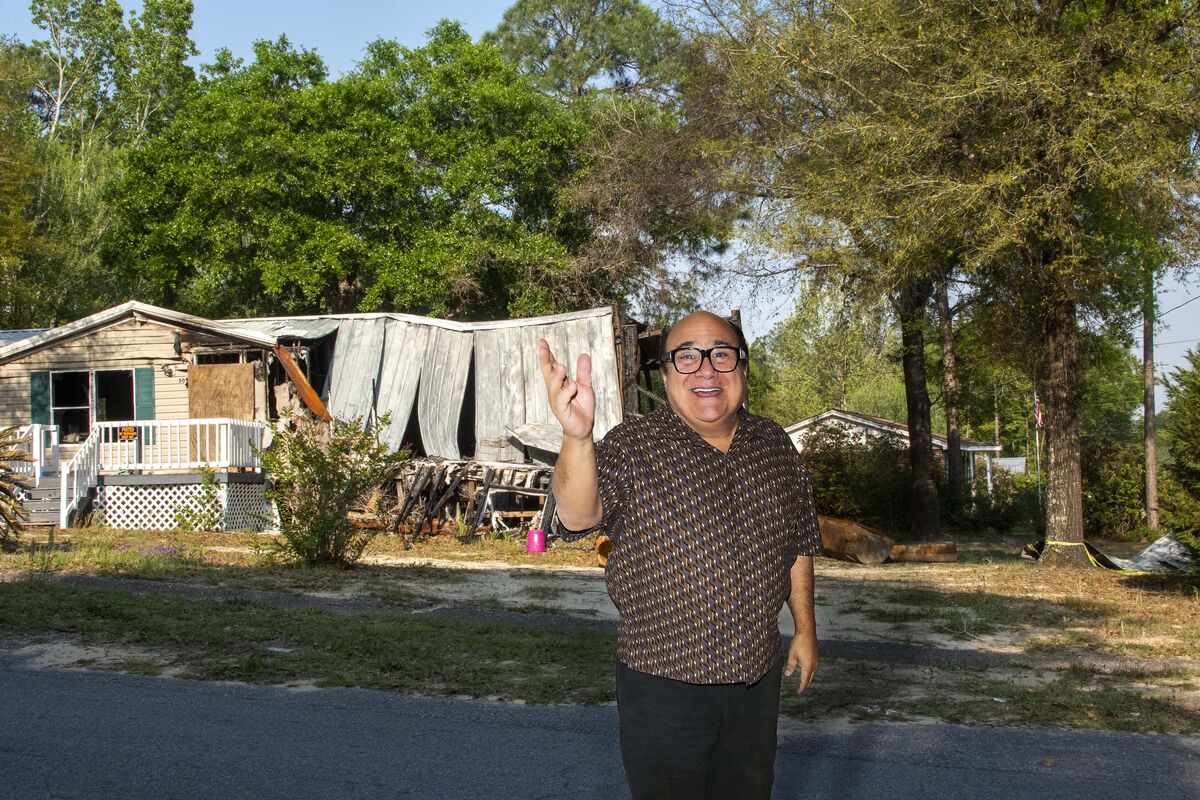
Note: This process works with almost everything, BUT you will need to adapt the shadows to the environment... Texture, direction and possible stronger light sources that might kill the shadow in places.
Open your image.
Duplicate the base layer.
Create a selection (Magic wand in this case)
If you are not using my image, invert the selection. (Ctrl-Shift-I)
Adjust the selection (shrink)
Select Filter ⇾ Modify ⇾ Grow (The amount depends on your image size and possible fringing)
Press delete to remove the background.
IF your selection is deleted...
Use Ctrl-Z then Ctrl-Shift-I then delete.
(press Ctrl-D to remove the selection - To avoid confusion)
Create a color fill layer (Magenta is the best color to use)
Move this layer below the cut-out.
Uncheck the base layer visibility.
Click on image layer
Ctrl-click on it to create a selection.
Double-click on the right of the layer to create a layer style.
Click on drop shadow to activate it.
Change the Distance, Spread and size slider value to '0'.
Click OK.
Set the opacity to 100%
Right-click on the layer EFFECTS (specific)
Click OK.
Lock the new layer, remove its visibility. This in case you want to create multiple shadows....
Duplicate the locked layer and activate the visibility.
Ctrl-Click on the icon. A selection will be created.
Using the EDIT drop down menu, Select puppet warp.
Create a couple of locks (Points in the feet)
Create a point at the top and drag it in the opposite direction from the light.
Now you can adjust the shadow fill (not the opacity), the blur, whatever.
When using other selection method, you will have to adjust the lock points as needed.
I am considering creating a slow, mute video.
-----------------
Note: This process works with almost everything, BUT you will need to adapt the shadows to the environment... Texture, direction and possible stronger light sources that might kill the shadow in places.

Apr 11, 2024 01:52:36 #
I posted an image on another thread showing the same picture in a room, modified the shadow for the wall projection.

Apr 11, 2024 11:46:36 #
Apr 11, 2024 14:16:47 #
Putting it together...
I am currently looking on how to use the displacement filter to have a realistic blend. It works well with text but with a real image, I am not so confident.
As usual, experiment, experiment, experiment.
I am currently looking on how to use the displacement filter to have a realistic blend. It works well with text but with a real image, I am not so confident.
As usual, experiment, experiment, experiment.

Apr 11, 2024 14:42:31 #
Apr 11, 2024 14:58:45 #
Apr 12, 2024 06:33:43 #

Great Tutorial.
Mr. Google gave me many references on the "displacement filter" Live and Learn
Mr. Google gave me many references on the "displacement filter" Live and Learn
If you want to reply, then register here. Registration is free and your account is created instantly, so you can post right away.