Break in the storm
Mar 25, 2024 11:49:48 #
I thought I'd share the few steps I took to completely alter this scene from what the camera wanted to what I saw/experienced/felt. UHH makes this discussion a little awkward because it's difficult to do interlinear pictures without using a third-party service like Flickr, and I don't want to post the before shot on Flickr because I'm vain. :-)
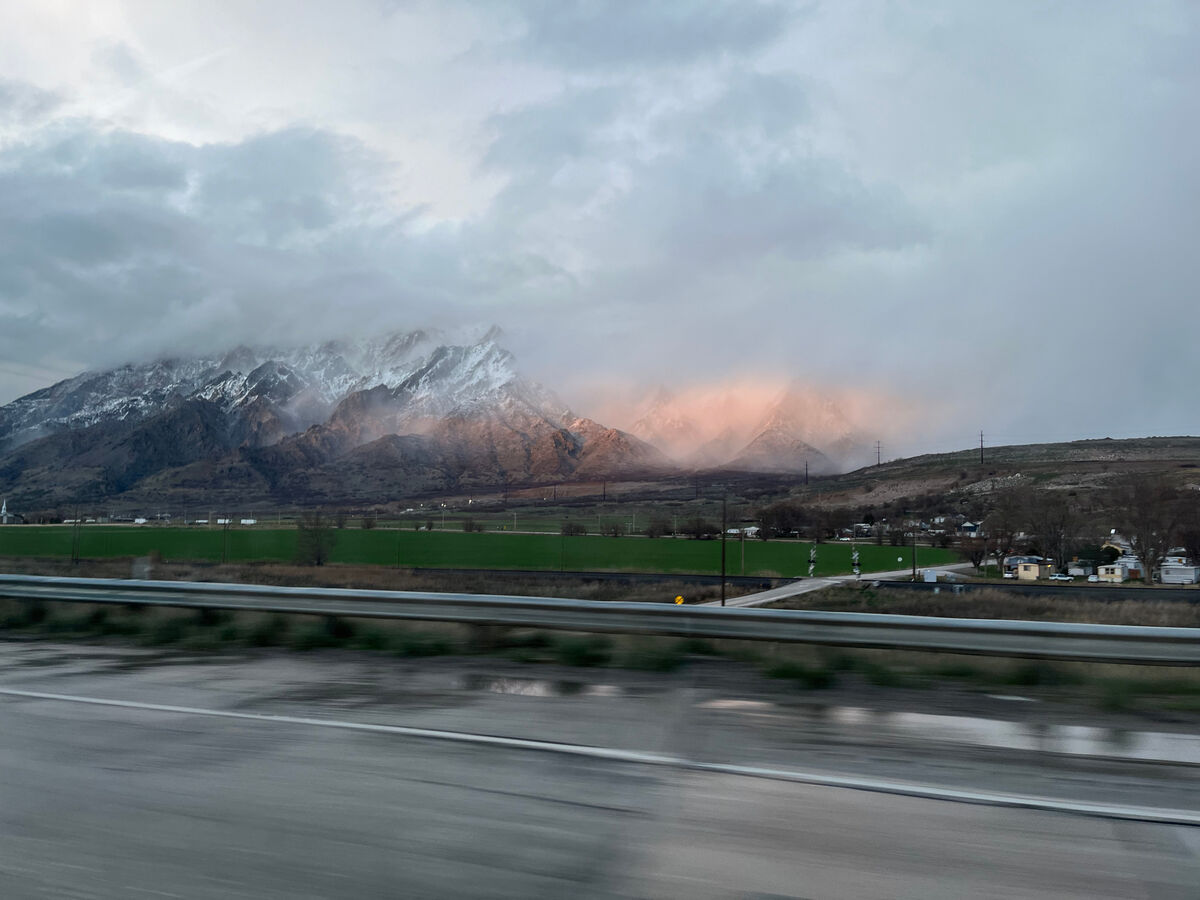
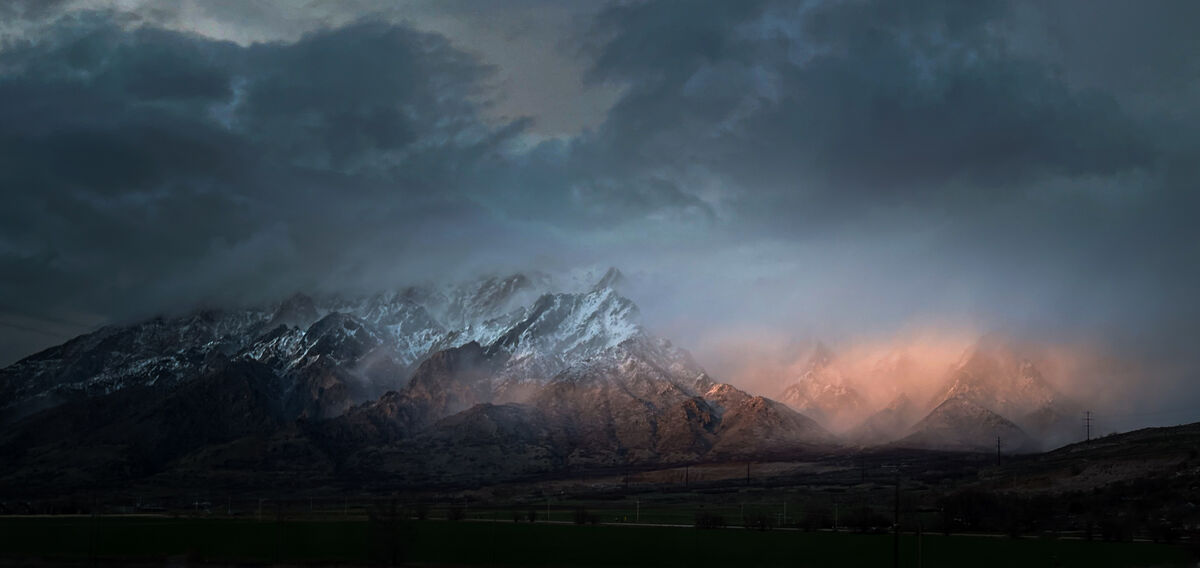
The edits were mostly pretty simple, but I think they made a dramatic difference in the image. All edits were done in Lightroom Mobile in less than ten minutes. As you can see, the subject was good, but the fixed focal length of the phone included a lot of irrelevant surrounding detail.
The first step was to get the crop right. I thought that the blurred street distracted from the feel of the photo, so that had to go. The right portion didn't add anything, so I removed that, too.
The phone significantly over-exposed the scene compared to what I saw. I added a bit of contrast, some texture, and removed the bright buildings and highlights from the base of the photo because the purpose was to communicate the landscape, not document what was there.
The critical change was adding a vignette using a radial filter. I used the radial filter rather than the vignette tool because the radial filter allows me to place a long, narrow vignette around the dramatic parts and darken everything else, whereas Lightroom's built-in vignette function is pretty strictly limited to the corners. This emphasizes focus on the elements I want to draw attention to while simultaneously handling the phone's flat overexposure of the scene.
As I said, simple edits, but since the bones of the photo were good, that was all it took.
Mar 25, 2024 12:08:35 #

The sky is great.
The highlights in the mountain is preserved...
Good work.
Only one comment, unrelated to post-processing:
Was there no place to stop instead of shooting from a moving car?
The highlights in the mountain is preserved...
Good work.
Only one comment, unrelated to post-processing:
Was there no place to stop instead of shooting from a moving car?
Mar 25, 2024 12:11:53 #
A question, will you allow folks to try what you did and offer their own version?
Mar 25, 2024 12:13:33 #

jaredjacobson wrote:
I thought I'd share the few steps I took to completely alter this scene from what the camera wanted to what I saw/experienced/felt.
N I C E ...

Mar 25, 2024 12:14:30 #
jaredjacobson wrote:
.../... I don't want to post the before shot on Flickr because I'm vain. :-) .../...
Actually, your post-processing skills will be assessed as great by most folks.
Mar 25, 2024 12:19:34 #
Rongnongno wrote:
The sky is great.
The highlights in the mountain is preserved...
Good work.
The highlights in the mountain is preserved...
Good work.
Thanks.
Quote:
Only one comment, unrelated to post-processing:
Was there no place to stop instead of shooting from a moving car?
Was there no place to stop instead of shooting from a moving car?
We could have. There is an exit not too far from there. However, time constraints were a real concern. We were taking my daughter back to college. It's an hour and a half drive each direction in good weather, and with the storm we were concerned about how long the drive would take and, worst case, the possibility of the canyon being shut down.
As it turned out, we were lucky--the snow buildup on the roads wasn't too severe, the fog was manageable, and while there were a few tense moments with poor visibility due to heavy snowfall, people mostly drove sanely. It only took us an extra hour or so.
Mar 25, 2024 12:21:53 #
Rongnongno wrote:
A question, will you allow folks to try what you did and offer their own version?
Feel free.
Mar 25, 2024 12:22:28 #
Mar 25, 2024 13:36:29 #

jaredjacobson wrote:
I thought I'd share the few steps I took to comple... (show quote)
I like the cropped version.
If you want to reply, then register here. Registration is free and your account is created instantly, so you can post right away.