Hotel - Solvang, CA
Sep 2, 2023 01:57:35 #
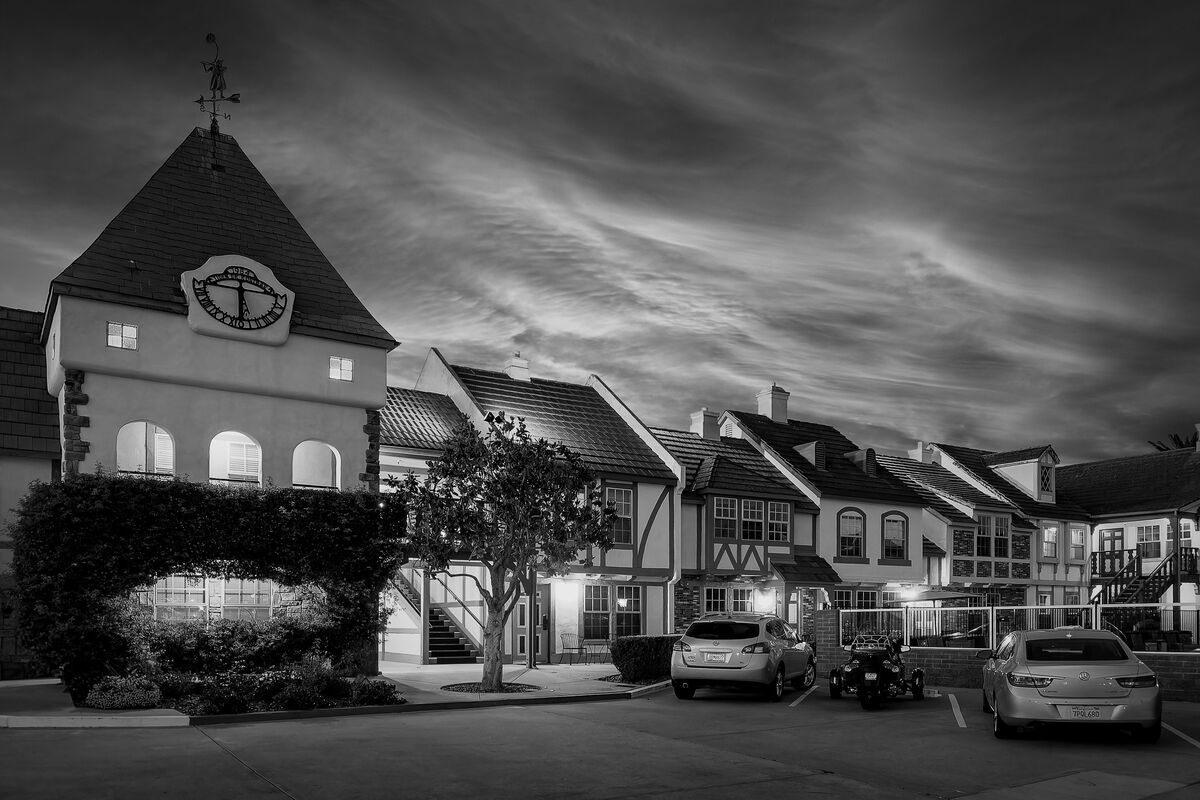
I captured this image more than several years ago. Original was color but was converted to B&W using Adobe Camera Raw. I often look back at older photos with the thought in mind of reprocessing them using modern processing tools and a little imagination.
Sep 2, 2023 07:35:52 #

The big anchor on the left, then all those repeating lines of lighted roof edges, and yummy textures and shadows = high impact for me!
Sep 2, 2023 08:29:36 #

Sep 2, 2023 09:25:57 #

Nice composition, but what strikes me the most is the excellent tonal range. Good work there!
Sep 2, 2023 10:15:00 #

Sep 2, 2023 11:54:35 #
Sep 2, 2023 12:43:04 #
rcarol wrote:
I captured this image more than several years ago. Original was color but was converted to B&W using Adobe Camera Raw. I often look back at older photos with the thought in mind of reprocessing them using modern processing tools and a little imagination.
This image is wonderfully processed. The cloudy sky has a captivating, almost hypnotic, quality pleasing to the eye . Well done!

Sep 2, 2023 12:44:05 #
FotoHog wrote:
This image is wonderfully processed. The cloudy sky has a captivating, almost hypnotic, quality pleasing to the eye . Well done!
Thank you.
Sep 2, 2023 16:03:36 #
Sep 2, 2023 18:24:39 #
Sep 2, 2023 21:34:08 #
Sep 3, 2023 09:01:20 #
Sep 3, 2023 10:27:24 #
rcarol wrote:
I captured this image more than several years ago. Original was color but was converted to B&W using Adobe Camera Raw. I often look back at older photos with the thought in mind of reprocessing them using modern processing tools and a little imagination.
I have always struggled with B/W conversions, and with achieving the rich tonal range that I see others get so often. I have tried the Camera Raw B/W sliders, the same tool in Photoshop, and also used gradient maps with multiple points from black to white and I have yet to get anything I am 100% satisfied with.
Do I understand that this was converted/processed 100% in Camera Raw using the B/W adjustment sliders? Did you do anything else (tone curves, dodge/burn etc.)?
I assume that beginning with a well exposed image in the first place is important.
Sep 3, 2023 11:39:29 #
rcarol wrote:
I captured this image more than several years ago. Original was color but was converted to B&W using Adobe Camera Raw. I often look back at older photos with the thought in mind of reprocessing them using modern processing tools and a little imagination.


Sep 3, 2023 13:32:12 #
terryMc wrote:
I have always struggled with B/W conversions, and ... (show quote)
In reality, this was one of the easiest color to B&W conversions that I have ever done. In general, I start with a well exposed color image then do a quick conversion to B&W by clicking the B&W tab in the Basic panel of ACR. I do this to get a sense of what the image looks like in B&W. Not all images convert well. Often, images that look good in color look horrible in B&W. The grey tones all run together with little separation and the whole thing becomes a muddled mess. When I get that result, I move on to another image as there is no way of salvaging it without a tremendous amount of work. If the image has potential, I will convert it back to color and I will add some local contrast using the unsharp mask in an unconventional way. Normally, when using the unsharp mask the amount is adjusted to somewhere between 50 to 100 and the radius is adjusted to between 0.1 and 2.0. To use it to adjust local contrast the amount is adjusted to 20 or 30 and the radius is adjusted to 100 to 150. This technique adds contrast at the micro level rather than globally and has less chance of blocking up the highlights than using the global contrast adjustment in ACR. I find that adding contrast to the color image makes for a better image when converted to B&W. I will toggle back and forth between color and B&W in ACR adjusting the contrast up or down until I feel that I have the best image that I can achieve. From there I will use the B&W Mixer panel to further separate grey tones. Once I have done the best that I can using the Mixer panel, I will further refine the image by using the masking tools available in ACR.
I started out by stating that this is one of the easiest conversions that I have ever done. Other than adding local contrast using the unsharp mask, no other adjustments were required after I clicked on the B&W tab in the basic panel. I'm usually not that lucky. I hope this helps.
If you want to reply, then register here. Registration is free and your account is created instantly, so you can post right away.