I am an absolute newbie to post-processing. How should I process this image?
May 20, 2023 13:47:41 #

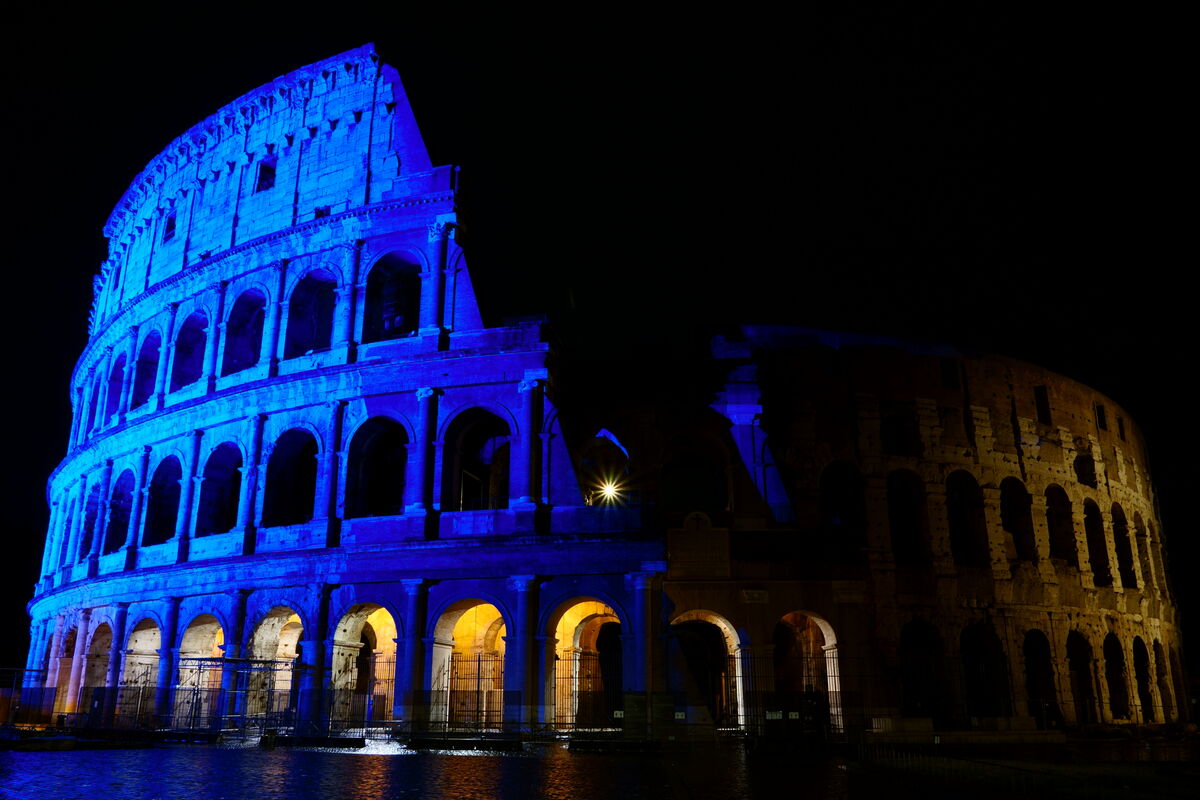
We just returned from a European trip. One of our outings was a night shoot with a professional photographer in Rome and I have several images from that outing that I want to print for display.
I have never really tried to process RAW image files, but I want to learn.
I have both the Sony Imaging software and GIMP, but am not very comfortable with either of them yet.
I would like to understand how to evaluate the image as well as how I should be proceeding with the processing.
If this were your photo, how would you evaluate the image and what improvements would you make?
Thanks in advance for your input!!!
Joe
May 20, 2023 14:45:03 #

jmt455 wrote:
We just returned from a European trip. One of our ... (show quote)
Did you capture RAW and JPEG versions of these images? An editor that just applies the camera settings to the RAW, creating essentially the same as the camera's JPEG, would be a good start, if you don't have the JPEG version directly.
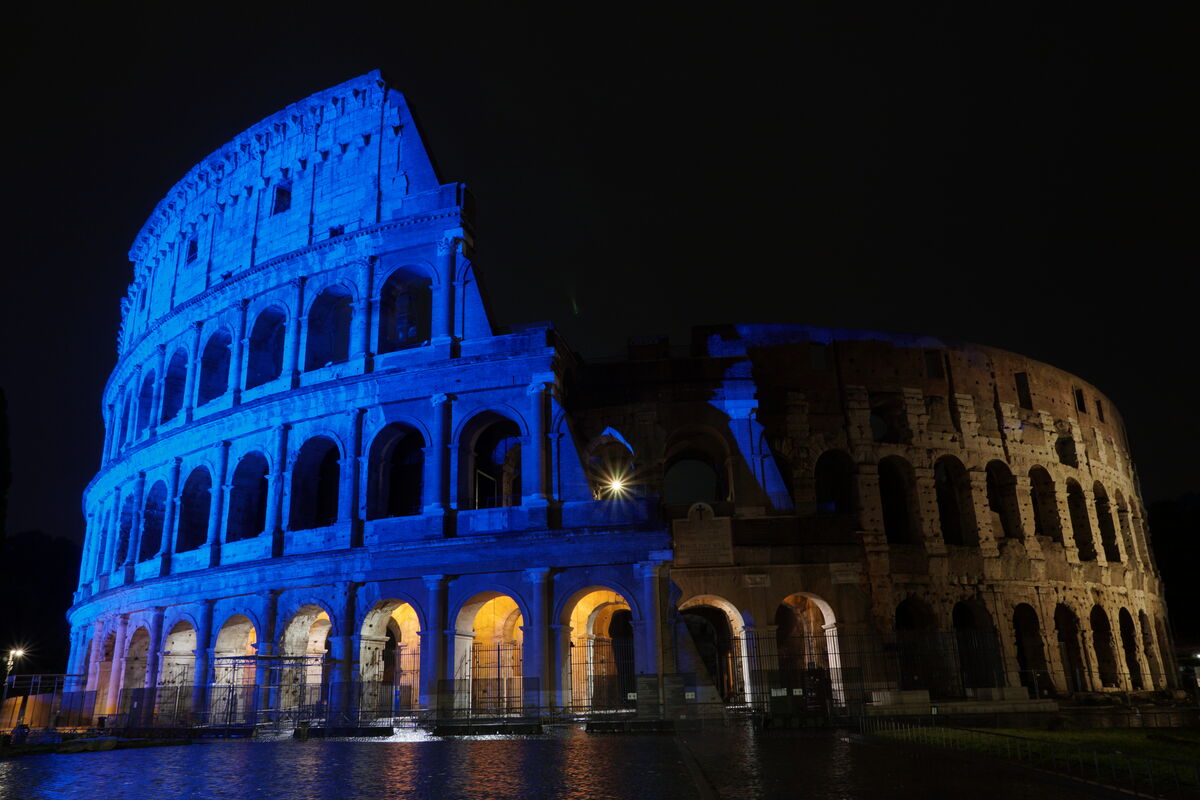
The attached version is essentially that conversion. I chose to change the Creative (Picture) style to Landscape and leveled the image with a bit of cropping. The tone curve is adjusted just slightly, to make the brights brighter and the darks darker. I'm not an expert with Sony Edit and the Sony tools are a challenge to use, for even basic edits beyond this 'auto convert' of the camera settings. I added some sharpening too, but I'd much prefer a tool like Lightroom for all these changes, rather than fumbling around in the Sony software.
I haven't used GIMP, but I've used PSE enough to prefer Lightroom, where GIMP is similar to PS / PSE, and a steep learning-curve to get beyond just <auto> functions. If the Sony software has a similar <auto> capability, I couldn't find it.
So, if your only version(s) of this night scene are RAW files, you're going to have some challenges beyond just performing an 'auto convert' of the camera settings into another format file. And, just "auto-convert" is better served by just shooting in JPEG and skipping RAW altogether.
You might seek to get more artistic in the processing, maybe lightening the shadows within the arches, but keeping the black of the night background? That's work for PS / GIMP, something you could do by masking the sky away and then processing the shadows in the arches. The 'rich' data of the RAW file will help with the detailed (technical) edit, but that work could be quite time consuming, both learning the process and successfully implementing the change. Certainly, you can keep the RAW file forever, and return to the processing over and over until you have the skills, and the software, to realize something more complex than an auto-convert and minor leveling, like this version.
May 20, 2023 15:02:11 #
CHG_CANON wrote:
Did you capture RAW and JPEG versions of these ima... (show quote)
CHG_CANON, thanks for the quick response!
Yes, I shot RAW + JPG files. Here is the JPG version:
May 20, 2023 15:47:36 #

jmt455 wrote:
......I have never really tried to process RAW image files, but I want to learn....
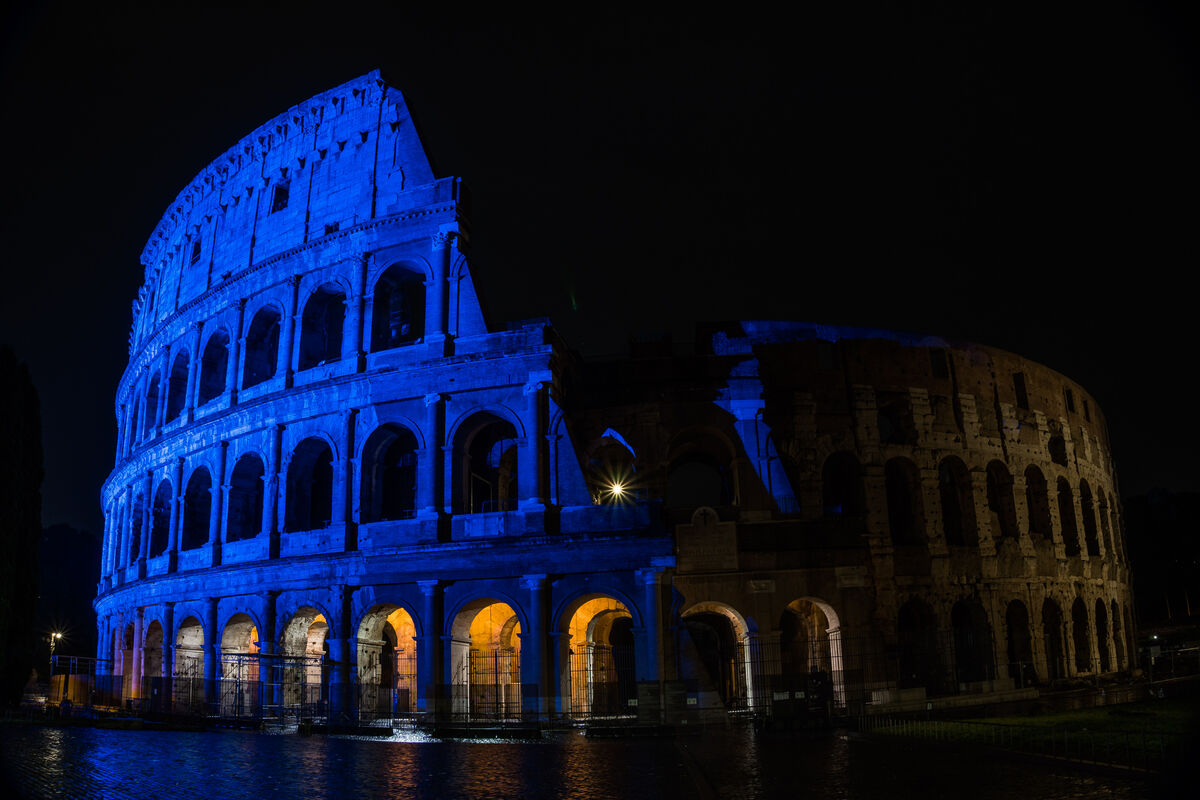
Raw files come with a need for basic processing, which means contrast and sharpening as a basic necessity plus saturation, brightness levels and denoise adjustments as required. If you look at the adjustments that the Sony editor gives raw files in order to reproduce what an in-camera standard jpeg would have been, you'll see what Sony's version of basic adjustments is (the good news is that you and your editor can do a better job than the camera with its in-camera processing). Another basic requirement may be levelling and/or cropping - if required.
Only you saw the original scene and only you know exactly what you want the images to look like. There are a lot of adjustments that need to be done to suit your personal preferences. For example, how much of the shadow detail do you want to be revealed? How much do you want to tone down the highlights? Is the colour cast to your liking - if not, white balance (WB) adjustments may be required. Are the most eye-catching parts of the image the parts that you want to be the most eye-catching? Are there distractions that you would like to get rid of? Do you want a natural look or a ramped-up look?
Apart from some rare exceptions you won't want your photos to have a flat look. If you brighten the shadows and tone down the highlights you'll reduce the overall contrast so you'll need to add some contrast in order to avoid a flat look. Increasing saturation will also take the photo away from being flat but be warned - the quickest way to an overcooked, overprocessed look is to turn up the Contrast and Saturation too high.
If your editor allows you to keep the sharpening away from smooth areas and limit it to the edges within the image you should take advantage of that capability. Sharpening aggravates noise, and noise is most noticeable in the smooth areas. Denoise has a softening effect so you want to use the absolute minimum. If you can apply denoise via a brush you can apply extra denoise to any problem areas. That's a lot better than ramping up global denoise (which will affect the whole image).
Most editors have the adjustment sliders in the order that you're most likely to want to use them. Typically that would be brightness levels (blacks, whites, shadows, highlights and overall brightness), contrast, saturation, sharpening/denoise.
The following edit consists of adjustments to contrast and brightness levels, plus some sharpening/denoise applied as described above. I've highlighted what I would describe as the basic adjustments that raw files require. All of the other stuff is a matter of personal preference.
.
May 20, 2023 16:05:02 #

jmt455 wrote:
If this were your photo, how would you evaluate the image and what improvements would you make?
If this were your photo, how would you evaluate the image and what improvements would you make?
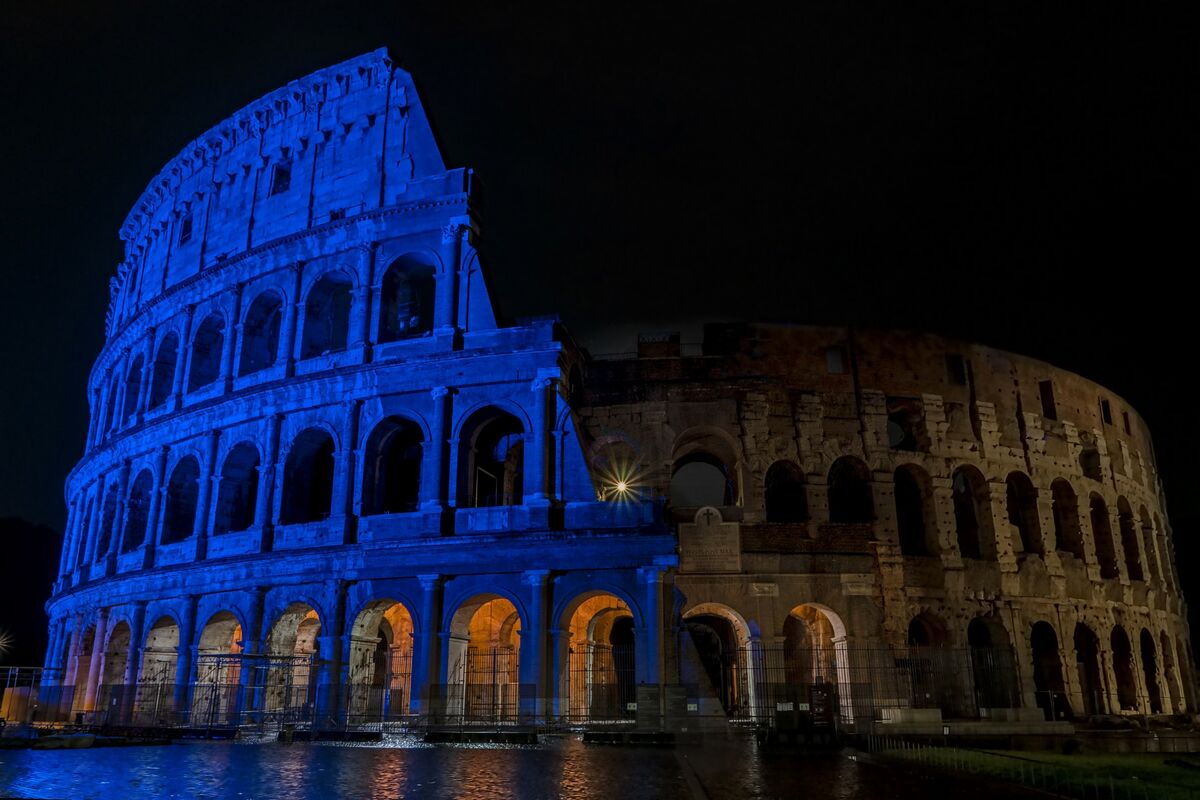
Nice capture !
I removed most of the blue reflections.
May 20, 2023 16:40:13 #

dannac wrote:
I removed most of the blue reflections.
Amazingly stunning results 💙💙🏆💙💙
May 20, 2023 17:03:38 #

May 20, 2023 19:24:28 #
CHG_CANON wrote:
Did you capture RAW and JPEG versions of these ima... (show quote)
Thank you for the insights.
I have learned that I can't open the Sony "RAW" files in GIMP without adding a file translator and I agree that GIMP doesn't seem very friendly.
I've made some adjustments to the image in the Sony editing package, but I don't see any way to make spot corrections with the Sony editor.
Is Lightroom the simplest editor to learn?
May 20, 2023 19:30:05 #
R.G. wrote:
Raw files come with a need for basic processing, w... (show quote)
Thank you, R.G.
I liked the very dark shadows and the brilliant blue floodlight bath. Apparently, they were preparing for a big concert event and the Coliseum was only lit like this for one or two nights; I like this unusual (to me) view of the site.
Your adjustments are very close to what I envisioned; thank you for taking the time to make the edits and share your knowledge.
Joe
May 20, 2023 19:31:28 #
dannac wrote:
Nice capture !
I removed most of the blue reflections.
I removed most of the blue reflections.
thanks for your efforts, dannac.
How did you remove the blue cast on the right side of the building?
Joe
May 20, 2023 20:29:25 #
jmt455 wrote:
thanks for your efforts, dannac.
How did you remove the blue cast on the right side of the building?
Joe
How did you remove the blue cast on the right side of the building?
Joe
Welcome.
Some copy and paste of different parts ... but mainly the clone stamp tool.
May 20, 2023 23:55:35 #

jmt455 wrote:
Thank you for the insights.
I have learned that I can't open the Sony "RAW" files in GIMP without adding a file translator and I agree that GIMP doesn't seem very friendly.
I've made some adjustments to the image in the Sony editing package, but I don't see any way to make spot corrections with the Sony editor.
Is Lightroom the simplest editor to learn?
Most of us that use Lightroom Classic and found it to be our favorite will say that the basics are easy to learn. But that is only true if you approach it in and organized, methodical way. If you blindly jump in, you can make a quick mess.
Those that use Capture One, On1, etc. will say the same thing.
In the title you say you are an absolute post processing newbie. You should enjoy changing that.
May 21, 2023 06:29:25 #

Darktable is an Opensource Free, excellent RAW processing software said to be competitive with Lightroom. Check today's main section and IR section for a discussion. Rob Shea has many How2 videos for RAW processing.
Your photos are excellent ...
Your photos are excellent ...
May 21, 2023 10:53:34 #
bsprague wrote:
Most of us that use Lightroom Classic and found it to be our favorite will say that the basics are easy to learn. But that is only true if you approach it in and organized, methodical way. If you blindly jump in, you can make a quick mess.
Those that use Capture One, On1, etc. will say the same thing.
In the title you say you are an absolute post processing newbie. You should enjoy changing that.
Those that use Capture One, On1, etc. will say the same thing.
In the title you say you are an absolute post processing newbie. You should enjoy changing that.
Thanks, Bill!
May 21, 2023 10:54:33 #
dpullum wrote:
Darktable is an Opensource Free, excellent RAW processing software said to be competitive with Lightroom. Check today's main section and IR section for a discussion. Rob Shea has many How2 videos for RAW processing.
Your photos are excellent ...
Your photos are excellent ...
Thanks, I will check out Darktable.
I appreciate the comment about the photos, too.
Joe
If you want to reply, then register here. Registration is free and your account is created instantly, so you can post right away.