Before & After Improving the Red
Aug 1, 2022 20:20:12 #
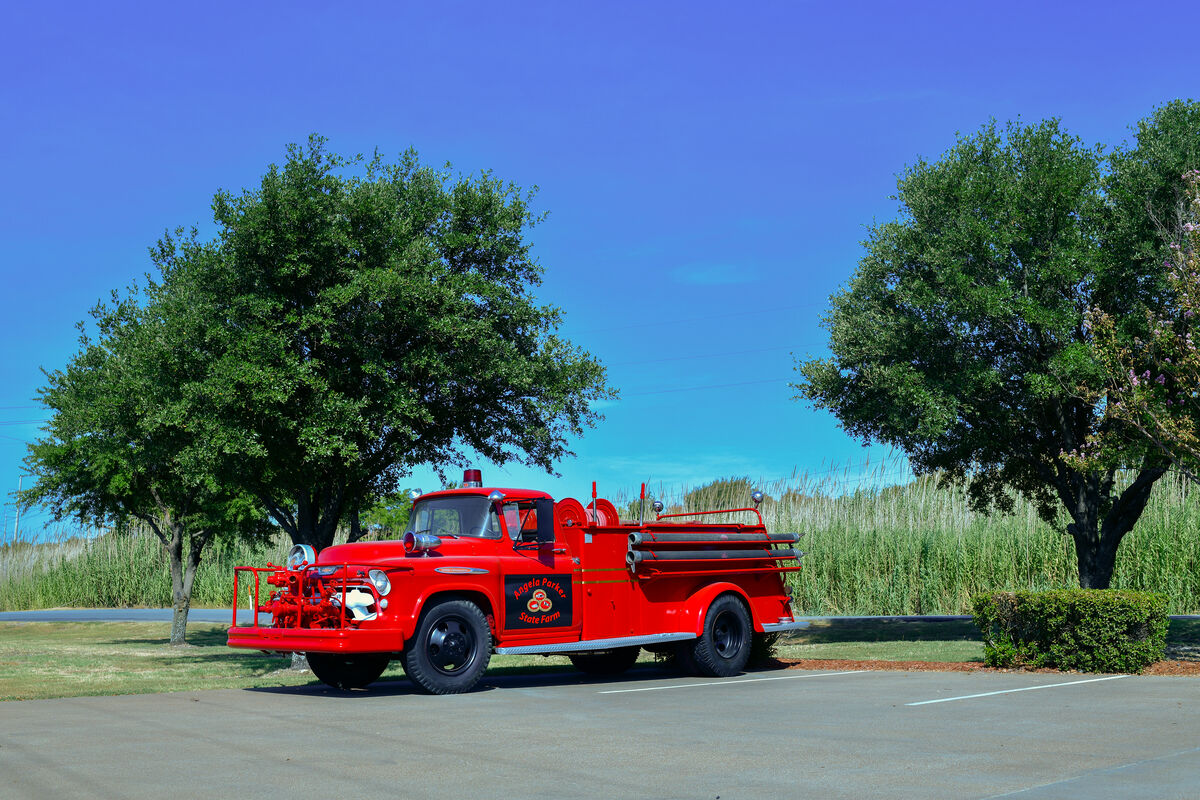
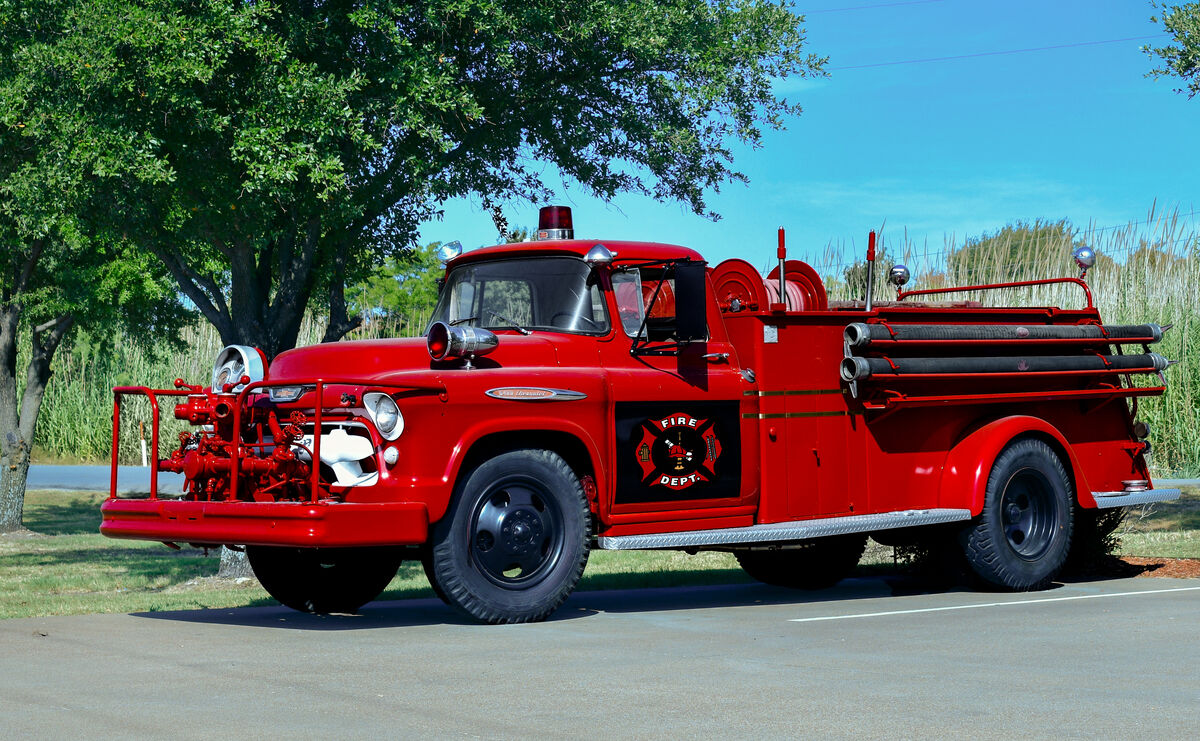
SOOC my red was too hot, unrealistic. I've had this happen many times especially with red vehicles. I tried several things to get the red deeper. I first tried many of the sliders in Camera raw not liking any of the results. I then remembered the Black & White layer might help with some of my problems.
So here are the steps I did to create this edit.
Started with base image
Played with Camera Raw to help with shadows and texture. Changed the crop and straightened.
Next added a Black & White layer, sett the layer to Multiply.
Set sliders to Red 81, Yellow 60, Green 202, Cyans 142, Blue 19, Magenta 79
Now I like the red on the fire truck but it messed up my background. So I made a mask to apply these changes to just the fire truck.
This fire truck was rebuilt setting in front of an insurance agency. The agency put its own logo on the side door. I changed that with a standard volunteer fire dept. logo.
Had to change that logo to match the fire truck red. to do that I added a channel mixed layer then made appropriate slider adjustment fixing the red.
Feel free to download and play with either image.
Aug 1, 2022 22:22:50 #

Red not working? That is an issue with all cameras and hard to correct.
You have done a good job adapting the logo to the door shape.
As to the red? What you remember is what counts.
Masking this for a 'better' or unadulterated background is easy, there is so much contrast and hard lines.

You have done a good job adapting the logo to the door shape.
As to the red? What you remember is what counts.
Masking this for a 'better' or unadulterated background is easy, there is so much contrast and hard lines.
Aug 2, 2022 01:11:46 #
Beautiful job on the engine Jim. Really improved with the second version. I read and re-read Rongnongno's comments and I'm still not sure what he was implying. Just a question, was there a control panel on the right side? The size of the hard suction hoses would indicate a 750 gpm pumper
Aug 2, 2022 03:31:06 #

When you described the red as being too hot, I got the impression that perhaps the red is being rendered with too much orange. That's how it appears to my eye. So I used the HSL tool in Lr to give orange a big shift towards red and quite a lot of darkening and desaturating. I then gave red the same sort of adjustments but only minor tweaks compared to what orange got. The only other thing in the pic that was affected by those adjustments was the bark chips (?) in the flower bed, and they just look darker so it's hardly noticeable.
Apart from my adjustments being far simpler, if a colour is not being rendered accurately, darkening and desaturating it is not going to be a complete answer. The colour needs to be corrected as much as possible. I had to guess but you saw it with your own eyes.
.
Apart from my adjustments being far simpler, if a colour is not being rendered accurately, darkening and desaturating it is not going to be a complete answer. The colour needs to be corrected as much as possible. I had to guess but you saw it with your own eyes.
.

Aug 2, 2022 09:11:04 #
Rongnongno wrote:
Red not working? That is an issue with all cameras and hard to correct.
You have done a good job adapting the logo to the door shape.
As to the red? What you remember is what counts.
Masking this for a 'better' or unadulterated background is easy, there is so much contrast and hard lines.
You have done a good job adapting the logo to the door shape.
As to the red? What you remember is what counts.
Masking this for a 'better' or unadulterated background is easy, there is so much contrast and hard lines.
Thank you Rongnongno. Strong reds have always been a problem in my opinion. I'm wondering if it is more prevalent with a Nikon?
Aug 2, 2022 09:13:09 #
Curmudgeon wrote:
Beautiful job on the engine Jim. Really improved with the second version. I read and re-read Rongnongno's comments and I'm still not sure what he was implying. Just a question, was there a control panel on the right side? The size of the hard suction hoses would indicate a 750 gpm pumper
I'm not sure what is on the right side. Never looked on that side the composition would not have worked from that side.
Aug 2, 2022 09:23:08 #
Thanks R.G.
As you know there are several different ways to make the same corrections in Adobe products either Lightroom or Photoshop CC. Most people use what they are most familiar with. I like the results you came up with, in fact probably more accurate than mine. I also think during the restoration they use a red that was just too bright.
As far as the masking on this I used the one click Select Subject mode. It did a very good job with just a couple of tweaks.
Thanks for showing your results and giving us your steps.
Jim
Aug 2, 2022 09:33:07 #
Jim-Pops wrote:
...I also think during the restoration they use a red that was just too bright....
Nikons in particular do have a tendency to render colours on the warm side, and you may well be right about the restoration, but it's worth bearing in mind that the truck was receiving a lot of strong, direct sunlight which we would expect would warm the colours up a bit. Further to what I said already, the red is not primary but more of an orange/red and the bright sun has possibly over-emphasised the orange content of the colour, which is why I concentrated on subduing orange with the HSL tool. That on its own may have been enough, given the reality of the shooting conditions. The alternative is to make the red increasingly more dull, which may not be any kind of an improvement, regardless of what the reality was.
Aug 2, 2022 10:29:37 #
Jim-Pops wrote:
Thank you Rongnongno. Strong reds have always been a problem in my opinion. I'm wondering if it is more prevalent with a Nikon?
Yes.
If you want to reply, then register here. Registration is free and your account is created instantly, so you can post right away.