Help needed - Night Sky Photography
Jul 30, 2022 14:41:28 #
I have been a photographer for a long time, but I've never done any night sky photography, except for fireworks. Would someone with experience discuss lens choice? Milky way? Northern lights? Thanks in advance.
Jul 30, 2022 15:03:30 #

As wide an aperture as you can get to let as much light in as possible. I use a 50mm ƒ1.4. Wide/tele depending on how much of the sky you want to capture vs. the aperture available for that focal length.
Tripod with remote shutter release.
After about 15+ seconds you'll start getting star trails.
Lens hood to keep stray light out.
Works best in a dark area, otherwise neighbors lights can cloud the image.
Possibly up the ISO.
Experiment for your camera.
Tripod with remote shutter release.
After about 15+ seconds you'll start getting star trails.
Lens hood to keep stray light out.
Works best in a dark area, otherwise neighbors lights can cloud the image.
Possibly up the ISO.
Experiment for your camera.
Jul 30, 2022 15:10:56 #
It's surprisingly easy. I took a three-day course years ago. Get yourself some of these - https://smile.amazon.com/dp/B0028AD6V0/?coliid=I3VPP2MNRL9FHV&colid=397RKZB5HZQZX&psc=0&ref_=lv_ov_lig_dp_it
Everyone in the course had to bring them. It keeps the lens from foggy up, but it not so hot that it hurts the lens.
It turns out I have more links than I thought I did, so I'll post all of them.
https://www.wikihow.com/Photograph-the-Night-Sky
https://www.lightstalking.com/bite-size-tips-build-workflow-post-production/
http://makezine.com/projects/how-to-capture-breathtaking-tim
e-lapses-of-the-night-sky/
http://www.popphoto.com/how-to/2013/06/how-to-shoot-epic-landscape-photos-night-sky
http://photography.nationalgeographic.com/photography/photo-tips/night-sky/?sf4138099=1
http://iso.500px.com/a-day-in-the-life-of-astrophotographer-aaron-groen/?utm_campaign=nov132014digest&utm_content=CTAbutton_aaronjgroen_500pxProfilepage&utm_medium=email&utm_source=500px
http://www.picturecorrect.com/tips/tips-for-post-processing-your-constellation-photos/
http://petapixel.com/2014/01/29/picking-great-lens-milky-way-photography/
http://www.borrowlenses.com/blog/2013/05/the-best-lenses-for-night-photography-a-case-for-rokinon-primes/
http://www.picturecorrect.com/tips/star-trail-photography-tips/
http://photography.tutsplus.com/tutorials/how-to-set-up-your-digital-slr-for-night-photography--cms-24099
Also -
http://petapixel.com/2014/03/28/prep-work-post-processing-depth-star-photography-tutorial/
Within an hour before sunrise and an hour after sunset is a time called Blue Hour. Although your eye will not see it, your camera detects a deep blue in the sky. That’s a great time to shoot.
Jul 30, 2022 15:11:32 #
Longshadow wrote:
As wide an aperture as you can get to let as much light in as possible. I use a 50mm ƒ1.4. Wide/tele depending on how much of the sky you want to capture vs. the aperture available for that focal length.
Tripod with remote shutter release.
After about 15+ seconds you'll start getting star trails.
Lens hood to keep stray light out.
Works best in a dark area, otherwise neighbors lights can cloud the image.
Possibly up the ISO.
Experiment for your camera.
Tripod with remote shutter release.
After about 15+ seconds you'll start getting star trails.
Lens hood to keep stray light out.
Works best in a dark area, otherwise neighbors lights can cloud the image.
Possibly up the ISO.
Experiment for your camera.
Thank you my friend!
Jul 30, 2022 15:17:19 #
jerryc41 wrote:
It's surprisingly easy. I took a three-day course... (show quote)
Thanks for your input Jerry!
Jul 30, 2022 15:39:52 #

Jul 30, 2022 16:42:38 #
mr1492
Loc: Newport News, VA
I agree it's daunting but surprisingly simple. My recipe:
1) wide angle lens with wide aperture - I use a Sony a7iii with a Tamron 17-28 f/2.8 lens. I usually shoot at 17mm and f2.8
2) tripod - you can't do this handheld
3) up your ISO - I'm an old film shooter and an ISO of over 25 seems hight to me!!! However, with the dynamic range of our new cameras, you can easily shoot 2000-3000 ISO and higher
4) use a remote release or set a delay - camera shake after pressing the shutter can mess up a shot easily.
5) use PhotoPills or similar - These apps are lifesavers. They can give you a great idea of what you can expect when you visit or it can help you plan your visit. They are sometimes confusing but there are a ton of videos on YouTube available.
6) Take a small flashlight (or one of those tiny headband lights) - If you have to adjust something during a night shoot, it's better to have a small light with you so you aren't fumbling around with settings in the dark
7) scout your location in the day - Visit the location you are going to shoot during the day and get an idea of what's in the area. There is no sense in stumbling around in the dark, getting hurt, and not being able to get out!!! Know the terrain and dangers BEFORE you go.
Anyway, you can add these to the lists you have. Have fun, too!
Jul 30, 2022 18:23:14 #
mr1492 wrote:
I agree it's daunting but surprisingly simple. My ... (show quote)
Thank you. To ALL. I have a general understanding of how to accomplish this task, just looking for LENS RECOMMENDATIONS! So far, I'm figuring on a fast 50 or less.
Jul 30, 2022 18:53:28 #
kmielen
Loc: Eastern NC
cjc2 wrote:
Thank you. To ALL. I have a general understanding of how to accomplish this task, just looking for LENS RECOMMENDATIONS! So far, I'm figuring on a fast 50 or less.
The Tokina 11-16mm or 11-20mm, both f2.8, seem to be popular and economical choices. Lots of copies are available used at around $200 price point.
Jul 30, 2022 19:28:47 #
kmielen wrote:
The Tokina 11-16mm or 11-20mm, both f2.8, seem to be popular and economical choices. Lots of copies are available used at around $200 price point.
Thanks.
Jul 30, 2022 19:38:10 #
jerryc41 wrote:
Within an hour before sunrise and an hour after sunset is a time called Blue Hour. Although your eye will not see it, your camera detects a deep blue in the sky. That’s a great time to shoot.
Within an hour before sunrise and an hour after sunset is a time called Blue Hour. Although your eye will not see it, your camera detects a deep blue in the sky. That’s a great time to shoot.
Based on some blue hour transparencies I made ages ago on EHB120 film, I'll suggest setting your color temperature to around 3200-3400K for some tests. Good luck.
Jul 30, 2022 20:22:29 #
cjc2 wrote:
Thank you. To ALL. I have a general understanding of how to accomplish this task, just looking for LENS RECOMMENDATIONS! So far, I'm figuring on a fast 50 or less.
To help investigate what lens FLs will do what I recommend is that you download 'Stellarium' and you are then able to feed in different focal lengths and see what will be in frame.
Depending upon your location and time of year you will see exactly what you could achieve with say the milky way in the background.
Having decided upon a FL you want next look for something with minimal coma that makes the stars look like flying saucers towards the edges.
Jul 30, 2022 20:47:28 #
Grahame wrote:
To help investigate what lens FLs will do what I recommend is that you download 'Stellarium' and you are then able to feed in different focal lengths and see what will be in frame.
Depending upon your location and time of year you will see exactly what you could achieve with say the milky way in the background.
Having decided upon a FL you want next look for something with minimal coma that makes the stars look like flying saucers towards the edges.
Depending upon your location and time of year you will see exactly what you could achieve with say the milky way in the background.
Having decided upon a FL you want next look for something with minimal coma that makes the stars look like flying saucers towards the edges.
Thanks.
Jul 31, 2022 01:03:31 #

Longshadow wrote:
As wide an aperture as you can get to let as much light in as possible. I use a 50mm ƒ1.4. Wide/tele depending on how much of the sky you want to capture vs. the aperture available for that focal length.
Tripod with remote shutter release.
After about 15+ seconds you'll start getting star trails.
Lens hood to keep stray light out.
Works best in a dark area, otherwise neighbors lights can cloud the image.
Possibly up the ISO.
Experiment for your camera.
Tripod with remote shutter release.
After about 15+ seconds you'll start getting star trails.
Lens hood to keep stray light out.
Works best in a dark area, otherwise neighbors lights can cloud the image.
Possibly up the ISO.
Experiment for your camera.
This advice about setting the aperture as wide open as possible doesn't work well with many lenses. And some it does. Stars are point sources of light and really challenge a lens. And problems such as Chromatic Abberations (CA) can show up. And coma distortion. And astigmatism distortion. And on and on, I could go.
And cost of a lens isn't always a good indicator too. Some lenses are just better at this than others.
The web site www.lonelyspeck.com has lens recommendations.
One thing I have found is that using a narrow band pass filter helps a lot. I had the CFA removed from the sensor turning the camera into a mono sensor camera. And when you can limit the range of wavelengths going through the lens, CA problems go away. But not everyone has such a camera.
Stopping down a few notches can greatly reduce lens distortion problems. But now you have less light, and need longer exposures.
And then there are lenses that just happen to be good wide open for these shots. These are a delight to use.
Next problem is focus. I really dislike focus-by-wire for stars. Much prefer old fashioned manual focus, and especially lenses that use a lot of focus ring rotational travel.
And I have found macro lenses tend to work really well too.
It is OK to up the ISO too. Noise reduction SW like Topaz's Denoise AI can save the day.
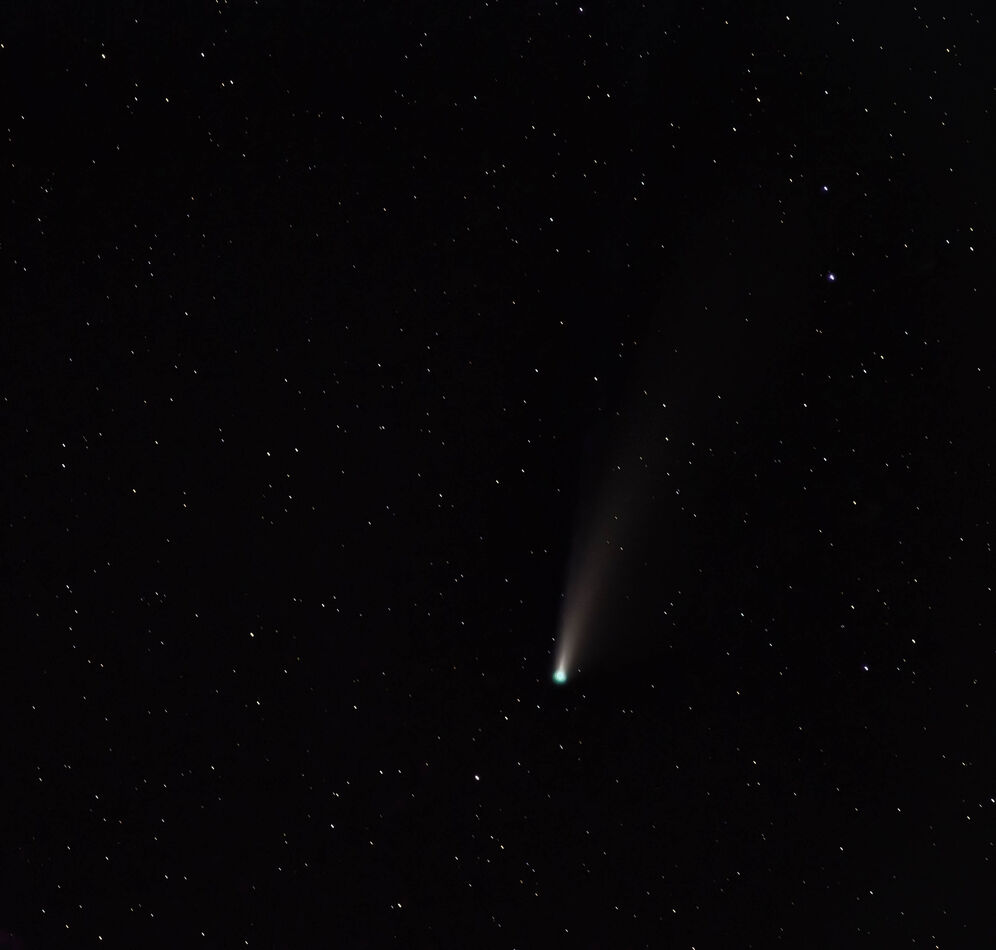
I am attaching a lens that does work well for stars. This is the Olympus 12-100mm f4 lens, and used at 100mm and wide open at f4. This was shot using an Olympus EM1ii and consisted of many shots that were stacked. Each shot was 6 sec and for this image, I did not track. If you zoom way in, you can see tiny star trails. This is Comet Neowise that was in the sky 2 years ago in July 2020. I used ISO 3200 for which the stacking helped with the noise and then I did some stretching in curves in Photoshop and some Topaz Denoise AI. And by the way, this is a focus-by-wire, and happens to be an exception to my rule about focus-by-wire. Olympus did a great job designing this lens, and distortion with stars is under control.
I have many other lenses that are not so good at stars. But I don't like to show those.
Jul 31, 2022 01:39:41 #
twowindsbear wrote:
Based on some blue hour transparencies I made ages ago on EHB120 film, I'll suggest setting your color temperature to around 3200-3400K for some tests. Good luck.
If you shot RAW, just use daylight WB. In post processing, you can change it to anything you want. Not so if you shoot JPEG.
If you want to reply, then register here. Registration is free and your account is created instantly, so you can post right away.