Exposure methods for BIF
Jul 29, 2022 09:33:59 #
gvarner
Loc: Central Oregon Coast
What are your tricks for getting the exposure right on BIFs? They’re such a small target and the overall scene lighting may not be the way to go. Or you could have high contrast between the bird and the background. Your experience would be good to know.
Jul 29, 2022 10:08:18 #
Strodav
Loc: Houston, Tx
For birds against open sky I shoot manual, higher shutter speed (1/1000 minimum), usually around f/8, give or take, meter on the open sky to adjust ISO. I use the histogram and put the sky to the right wall without the blinky going off. It's easier to do this in Live View mode as you can adjust ISO and watch the histogram change real time. That's usually 2 to 3 stops above the cameras metering system making the sky 18% gray. It's a good idea to have the sun more behind you and the wind at your back if possible.
Jul 29, 2022 10:24:46 #

EXPOSE TO THE RIGHT - ETTR
It doesn't matter what speed you select. There is no 'right' shutterspeed for every size / type bird against every shade of sky.
It doesn't matter what aperture you select. There is no 'right' aperture setting for every size / type of bird in every possible pose.
It doesn't matter what ISO you select. Every camera is slightly different, older or newer, brand, etc.
It doesn't matter what metering mode you select. Although, your brand's version of evaluative (using the entire frame) is probably better than pretending you can keep a small moving subject in a 'spot' that is 3% to 7% of the total frame to get an accurate metering in action.
It does matter two things: use the lowest ISO possible for your aperture and speed selections and EXPOSE TO THE RIGHT. Look at your meter position against the target sky before you start tracking a subject bird. Adjust the ISO manually or the Exposure Compensation to position the meter at +1 over the zero mark, or as far as +2, depending on dark vs white birds and direct sunlight. The same applies to shooting airshows.
Jul 29, 2022 10:28:52 #
And to add to that, there is exposing for a flying (black) crow vs a flying (white) seagull, with the rest being in between somewhere.
Jul 29, 2022 10:53:49 #

gvarner wrote:
What are your tricks for getting the exposure right on BIFs? They’re such a small target and the overall scene lighting may not be the way to go. Or you could have high contrast between the bird and the background. Your experience would be good to know.
#1 Avoid trying to photograph birds in flight with JPEG capture. Record raw files!
#2 If the scene is in daylight/direct sun, start with Sunny 16 and adjust up or down the scale (If ISO 200 at f/16 at 1/200 is the sunny 16 exposure, I'd go to f/8 at 1/800 or f/5.6 at 1/1600 or (probably) f/8 at 1/1600 at ISO 400. All three are equivalent exposures.
#3 If the scene changes rapidly, as in a wooded area with lots of shade, occasional front light, and occasional backlight as the bird flies, I'd meter the LIGHT in the most well lit and the darkest areas (with an incident meter or gray card or ExpoDisc) and calculate the difference between the two. You can usually "overexpose" your scene in raw by a stop (expose BEYOND the right of the JPEG histogram) and still recover the highlights. That will bring up the shadows by a stop, to make post-processing recovery easier. This works ONLY with raw files.
Working in raw with most cameras will give you recoverable detail from about two stops over and two stops under either the meter reading of a gray card held in the same light as the subject, or an incident meter reading, or a reading through an ExpoDisc pointed at the light source. What that means is:
When you work in a parametric post-processing editor such as Lightroom Classic, you can move the exposure, whites, highlights, shadows, and blacks around to open shadows and bring down highlights. You can attempt to do that with JPEGs, but there is much less recorded range in a JPEG, so there is much less detail above the whites and below the blacks defined by the in-camera processed JPEG.
While using an autoexposure mode can work well, always remember that camera meters are stupid. They want to see neutral gray, period. Oh, there are matrix modes that do some pretty good guesstimates of exposure, based on scene structure, but they can be fooled, especially by backlit situations. So you may have to use pretty aggressive EC (exposure compensation) in some areas.
Birds backlit by sky will appear darker than they should. One to two stops of EC adjustment to the auto exposure may be required to put the scene in a range that can be tweaked in post. In bright sun, the dark side of a fully backlit subject will be exposed about two stops less than its front-lit side.
If the sun is in the frame, experience will teach you what to do. Your equipment is going to perform differently from others'. By that, I mean that your lenses may flare more or flare less than mine. You may need more or less EC than I do to reduce the flare. You may need more or less of the dehaze control in Lightroom Classic than I would.
Work with scrupulously clean lenses! This will reduce flare. Keep filters clean, or don't use them. Every surface of glass adds flare and reduces exposure, so consider the need for, and worth of, a filter when aiming into the sun.
Probably the hardest things to do when photographing moving targets in changing light is to keep the scene brightness range within the range of what the sensor can record. That's why raw capture is so important. The best cameras can save a 13 to 15 stop brightness range in a raw file. They only save the same 5.5 to 6 stops of brightness range in a JPEG that cheap cameras do.
I hear photographers say they never want to post process. They just want to use the JPEGs out of their camera. Yet they want to photograph action sports and birds in flight and wild animals running through the woods. They wonder why their JPEGs out of the camera look like garbage.
The average 8-bit monitor, an 8-bit JPEG file, and the average sheet of traditional wet-process photo paper can all display or store about the same brightness range. The paper reflects about five stops of range, so it is the "least common denominator." That means if you start with 13 stops of brightness range in a raw file, you can tonally compress the file in post processing and cram a good simulation of that wide range into a narrower range of printable detail. The tonal compression happens when you adjust the sliders mentioned above.
Jul 29, 2022 10:54:12 #
In many cases your cameras meter will not provide you the proper exposure on your subject consider it is relatively is relatively small in the frame. Lots of times I will try to find a subject with similar light and adjust my exposure accordingly. In order to do that, you need to be in manual mode so the exposure won’t change when you turn the camera to your subject. Alternatively, you can take an exposure off the sky, the most likely background, and compensate, 1-2 stops less for white birds (like snowy egrets) or 1-2 stops more for dark birds (like blackbirds or ravens). You can take some test shots, if time allows, and check for blinkies. If you are lucky enough to be using the newer Sony gear, using zeebras, when set up properly, can provide a tremendous advantage for getting proper exposurers.
Jul 29, 2022 11:19:51 #
gvarner
Loc: Central Oregon Coast
burkphoto wrote:
#1 Avoid trying to photograph birds in flight with... (show quote)
Thanks for relating your experience. So a gray card still has uses in this digital age. In my early years I had one of those little Kodak handbooks that had a gray card in it. I used that to set exposure for my Mamiya 1000 when photographing closeups using a set of extension tubes and my Spiratone 135 mm. I knew the camera's meter was going to read all that shadow surrounding those little sunlit flower heads I wanted to capture. Worked pretty well for me.
Jul 29, 2022 11:26:56 #
I always use auto iso for birds in flight as the light changes as you pan. For perched birds all the given advice works at given times and for different birds.
Jul 29, 2022 20:39:02 #
Just Shoot Me
Loc: Ithaca, NY
CHG_CANON wrote:
EXPOSE TO THE RIGHT - ETTR br br It doesn't matte... (show quote)
If you are shooting JPEG. this may or not apply. Otherwise Paul is right on target, shoot in RAW and ETTR.
Ron
Jul 30, 2022 06:32:00 #
billnikon
Loc: Pennsylvania/Ohio/Florida/Maui/Oregon/Vermont
gvarner wrote:
What are your tricks for getting the exposure right on BIFs? They’re such a small target and the overall scene lighting may not be the way to go. Or you could have high contrast between the bird and the background. Your experience would be good to know.
I shoot birds in flight in Florida. First of all I mostly use Manual exposure. And I usually shoot with the sun coming over my shoulder and lighting the bird head on.
I take a reading of a white bird, then I usually go two stops under to get feather detail, I usually leave this exposure even for grayish birds. Now that I have my BASE exposure, I can shoot the birds either in the air or on branches as long as my lighting does not change the exposure will be spot on.
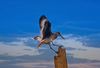
In the first image below, (a Great Blue Heron doing a mating call) I have already taken my base exposure, notice that the background is much brighter, but my bird is exposed properly. Keep in mind that as you shoot, if the light changes, you must constantly redo your BASE exposure, for instance, I start shooting around first light in Florida wetlands. My BASE exposure at 7 AM is much different than my BASE exposure at say 9 AM, especially if there is a clear sky, it will be much brighter at 9 than at 7 and you have to constantly adjust your BASE exposure.
Lots of folks will use auto ISO, I do not, because, if the bird is flying from shadow to light, the meter can still be fooled and this will cause your image will NOT be properly exposed. So I shoot manual everything unless my lighting is going to change rapidly without notice.
In the second example, shot early in the morning, I have already done my BASE exposure off a white bird, in this case, a Great Egret in mating colors. Note the dark background, but everything the sun is hitting is exposed OK. If I had shot in Aperture, Shutter, or another automatic setting, my bird would have been washed out and the background would have been brighter.
It also takes a lot of time to adjust your manual exposure to the settings that will look right to you.
But when using manual, if the bird takes off into a bright sky, your BASE exposure will work fine and the bird will be properly exposed.
So, it is a skill and most skills take practice, now that you have BASE knowledge, go and out and have some fun.
OK, here is a tip, if you have no bird yet, but if you see any grass that is being lite the same way as the rest of the scene in front of you, take a manual exposure off the green grass, green grass reflects the sun very close to what a gray card would reflect, so, take the manual exposure off the green grass, then when a bird flies by, your exposure should be close to perfect.
Second tip, this one is simple, I call it the 45/45 rule, when your out in the field, aim your camera at the sky where birds will be flying, again, I usually point it at the sky with the sun coming from behind me, aim your camera 45% to one side and 45% up into the clear sky, I like then to set may camera manually 2 stops over exposed, now your ready for birds to fly by, keep that setting and your birds should look good, always always shoot in RAW so you can make slight changes in post later.
Good luck and keep on shooting until the end.


Jul 30, 2022 07:28:29 #
gvarner wrote:
What are your tricks for getting the exposure right on BIFs? They’re such a small target and the overall scene lighting may not be the way to go. Or you could have high contrast between the bird and the background. Your experience would be good to know.
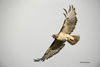
While I am not a regular Birder, one of my best lifetime shots was of a BIF near Tilghman Island in the Chesapeake Bay area. My "trick" was to be ready for anything, which for a boat cruising the Chesapeake Bay includes a wide variety of opportunities for shots of wildlife, watermen on the job, water scenery and much more.
I was shooting with a Tamron 28-300mm lens mounted on a Nikon D750. The D750 was set to Aperture preferred at f6.3; ISO was 400. Towards the end of a four hour journey on the water my friend, the boat captain, shouted, "He's got a fish," pointing to an Osprey that had just snagged a fish from the water and was flying away to his nest and family for dinner. I quickly reacted and started tracking the Osprey flying away from us at his top speed. I managed to capture him/them in five frames at 300mm, the last of which was the keeper.
Upon close inspection of the resulting image, I discovered that I had captured an Osprey carrying a Rockfish . . . the Rockfish with a hook and lure dangling from his mouth!!
Sometimes the best "trick" is to be in the right place at the right time with the right equipment ready to shoot.
Best Regards,
BT

Jul 30, 2022 08:58:59 #

Wow....these are gorgeous photos, Bill!! Thank you for your tips and valuable information! I've learned a lot this morning, from you and others who have shared on this thread. Thank you, everyone!
Patty
Patty
Jul 30, 2022 10:23:58 #
billnikon wrote:
I shoot birds in flight in Florida.
Good luck and keep on shooting until the end.
Good luck and keep on shooting until the end.
Simply gorgeous images, billnikon. Thanks for sharing. BT
Jul 30, 2022 11:36:51 #
burkphoto wrote:
#1 Avoid trying to photograph birds in flight with... (show quote)
I beg to differ with you! I shoot only jpegs and I have quite a few BIFs and other wildlife photos posted here and elsewhere that get rave reviews. I grant you, I get some rejects, and I'll live with that. But I don't plan to start shooting RAW anytime soon!
Jul 30, 2022 11:37:27 #
If you want to reply, then register here. Registration is free and your account is created instantly, so you can post right away.