How do i fix this picture
Dec 22, 2021 15:49:06 #
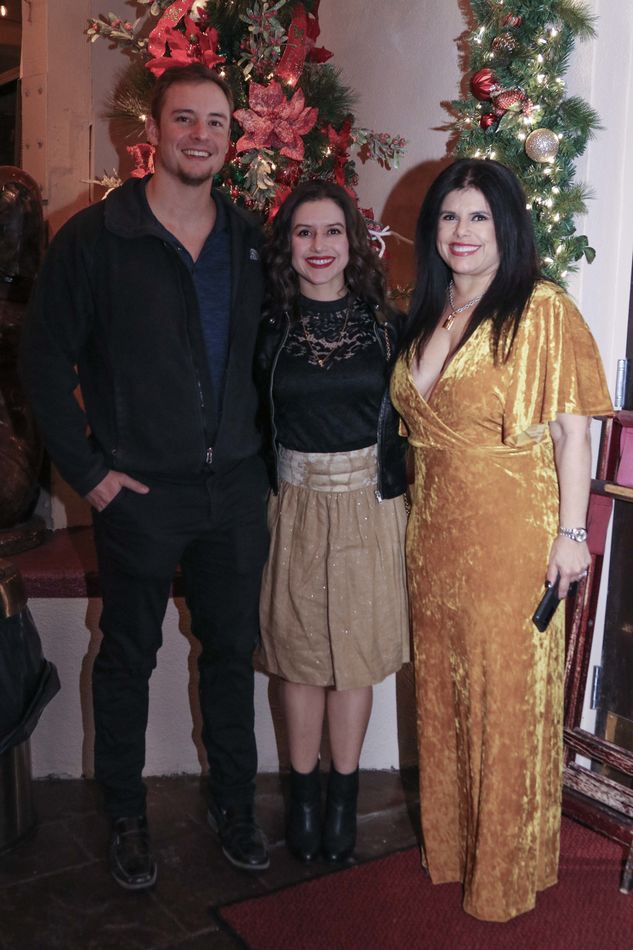
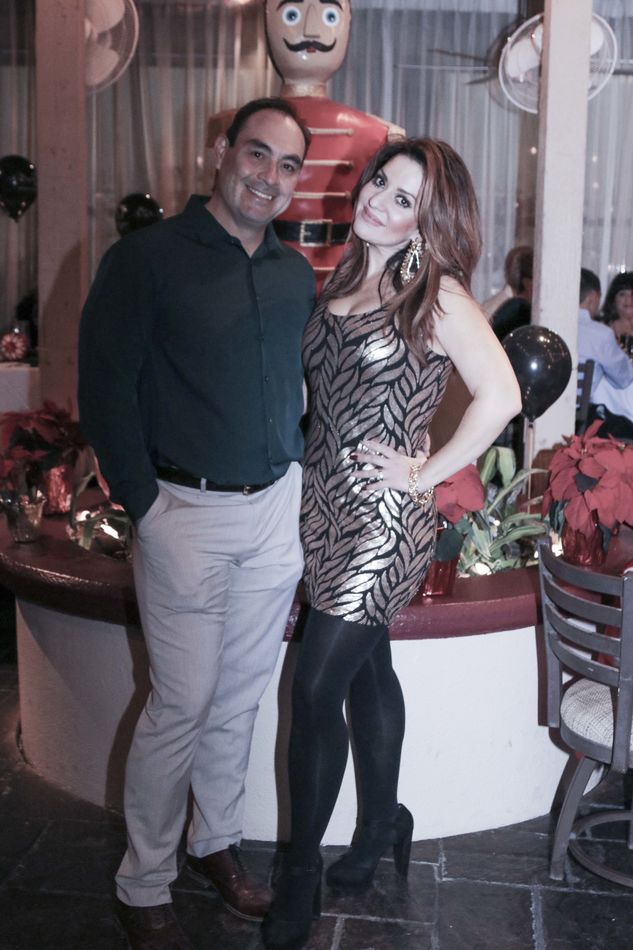
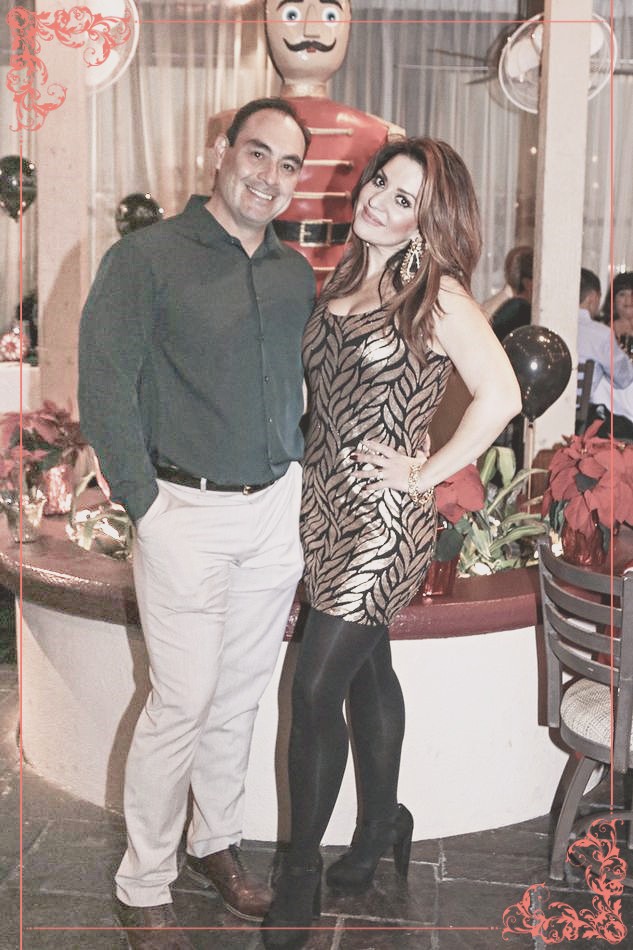
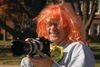
So Iwas using a camera mounted flash and I turned the camera sideways, so the flash only covered part of the picture so now I am stuck with a color mismatched picture :(
Also the colors are a little off....
Any suggestions? Please help
Also the colors are a little off....
Any suggestions? Please help

Dec 22, 2021 16:04:30 #
Dec 22, 2021 16:07:43 #
larryepage
Loc: North Texas area
cony25 wrote:
So Iwas using a camera mounted flash and I turned the camera sideways, so the flash only covered part of the picture so now I am stuck with a color mismatched picture :(
Also the colors are a little off....
Any suggestions? Please help
Also the colors are a little off....
Any suggestions? Please help
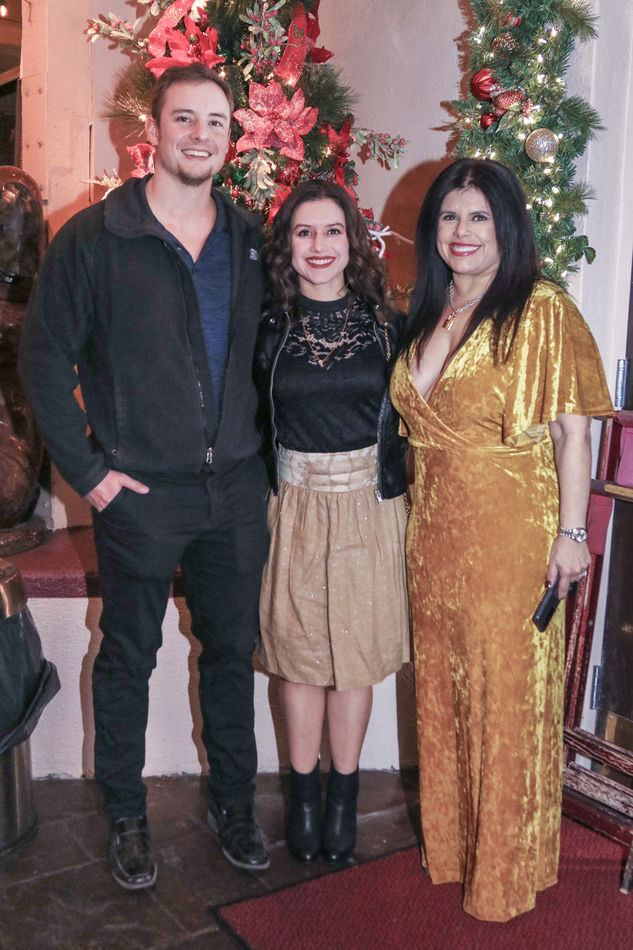
Your flash is not covering your field of view in any of these three images. My guess is that it is a non-adjustable flash intended to cover a 50mm field of view and that you are shooting very close with a very wide lens...probably 24mm or so. The shadows behind the folks in the dark part of the image are completely different from those in the area illuminated by the flash.
It is also possible that your flash is adjustable, but is stuck on a longer focal length setting for some reason.
These are the things I'd look for first.
Dec 22, 2021 16:22:40 #

cony25 wrote:
So Iwas using a camera mounted flash and I turned the camera sideways, so the flash only covered part of the picture so now I am stuck with a color mismatched picture :(
Also the colors are a little off....
Any suggestions? Please help
Also the colors are a little off....
Any suggestions? Please help
Not sure what the colors should be, but with a little work in Lightroom or Photoshop (using linear gradient masking) you can correct some of the flash issues. This was a quick fix, spend a bit of time, especially to work on what the color issue is and I think you can save all these photos...and if you had a hood on the lens, take it off when using the flash.
Good luck...
Dec 22, 2021 16:25:05 #
fredpnm wrote:
Not sure what the colors should be, but with a little work in Lightroom or Photoshop (using masking) you can correct some of the flash issues. This was a quick fix, spend a bit of time, especially to work on what the color issue is and I think you can save all these photos...and if you had a hood on the lens, take it off when using the flash.
Good luck...
Good luck...
what features did you use in lightroom? Please help
Dec 22, 2021 16:28:55 #

fredpnm wrote:
Not sure what the colors should be, but with a little work in Lightroom or Photoshop (using linear gradient masking) you can correct some of the flash issues. This was a quick fix, spend a bit of time, especially to work on what the color issue is and I think you can save all these photos...and if you had a hood on the lens, take it off when using the flash.
Good luck...
Good luck...
Lovely ⭐💛⭐💛⭐
Dec 22, 2021 16:30:45 #
linear masking and then adjust exposure and shadows. Do the left side to increase and the right side to decrease to balance the two sides. Then select 'subject' and use a subtract brush to erase all but the man's face to reduce the red tint on the man's face with saturation and/or hue adjustments as you see fit.
This all assumes you have the latest version of LR/PS.
This all assumes you have the latest version of LR/PS.
Dec 22, 2021 16:43:30 #

cony25 wrote:
So Iwas using a camera mounted flash and I turned the camera sideways, so the flash only covered part of the picture so now I am stuck with a color mismatched picture :(
Also the colors are a little off....
Any suggestions? Please help
Also the colors are a little off....
Any suggestions? Please help
The suggestions for post processing are 100% Correct. Very easy to do in Lightroom - and just slightly more involved in Photoshop and other raster image editors.
But the best way to fix it is to avoid it. A camera-mounted speed light is the worst kind of light for most subjects, unless it is an articulated one that can be pointed in any direction. Using a wall or a ceiling, preferably behind the camera, will provide far better light - less harsh, softer shadows, etc.
Dec 22, 2021 17:16:52 #

Unless you re-shoot these images, the only "FIX" is editing an application of burning and dodging in selected areas. To avoid thIS UNEVEN LIGHTING in future make sure your Speedlight is aligned properly atop the camera. If you are using it off-camera be sure to aim it carefully or employ bounce techniques.
Meanwhile, enjoy these images- nice expressions and a festive atmosphere!
MERRY CHRISTMAS AND HAPPY NEW YEAR!
Meanwhile, enjoy these images- nice expressions and a festive atmosphere!
MERRY CHRISTMAS AND HAPPY NEW YEAR!


Dec 22, 2021 17:19:25 #
therwol
Loc: USA
Gene51 wrote:
A camera-mounted speed light is the worst kind of light for most subjects, unless it is an articulated one that can be pointed in any direction.
Agree except in one instance. It can be handy for fill flash outdoors when the subject is backlit. Direct flash otherwise can be very harsh and uneven. When I was in college, I had a very powerful (for then) 250 watt second, two piece flash that I always used aimed at the ceiling in the dorm but with a piece of notebook paper taped on the head in such a way as to brighten up the faces a bit. You mostly couldn't tell that I wasn't using natural light.
Dec 22, 2021 17:59:39 #
therwol wrote:
Agree except in one instance. It can be handy for flash fill outdoors when the subject is backlit. Direct flash otherwise can be very harsh and uneven. When I was in college, I had a very powerful (for then) 250 watt-second, two-piece flash that I always used aimed at the ceiling in the dorm but with a piece of notebook paper taped on the head in such a way as to brighten up the faces a bit. You mostly couldn't tell that I wasn't using natural light.
Of course on camera, flat, direct flash is not ideal lighting, however, anyone starting to learn flash technique should start off by being able to create a "clean" well illuminated and exposed image with a simple on-camera Speedlight. Besides exposure issues, the next step might be to use a proper bracket to elevate the flash unt about 12 inches above the lens to enable a small degree of modelling and a little to be more depth of lighting and better control over districting shadows in the background. This should produce clean even lighting and will also serve as a fill light in multiple flash setups or as a fill source in daylight.
Bounce flash, when possible, is a good technique to master but it too, can not be successfully done randomly and some knowledge of the angle of incidence theory will help as to what surfaces, distances, and direction as walls or ceilings are best to employ for various effects.
Of course, light modifiers, both manufactured and improvised are handy tools but just arbitrarily mounting any of these things on your lights will not necessarily and automatically improve the effect.
There are all kinds of great systems that provide not only triggering but pretty sophisticated exposure and ratio control via an accessory or the camera's internal commanded system. There are a plethora of modifiers on the market, and of course, old-timers, who are well acquainted with improvised flash technique, each has their favourite simple or Rube Goldberg contraptions, but without some basic knowledge of the inverse square law, the angle of incidence theory, and exactly how to employ all of these pre-manufactured or homemade gadgets, none of them will work to their full potential.
Dec 22, 2021 21:02:56 #
fredpnm wrote:
Not sure what the colors should be, but with a little work in Lightroom or Photoshop (using linear gradient masking) you can correct some of the flash issues. This was a quick fix, spend a bit of time, especially to work on what the color issue is and I think you can save all these photos...and if you had a hood on the lens, take it off when using the flash.
Good luck...
Good luck...
deleted
Dec 22, 2021 21:03:59 #
E.L.. Shapiro wrote:
Unless you re-shoot these images, the only "F... (show quote)
Good job. I thought it was a hopeless cause.
Dec 22, 2021 23:32:03 #

les spencer wrote:
live and learn...:)

Really Les? That's the best you can do for someone who asks for help with an exposure problem? I hope you feel very proud of yourself.
Dec 23, 2021 05:34:40 #

If you want to reply, then register here. Registration is free and your account is created instantly, so you can post right away.