Cleaning Dirty Negatives
Feb 26, 2021 17:54:19 #
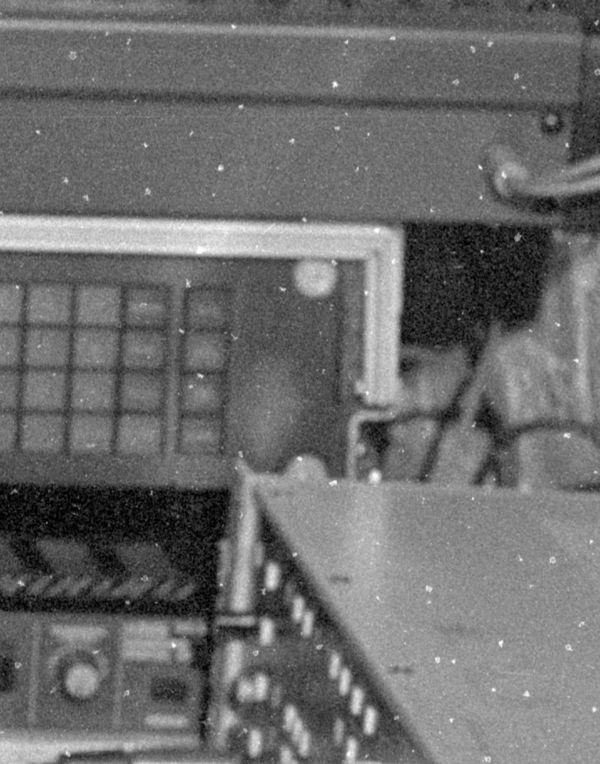
I'm scanning old negatives using a Nikon Coolscan V and I'm finding these white spots of various sizes and shapes on them. And it's the inverse of what you'd expect: negatives stored 'improperly', as in stuffed in an envelope, scan clean. One's in Q-Pic archival plastic sleeves have the spots.
All were processed the same way: one of various b/w developers, kodak stop bath, kodak fixer, thorough wash and then kodak photo-flo. Excess liquid removed by running the film between two fingers or wiping with lint free photo-wipes.
When the image is on the monitor full frame, you can only see one or two on the better ones. The uploaded sample is blown up from a 1"x.85" segment of a scan which loads in as an 11x17 16 bit gray tiff file at about 330 dpi. (it varies a little depending on how/whether the negative is cropped in scanning.)
So far, I've been processing these in Affinity Photo using the clone tool. This takes twenty minutes to half an hour per frame. I have several hundred rolls of film to scan. While I don't know how many are damaged, cleaning them with Affinity isn't doable. I tried denoise in Affinty and Luminar 4, but to work enough to blend the spots into the background, they turn the image to mush (or I'm doing it wrong...)
I tried Cleaning a strip with PEC-12 Photographic Emulsion Cleaner. It seemed to work a bit but not enough to save me from a massive clone job.
Please suggest how I can clean these. Thanks, all.
Feb 26, 2021 18:21:29 #
RWR
Loc: La Mesa, CA
Steve22 wrote:
I'm scanning old negatives using a Nikon Coolscan ... (show quote)
Try Edwal Anti-Stat Film Cleaner.
Feb 26, 2021 18:54:46 #
Feb 26, 2021 19:19:06 #
Feb 26, 2021 19:32:02 #

Photo-Flo is your friend!
First, scan all the negatives as is, dirt and, all just in case there is further damage in the cleaning process, you still have the images.
Next, rewash them in water at 68 degrees for about 10 minutes. Then, immerse the in diluted Photo-Flo for about 2 minutes with extremely gentle agitation. This should soften the emulsion sufficiently to release any embedded particles. Very gently rubbing with your fingers or a small wad of absorbent content will help.
Finally, immerse the negatives in a clean Photo-Flo bath and squeegee between your fingers or 2 small viscose sponges that were washed and squeezed out in the Photo-Flo bath.
Film cleaners will remove surface smudges but are not as effective with embedded dust and dirt.
Try this on a few less important negatives to see if it is successful before doing the whole batch.
I have done this many times with both colour and black and white negatives. I have also done this with slides and transparencies using the f appropriate stabilizer for the original process and subsequent baths in Photo
-Flo.
Photo-Flo is a wetting agent to promote even drying but it has some detergent action that won't harm the film.
Det cleaned film in a dust-free place and avoid heat or forced air drying.
I hope this helps.
Feb 27, 2021 07:39:26 #

Feb 27, 2021 07:58:53 #

I've taken old negs and yesterday's negs onto the scanner. I have come to believe that the scanner invents spots! When I was using my Nikon Coolscan, it did an excellent job taking care of it. My Epson scanner simply makes it worse! It's part of the process.
Feb 27, 2021 11:06:16 #
AzPicLady wrote:
I've taken old negs and yesterday's negs onto the scanner. I have come to believe that the scanner invents spots! When I was using my Nikon Coolscan, it did an excellent job taking care of it. My Epson scanner simply makes it worse! It's part of the process.
I don't think that a scanner, in ab of itself, creates spots or any defects on a negative. A better quality scanner will better reveal the dist this is already on the negative. The negative must be cleaned before scanning and the glass on the scanner shod be clean before each scan.=
Clean routinely clean the class before each scab with an anti-static cloth- it only takes a few seconds. Wot a separate anti-static cloth. I also quickly treat each negative. Takig both of these steps has virtually eliminated cloning of dust spots that are not embedded in the negatives.
Anyone that did darkroom work, back in the olden days, or still uses a condenser enlarger with a glass carrier is too familiar with dust spots. We had to deal with 6 surfaces to clean. With a scanner, you only have to worry about 3, both sides the negative and the surface of the scanner glass. A gentle blow with compressed air helps as well.
Feb 27, 2021 15:50:02 #
E.L.. Shapiro wrote:
Photo-Flo is your friend! br br First, scan all t... (show quote)
First of all thanks for detailed instructions.
Fortunately (or forthoughtfully ;<} ) I bought a fresh bottle of photo-flo the same time I bought film cleaner. So, I can try the re-wash theory.
Feb 27, 2021 16:04:42 #
Are the spots in the same place on each photo? It could be a dirty lens inside your scanner. I had the same issue and found that most of the spots went away once I cleaned inside the scanner.
Feb 27, 2021 16:58:05 #
DJBAD
No, unfortunately. They're random in position, shape, density and size: on any strip of six negatives there can be almost none, or almost completely filling a frame. They can be small -- about 25 times the size of a piece of grain, or about half an inch at 500x. Most are dead white (the scanner software reverses the negative), a few are mottled.
No, unfortunately. They're random in position, shape, density and size: on any strip of six negatives there can be almost none, or almost completely filling a frame. They can be small -- about 25 times the size of a piece of grain, or about half an inch at 500x. Most are dead white (the scanner software reverses the negative), a few are mottled.
Feb 27, 2021 17:01:19 #

Steve22 wrote:
I'm scanning old negatives using a Nikon Coolscan ... (show quote)
I've done photo retouching since the 90s (retired from custom lab business in 2008) and the best way to save time eliminating spots and scratches for me is to use Photoshop Elements. I happen to have Version 13 on this particular laptop but also works on newer versions.
Click on "Filter" along the top menu bar, then "Noise" in the dropdown menu. then click on "Dust and Scratches"
in the right-sided menu. A window will open up with a preview of the image. Increase the "Radius" depending on the size of the spots; you'll be able to see the effect in the preview window. In your sample I used radius 4;
bigger spots require a higher number.
You can download a 30-day trial of the latest PS Elements 2021 from Adobe and see if this works for you.
Be well! Ed

Feb 27, 2021 19:39:02 #
ELEE
Thank you, Ed. When I tried similar in Affinity Photo and Luminar 4, it turned the whole image to mush. Perhaps Elements works differently. I'll try it.
Thank you, Ed. When I tried similar in Affinity Photo and Luminar 4, it turned the whole image to mush. Perhaps Elements works differently. I'll try it.
Feb 27, 2021 21:28:44 #
Henlopen
Loc: Lewes, Delaware
PaintShop Pro has a similar filter, called salt and pepper under their add or remove noise section that I've been using for many years where you set the speck size (usually between 1-5 for most of my problems), and sensitivity to specs - usually around 3 from my experiences. And it does a very good job without smudging the image in most cases.
Feb 27, 2021 21:42:27 #
Henlopen
Loc: Lewes, Delaware
Here is what I got using PaintShop Pro's salt and pepper filter and following it up with the High Pass Sharpen filter in the soft light blend mode. The settings on the spec size was 17, and sensitivity to specs was set to 2 for this.

If you want to reply, then register here. Registration is free and your account is created instantly, so you can post right away.