Extremely Post, Post Processing
May 4, 2020 09:32:11 #
Just finished digitizing around 1500 slides from the 1970's and 80's. It was interesting to say the least. I've been fooling around with digital post processing for almost as long as it's been available to the average photo buff, using a variety of editors, but still manage to get pleasantly surprised.
I used to try to squeeze as many slides out of a roll of film as possible, and often the
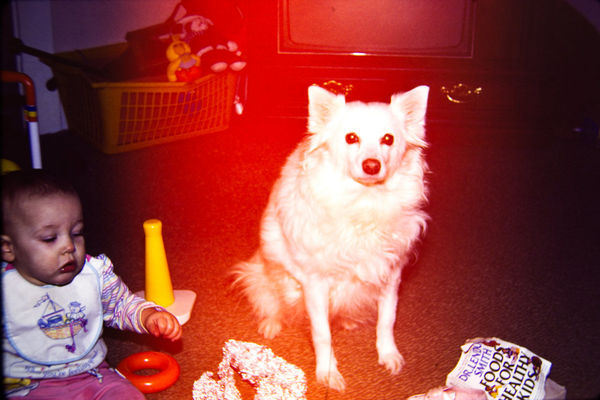
first slide would be messed up, half missing or like this one, with red color over half the pic. I _guess_ because when the developers opened the roll, light would hit the first bit of film, which normally wouldn't have in image on it unless you were cheap as me.
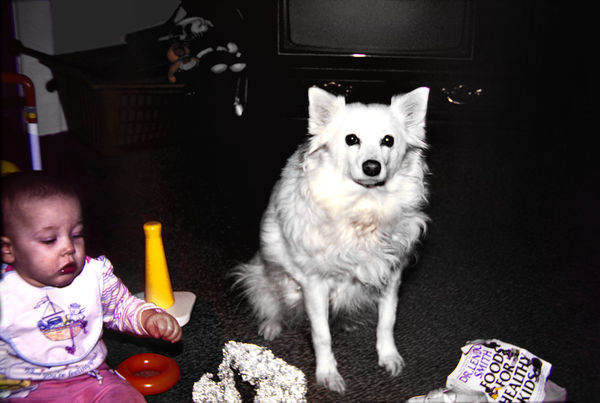
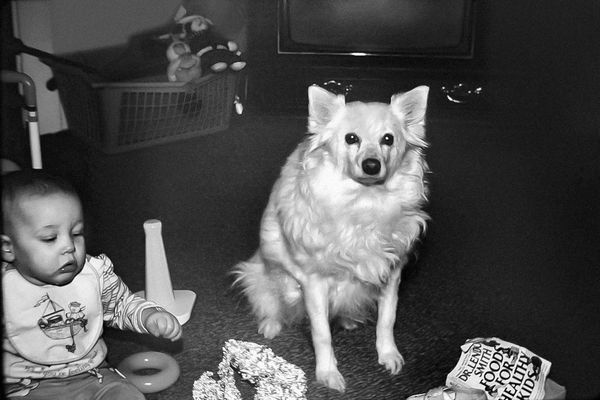
Anyway, below is an image of a slide like this. The image is not all that, but since it was a rare picture of my dog Maggie who was covered in red, I decided to try to save it. I've removed tint and haze before, but this time I used Affinity Photo's HSL filter. It was amazingly simple and kind of shocked me how easily today's software can fix up a really bad image, even one from 35 years ago. I didn't do any processing other than to remove the red.
Technique, for those interested was simply open an HSL adjustment layer, select red, pick on the reddest part of the picture and reduce the saturation of that color to zero. That's it, no muss, no fuss. One image saved from the bit bin.
Also after looking at all these slides made with SLR's with full on manual controls and no skill or experience of the shooter, reminded me of how horrible shooting film really was, where you had to wait days to see the results of your efforts, and pay good cash for each and every pic, good, bad or indifferent. Thank god for today's cameras, and today's computers/software.
I used to try to squeeze as many slides out of a roll of film as possible, and often the
first slide would be messed up, half missing or like this one, with red color over half the pic. I _guess_ because when the developers opened the roll, light would hit the first bit of film, which normally wouldn't have in image on it unless you were cheap as me.
Anyway, below is an image of a slide like this. The image is not all that, but since it was a rare picture of my dog Maggie who was covered in red, I decided to try to save it. I've removed tint and haze before, but this time I used Affinity Photo's HSL filter. It was amazingly simple and kind of shocked me how easily today's software can fix up a really bad image, even one from 35 years ago. I didn't do any processing other than to remove the red.
Technique, for those interested was simply open an HSL adjustment layer, select red, pick on the reddest part of the picture and reduce the saturation of that color to zero. That's it, no muss, no fuss. One image saved from the bit bin.
Also after looking at all these slides made with SLR's with full on manual controls and no skill or experience of the shooter, reminded me of how horrible shooting film really was, where you had to wait days to see the results of your efforts, and pay good cash for each and every pic, good, bad or indifferent. Thank god for today's cameras, and today's computers/software.
May 4, 2020 09:38:32 #

May 4, 2020 09:39:50 #

May 4, 2020 09:47:37 #

Terrific! Thanks very much for sharing your result and your enthusiasm for 21st century digital photography 
Your dog reminds me of one we had in the 1960's. Breed was called American Eskimo Spitz.
Your dog reminds me of one we had in the 1960's. Breed was called American Eskimo Spitz.
May 4, 2020 09:49:19 #
It's amazing what todays software is capable of achieving. I was wondering who did the damage to the book? They both look guilty.😊
Have you tried a B&W or a sepia tone to see if that might be a better choice as a keepsake?
Have you tried a B&W or a sepia tone to see if that might be a better choice as a keepsake?
May 5, 2020 07:57:32 #

May 5, 2020 08:23:11 #

May 5, 2020 09:05:48 #
I wanted to see how easy the red would be using this program since I use PS . I bought the program , downloaded your for photo for testing only . I opened the photo layers , clicked on the adjustment icon , selected HSL . Picked the Red circle , than clicked the Picker tool . Clicked on your photo on a strong red point . I don't see a saturation slider to take to zero . What I do see is Hue shift - Saturation Shift (which is at zero ) and Luminosity Shift . Could you show me exactly how you did it in just one step . If I use the Saturation Shift , I lose the red colors on the baby and toy Thanks , Tommy
May 5, 2020 09:13:38 #
Linda From Maine wrote:
Terrific! Thanks very much for sharing your result and your enthusiasm for 21st century digital photography
Your dog reminds me of one we had in the 1960's. Breed was called American Eskimo Spitz.
Your dog reminds me of one we had in the 1960's. Breed was called American Eskimo Spitz.
Yes, she was an Eskimo Spitz. Had her over 20 years. She was part of the family.
May 5, 2020 09:37:30 #
kubota king wrote:
I wanted to see how easy the red would be using th... (show quote)
You did exactly what I did with Affinity, however Affinity has sliders for Hue, Saturation and Luminosity.
The problem you had was with my faulty description of what I did. I wasn't lying, but I forgot one of the steps I did. After I did the layer, I now recall that I also messed up some of the colors on the baby. To correct, I inverted the layer mask to all black(Ctrl+I), cancelling the filter, then I did a gradient from black to white, adjusting it so it removed most of the red on the right 2/3's of the photo. Then, I used a brush to add/remove the filter to the parts of the baby that needed touched up.
I'm really glad you tried this, I've done it my self more than once when someone showed an edit that I wanted to try, specifically, the haze remover filter. I was hoping some one would give it a shot.
Sorry for the poor description of my technique, but it was a couple of weeks ago, and my memory has started to "leave the building" if you know what I mean. Also, I'm guessing that it was the saturation slider I moved, I did both saturation and luminosity, and pretty sure it was saturation the did the trick.
May 5, 2020 09:56:51 #
Jim-Pops wrote:
It's amazing what todays software is capable of achieving. I was wondering who did the damage to the book? They both look guilty.😊
Have you tried a B&W or a sepia tone to see if that might be a better choice as a keepsake?
Have you tried a B&W or a sepia tone to see if that might be a better choice as a keepsake?
It was like 35 years ago, but my guess is the baby did the damage. She thought she could read, but usually just stuck everything in her mouth😍
I haven't tried doing anything with the picture, other than getting the red out. I was thinking of painting the top background all black, but decided to just leave it alone. If I were to spend time with it, I'd try to get my daughters face coloring a little better.
Any one that wishes to fool with it, no problem. Note my comment line, my pics can be critiqued, edited, re-posted w/o asking, and that goes in spades in this PP forum.
May 5, 2020 10:45:13 #
BigDaddy wrote:
It was like 35 years ago, but my guess is the baby did the damage. She thought she could read, but usually just stuck everything in her mouth😍
Any one that wishes to fool with it, no problem. Note my comment line, my pics can be critiqued, edited, re-posted w/o asking, and that goes in spades in this PP forum.
Any one that wishes to fool with it, no problem. Note my comment line, my pics can be critiqued, edited, re-posted w/o asking, and that goes in spades in this PP forum.
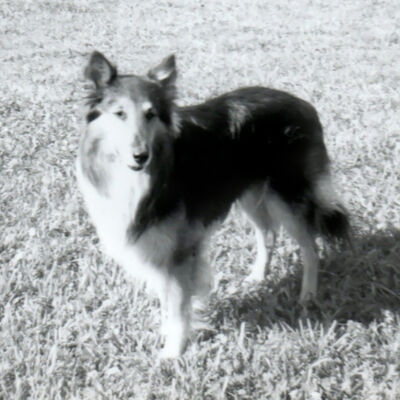
I did a bunch of color removal before I turned it into a B&W. Removed all the noise then added it back evenly for the picture.
All I could see were the odd magenta colors in the original so thought the B&W might be best for this problem.

May 5, 2020 10:47:45 #
Jim-Pops wrote:
Now it's timeless. Great work, Jim.I did a bunch of color removal before I turned it into a B&W. Removed all the noise then added it back evenly for the picture.
All I could see were the odd magenta colors in the original so thought the B&W might be best for this problem.
All I could see were the odd magenta colors in the original so thought the B&W might be best for this problem.
Any thought to cloning very slight detail into the blown areas of dog? Should be simple with all that fur to choose from
May 5, 2020 10:56:25 #
Jim-Pops wrote:
I did a bunch of color removal before I turned it into a B&W. Removed all the noise then added it back evenly for the picture.
All I could see were the odd magenta colors in the original so thought the B&W might be best for this problem.
All I could see were the odd magenta colors in the original so thought the B&W might be best for this problem.
Excellent work Jim. Looks a whole lot better than the original.
May 5, 2020 13:22:54 #
Linda From Maine wrote:
Now it's timeless. Great work, Jim.
Any thought to cloning very slight detail into the blown areas of dog? Should be simple with all that fur to choose from
Any thought to cloning very slight detail into the blown areas of dog? Should be simple with all that fur to choose from
I didn't think about cloning for the top of the dogs head👍
If you want to reply, then register here. Registration is free and your account is created instantly, so you can post right away.