Finishing Up Exposure and How It Works - A Beginner's Guide - Part 3
Mar 28, 2020 16:21:55 #

Part 1 - https://www.uglyhedgehog.com/t-638055-1.html
Part 2 - https://www.uglyhedgehog.com/t-638181-1.html
Part 3
So far all seems fine and good. However, there are consequences to each choice you make in getting that scale to balance or that glass to fill just to the rim. But, first, let us acquaint, or re-acquaint ourselves with some terms you'll be using quite frequently. As a refresher, we will review a couple of already discussed terms.
ISO - It is a system that specifies the sensitivity of the sensor or film to light. The higher the number the more sensitive to light the material is. The more sensitive the material the less photographic exposure is needed to obtain an image. Conversely, the less light is needed to obtain an image, as well. This is expressed simply as ISO with a number following.
Aperture - The effective diameter of the lens. To change the effective diameter, we adjust the aperture setting on the lens. Starting with the lens wide open we have the maximum aperture. This is also the number that will be used in denoting a particular lens, such as a 50mm f/1.4 lens. The lower this number is, the faster that lens is said to be. Adjusting the aperture setting will reduce, from completely open, to some smaller diameter, thus controlling the amount of light passing through the lens. This is expressed as an f-stop.
Shutter Speed - This is the amount of time the shutter stays open, allowing light to strike the photosensitive material. This is most commonly expressed in seconds and fractions thereof.
Here are some new terms.
Depth of Field - DOF is how much of the scene, measured from the camera, is acceptably sharp, or apparently in focus.
Motion Blur - Is the apparent blurring of any objects within a photograph due to the subject or the camera moving during the taking of the photograph.
Systems Management - The administration of associated systems in order to obtain an optimum desired result from that combination of systems, another name for photography.
Let's review a few things before we start getting really involved with clicking the shutter. We'll also describe each and then some side effects associated with each.
Shutter Speed - is the simplest of these settings. So, let's get that out of the way first. It is usually denoted in seconds or fractions of seconds. Whole seconds are easy 1,2, 3, etc. The numbers on your shutter speed setting are fractions of a second. 1/2, 1/4, 1/8, etc, The smaller the fraction the shorter time the shutter remains open. That is pretty much it.
Aperture or f-stop This is the diameter of the opening in the lens through which light is allowed to pass on its way to the photosensitive material. The larger the diameter the more light is allowed through. Conversely, the smaller the diameter the less light is allowed through. This opening is related to f-stops. Unlike the straight forward shutter speed numbers, f-stops can be a bit less simple. The f-stop number is a ratio of the focal length of the lens to the diameter of the aperture, f-stop=Focal Length/Opening. The basic glass elements of a lens have a fixed diameter. The aperture blades within the lens assembly are adjusted through the aperture setting to be equal to or less than that fixed diameter. The result of this math of dividing is that the larger the f-number the smaller the opening is. This gets easier as you use it more.
ISO - This is how reactive to light the photosensitive film or sensor is. We'll use photosensitive material to describe either film or sensor. The higher the number the more sensitive. The more sensitivity the less photographic exposure is needed to record a scene. This less photographic exposure can be the result of less light, faster shutter speed, or smaller aperture. Another aspect is that the higher the sensitivity the shorter the time the shutter needs to be open to allow the correct amount of light to strike the photo material. Finally, the higher the ISO is set the smaller the aperture can be to allow the correct amount of light to strike the photo material. The opposite is true for setting the ISO to lower numbers. Conversely, the more light that is needed, a longer shutter speed is needed and / or a larger aperture is needed.
Putting It All Together
This has all been pretty simple up to this point. Now, we need to start associating these three quantities and look at the intended, and / or unintended, consequences of our choices of the above three values. This is where it gets somewhat complicated. However, if the student of photography is well acquainted with the three values of ISO, Shutter Speed, and Aperture, it becomes rather second nature.
ISO - The higher the ISO is set, the more sensitive to light. The unintended consequence is grain. In the film world, it's because of the use of larger silver halide crystals in the faster films. The larger the crystal the more light it can gather. In the electronics world, it's a matter of signal to noise ratio. Signal, in our case, is light. Noise is an inherent characteristic of electrical circuits, much the same as silver halide crystals are part of film photography. Let us use an example with which many folks are familiar. Listening to the radio. In fact, let's put that radio in an automobile. As one is driving down the road listening to the radio there is also the noise of the vehicle, the engine, the tires on the road surface, and the wind as it passes over the vehicle.
While driving through a neighborhood at a slow speed the radio is sufficiently loud and quite clear. However, start driving on a high-speed roadway and the urge is to turn up the volume, thus increasing the amount of signal, the sound, to the amount of noise. At some point, the radio obscures the various noises. Never the less, the noise is still there. Also, if one tunes the radio to a frequency on which there is no broadcast, a hiss is audible. That's electronic noise. However, once tuned to a frequency on which there is a broadcast, the noise seems to disappear, as it's overpowered by the signal of the station. However, it's still there. The same happens with digital photography. The proper exposure, in most cases, will obscure the grain from being overtly visible. Do not fret. Noise, or as I prefer grain, is part of photography. In fact, let us just call it grain.
There are exposure techniques that can minimize visible grain, but that's for another discussion.
Shutter Speed - This is the amount of time the shutter is open, generally in fractions of a second. Here's a real-world experiment you can do, and it is free. Stand or sit by a roadway or sidewalk. Pick a location where there is a lot of movement. You are going to pretend to be a camera. So, you will need to close your eyes. Before you close your eyes, notice something in the near distance, a lamppost, a mailbox, anything. Without shifting your eyes, close them. Then open them for a very short period of time and close them again quickly. You just made an exposure. Anything that was within sight is captured, you may even see a bit of persistent vision of the scene. People, cars, etc. were captured within that short time you opened your eyes.
Now, without changing your attention to that near-distant object, open your eyes and stare at that object for a second or two. Close your eyes. Things that were stationary are locked in your visual memory. Things that were moving are pretty much a blur. The camera works the same way. Additional to objects moving, the camera can also move. This complicates things a bit, too. So, try looking straight ahead, opening your eyes, and move your head around. Nothing but blur. Same with a camera.
So, shutter speed is going to have to be chosen in such a manner as to be fast enough to capture your intended subject, and / or counter any slight movement of the camera.
Depth of Field or DOF is a characteristic associated with any lens. We'll use the subject to describe that on which we want to focus. The object will refer to things in the scene, but of secondary interest.
Every focal length lens, regardless of manufacturer, has a characteristic called Depth of Field. When focused on a subject that distance and only that distance is the distance from the camera that is in focus. If we focus on a subject, that subject and any other object in the scene at the same distance will be "perfectly" in focus. Any object at a shorter distance or farther distance will not be "perfectly" in focus. However, there is a near and far distance that will have objects that are very close to being in focus. So close that they will, for all intended purposes, be in focus. The distance between the nearest acceptably focused object and the farthest acceptably focused object is Depth of Field.
There are a couple of interesting aspects of DOF. The total DOF is distributed such that the nearest object which appears to be in focus is 1/3 of the total DOF in front of the subject and the farthest object which appears to be in focus is 2/3 of the total DOF behind the subject. This is an optical characteristic of a lens. Though the DOF may be different for different focal length lenses, or distances to subject, the distribution is always the same, 1/3 in front and 2/3 behind.
As one stops down the aperture, the depth of field will increase, as well. The wider angle lenses will have a larger depth of field than telephoto lenses. Also, as the subject is located farther away from the lens, the depth of field will increase with smaller f-stops. Lenses of 400-500mm and up, have very little depth of field regardless of f-stop.
Systems Management
For example, you are going to photograph an outdoor scene that features moving subjects. Depending on how fast the subjects are moving, one will need to select a faster shutter speed. This will require a more open lens. So the lens is going to need a larger f-stop. That is going to decrease the DOF. Hmm. What to do? Well, one can increase the ISO, thus requiring a bit less light and that allows us to stop the lens down a bit and gain back the DOF we wanted. We've just managed the three systems available to us to accomplish a photograph that stops the motion, maintains close to the DOF we desired, and kept grain to a minimum.
Let's say for another example, we are going to be indoors for a performance. We are not allowed to use flash. The stage will be well lit, but we are a number of rows away from it. We'll probably need a lens of moderate telephoto length. We have one, but the best it can do is f/5.6. The performers are not moving around a lot. So, we can probably get by with 1/250 for our shutter. We'll use f/5.6 and have to sacrifice DOF to minimize the ISO we'll need to use to get that exposure to balance. These are just a couple of examples of how we'll need to manage the systems that are used to make a photograph. As mentioned, this is systems management. Fortunately, the systems are predictable, to a good degree
Well, hopefully, the novice photography student has gained enough insight into the understanding that there is a systems management situation every time a photograph is being taken. It's trade-offs with DOF, shutter speed, grain. etc. There will be situations where taking the optimal exposure is just not possible, but getting close enough is going to be good enough. Artistic quality, perhaps not, but a lasting memory can be captured. In some cases, the focus is secondary to the importance of the image. There are a lot of photographs of The D-Day Invasion. A good many of them are not in focus or blurred by movement. This does not diminish the importance of those photographs. Conversely, there will be situations where you are afforded the time to determine an exact exposure, precise focus, and great composition. Take advantage of what you've learned here and through experience to make the most of that or any other photographic moment. Always attempt to produce the best you can. Most importantly, never give up in your attempts to improve over the last photograph you've taken. Thanks for reading and I hope you've learned.
Some Guidelines and Tricks
Minimum Shutter Speed
A rule of thumb is the slowest shutter speed should be equal to the focal length of the lens you're using. If you are using a 35mm lens, the slowest shutter speed would be 1/30sec. If you are using a 28~85mm zoom, but at 60mm focal length, the minimum should be 1/60sec. This is to accommodate camera movement during the exposure. If the subject is moving, you'll probably need to accommodate that movement, as opposed to camera movement.
Hyperfocal Technique
This is a nifty trick to convert your DSLR to a point and shoot. If I were photographing something at infinity for that lens, I'd place the infinity symbol over the White focus line on the lens. My nearest DOF distance would be perhaps 6 feet. However, if I were to place the infinity symbol at the far end of the DOF, I increase my depth of field to a bit over 3 feet to infinity. This is one of the nice things about the older lenses with DOF indications. It helps to make the setting a bit more precise. The advantage of this is that when set to the hyperfocal setting, everything the camera is pointed at between 3 feet to infinity will be focused. Can you say point and shoot?
I hope you have enjoyed this series and learned a bit from it.
-Bob
Mar 28, 2020 16:39:24 #
Mar 28, 2020 17:08:34 #
Thank you very much for the comment, Mike. It's certainly appreciated. You're very welcome.
--Bob
--Bob
Blenheim Orange wrote:
I just now discovered your series, Bob. Very well done. Thanks.
Mike
Mike
Mar 28, 2020 23:05:24 #
Timmers
Loc: San Antonio Texas.
I was wondering if you plan to have a part four (4) to go over that basic subject that many call the Sunny 16 rule.
Please note I have offered no critique of the factual data being presented. I'm just wondering about this statement about this being a Beginners Guide to Exposure. It is not my intention to derail your introduction as such, it is that in the past few years I have run across many photographers with good to vary high end gear that can not set the exposure of their camera with an eye to ISO, Shutter, and Aperture.
Please note I have offered no critique of the factual data being presented. I'm just wondering about this statement about this being a Beginners Guide to Exposure. It is not my intention to derail your introduction as such, it is that in the past few years I have run across many photographers with good to vary high end gear that can not set the exposure of their camera with an eye to ISO, Shutter, and Aperture.
Mar 29, 2020 00:32:12 #

Best three articles on exposure, Bob! Everyone should read these.
Andy
Andy
Mar 29, 2020 06:25:22 #
Very well done comprehensive but I'm not sure if the description of ISO and digital sensors is completely accurate. The sensitivity of a digital sensor is always the same regardless of ISO settings. For example, my D500 has a native ISO of 100. The circuitry boosts the signal for higher ISO's.
Mar 29, 2020 07:20:11 #

Timmers wrote:
I was wondering if you plan to have a part four (4) to go over that basic subject that many call the Sunny 16 rule. ....
That's always the best place to start because it immediately ties together all four concepts - aperture and shutter speed (exposure value) plus illumination and ISO.
Even a beginner can easily relate these to a sunlit scene.
Mar 29, 2020 07:58:27 #
genocolo
Loc: Vail and Gasparilla Island
Thank you for all your time and expertise which you put into this series.
Mar 29, 2020 08:01:49 #

Mar 29, 2020 08:19:59 #

rmalarz wrote:
I have enjoyed the series, Professor Bob. Well written and covered just about everything I can think of. Just wanted to say "Thanks."
Mar 29, 2020 08:26:07 #
Mar 29, 2020 08:26:43 #

Nice series Bob!
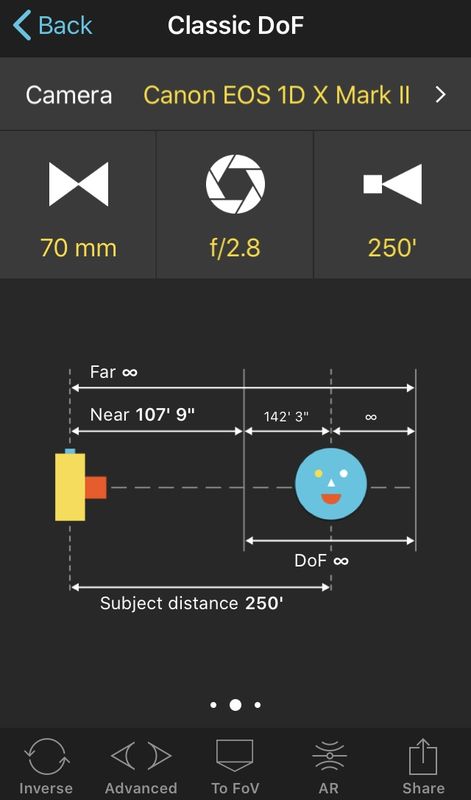
One question comes to mind when you speak to DOF though. The 1/3-2/3 rule doesn’t seem to match up to the DOF calculations I get from my DOF calculator. I have attached an example from the DOF calculator in PhotoPills. Perhaps you can further explain...what am I missing?
One question comes to mind when you speak to DOF though. The 1/3-2/3 rule doesn’t seem to match up to the DOF calculations I get from my DOF calculator. I have attached an example from the DOF calculator in PhotoPills. Perhaps you can further explain...what am I missing?
rmalarz wrote:
Mar 29, 2020 08:47:40 #

I found your 3-part series very informative and useful, Bob. Thanks
Mar 29, 2020 08:58:35 #
Timmers
Loc: San Antonio Texas.
Notorious T.O.D. wrote:
Nice series Bob!
One question comes to mind when you speak to DOF though. The 1/3-2/3 rule doesn’t seem to match up to the DOF calculations I get from my DOF calculator. I have attached an example from the DOF calculator in PhotoPills. Perhaps you can further explain...what am I missing?
One question comes to mind when you speak to DOF though. The 1/3-2/3 rule doesn’t seem to match up to the DOF calculations I get from my DOF calculator. I have attached an example from the DOF calculator in PhotoPills. Perhaps you can further explain...what am I missing?
It does not match the calculation nor does it in reality. The statement that 1/3 and 2/3 is a nice generality for most standard 'hand lenses*'. The generally excepted guide rule is as the lens is stopped down using the aperture of the lens, the area of what is being referred to here as the depth of field shifts more and more to a balance of equal spread across the range of focus. With view camera lenses this effect may actually shift with more weight towards the rear of the point of mid focus, though this is a rare effect found in obscure applications. Looking for details you may wish to begin with the first of the scheimpflug principle. More practice aspects may be found in the books/writings of Dr. Leslie Strobel (former Dean of the Rochester Institute of Technology).
* the term 'hand lens' is a category of lenses that are designed to be used on a camera that is held in the hand rather than designed for use on a camera support (examples would be most DSLRs are hand cameras, while a view camera is not designed nor intended to be used other than on a camera support like a tri pod or studio stand).
Mar 29, 2020 08:59:17 #
rmalarz wrote:
Bob, thanks for the time and effort you’ve devoted to a straight forward, easy to understand explanation of exposure. I’m just a beginner and, as such, have appreciated your series. Take Care and thanks!
If you want to reply, then register here. Registration is free and your account is created instantly, so you can post right away.