treasure
Feb 19, 2020 22:13:32 #
needed a small break from attempting to paint the figures.. (but will get back to that soon)
Inspired by Jim-Pops postings on light painting, I tried to give it a shot. Much, much, much I don't know and do not yet understand - and these items are small, the figure is perhaps 3 inches tall, so I don't have much control with my home made diffused flashlight.
But, I feel I have much greater control over what the metals and woods come out looking like. Indeed, I have found Treasure!!
Thank you Jim-Pops.

Feb 20, 2020 08:55:20 #

I was following your conversation with Jim-Pops and thinking how it represents the very best of UHH: fellow travelers assisting and inspiring one another in the joy of our hobby.
Piet, explain how the light painting helps (or you expect it will help) with your control over the metals and wood in your composite works. Many thanks!
Piet, explain how the light painting helps (or you expect it will help) with your control over the metals and wood in your composite works. Many thanks!
Feb 20, 2020 09:16:12 #
Linda From Maine wrote:
I was following your conversation with Jim-Pops and thinking how it represents the very best of UHH: fellow travelers assisting and inspiring one another in the joy of our hobby.
Explain how the light painting helps (or you expect it will help) with your control over the metals and wood in your composite works. Many thanks!
Explain how the light painting helps (or you expect it will help) with your control over the metals and wood in your composite works. Many thanks!
with metal, taking multiple shots and having soft lighting allows me to select (for a given area) from an image area that is lit, but not Over-lit blown out. Metal has specular highlight that can now be controlled (fewer or no Hot Spots).
I have to learn how to hold the light in different places so that the light "scrapes" the subject. It seems easy or at least easier to produce drama. It may not be as realistic as having "single source" lighting, but for what I do this is a big step forward from having to light the subject traditionally and then somehow achieve the perfect exposure.
Doing it this way allows me to "build up the exposure" where ever I wish from multiple images. And to not have the harshness typically associated with a HDR type process.
Feb 20, 2020 09:17:18 #
Feb 20, 2020 10:31:28 #
I was hoping to see if you got into it last night. Looks like your on your way.
Not trying to be critical just additional information we didn't talk about previously.
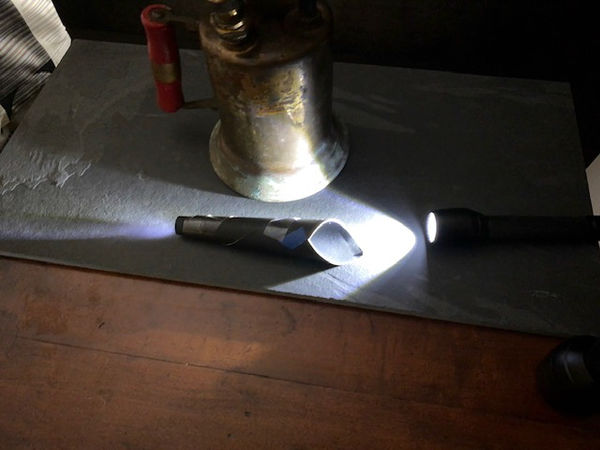
If you want to narrow your beam of light make a cone out of black paper and stick it over the end of your flashlight. You'r light here look good and soft but to wide to add highlighted accent areas. I tried to look at your file for f/ stop and sec information, wasn't on the file. I use about f/16 for mine and higher if I think I can get away with it. This will help to keep a larger portion in focus.
Have fun Light Sculpting/Painting
Jim
Not trying to be critical just additional information we didn't talk about previously.
If you want to narrow your beam of light make a cone out of black paper and stick it over the end of your flashlight. You'r light here look good and soft but to wide to add highlighted accent areas. I tried to look at your file for f/ stop and sec information, wasn't on the file. I use about f/16 for mine and higher if I think I can get away with it. This will help to keep a larger portion in focus.
Have fun Light Sculpting/Painting
Jim
Feb 20, 2020 10:40:44 #
Jim-Pops wrote:
I was hoping to see if you got into it last night.... (show quote)
Hi Jim - thanks - will find some black paper - you are right, that light spreads too fast!!! I think I used around f/13 or some such, going smaller sounds good. Here is the light I made, it had good diffusion, but perhaps diffusion is over-rated anyway, since we keep the light in motion anyway... and try to cone it. A little cone should be easy to make.
I went 6 seconds or so and used screen for some layers that I duplicated - images were pretty dark, but the lit areas looked good.

Feb 20, 2020 10:42:27 #
Forgot to mention your choice of items are perfect for trying out this process. Like the wood bases, I've been looking for some for a while now.
Feb 20, 2020 10:46:15 #
Jim-Pops wrote:
Forgot to mention your choice of items are perfect for trying out this process. Like the wood bases, I've been looking for some for a while now.
scraps of walnut, but man oh man, years ago and hand sanded them all day long..
Feb 20, 2020 16:32:05 #
Piet, I'm not ignoring you it's just that I have no idea what you two are talking about 
Jack
Jack
Feb 20, 2020 17:02:47 #
Curmudgeon wrote:
Piet, I'm not ignoring you it's just that I have no idea what you two are talking about
Jack
Jack
Hi Jack,
Ah.. Jim-Pops has been doing a lot of light-painting recently, and I wanted to give it a shot also, so I gave it a try. Jim is figuring out and has learned how how to do this - a technique popularized by Harold Ross. It involves multiple long exposures in a dark room where the only lighting is a hand held diffused or beamed flashlight that you strategically move about. Then in PS, you take in the multiple images and mask and blend then to your satisfaction mostly using the "lighten" blending mode. I really like it because you can build up the light in different areas without blowing out the specular highlights.
Feb 20, 2020 17:05:14 #
Feb 20, 2020 18:23:28 #
Curmudgeon wrote:
Ah, now I understand--I think.
Exactly - that is exactly what I said to myself when I was doing it. "Ah, now I understand--I think!!"
If you get some time, google Harold Ross - he has 15 or 20 short videos - each 3 or 4 minutes that each detail a single part of his process. Lots of good info there and fascinating to watch.
If you want to reply, then register here. Registration is free and your account is created instantly, so you can post right away.