Help With Rim Lighting
Dec 15, 2019 19:33:57 #
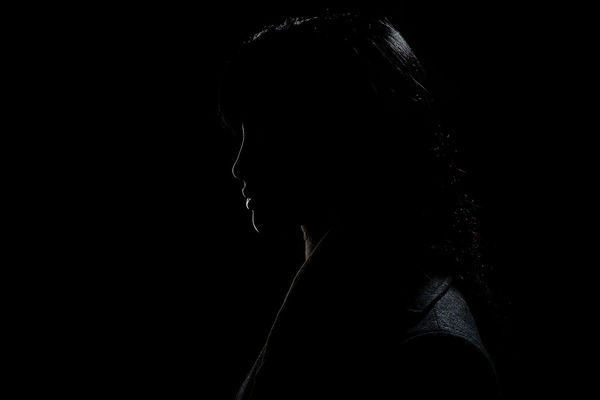
I'm trying to refine my rim lighting and it's required immense adjustments from the two lights to even get this effect. Does anyone have a suggestions that can speed up the process to give a clean rim light on a subject. I realize no two faces will be the same but a guideline to prevent 20+ minutes worth of adjustment would be greatly appreciated.
I've used one gridded strip bank on camera left but it required flagging to prevent flare. Camera right is a 7" reflector gridded. Understandably practice will refine the process. Maybe I'm looking for an imaginary magic bullet.
Please don't mind my subject, she's my mannequin. Thankfully she hasn't complained as of yet :)
Dec 16, 2019 06:24:58 #
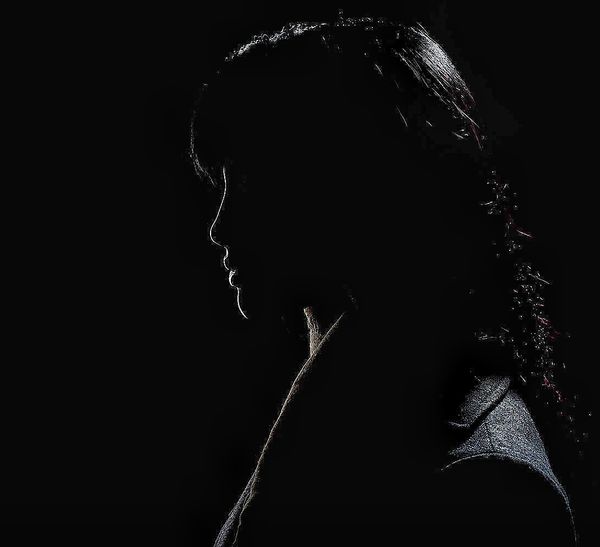
The rim light is not continuous around the mannequin's head. I did this before with one of my studio strobes hidden directly behind the model. I used an 8.5 reflector with a 30 degree grid in place to narrow the beam. I'm sure Mr. Shapiro will have expert advice on it.
Dec 16, 2019 11:03:55 #

Easy-peezie! Here's a method that always works for me in profile lighting. It is especially applicable to profile shots or if you want to employ a rim light as a kicker as part of another lighting arrangement.
When shooting a profile, set up the camera and pose the subject accordingly. Then step away from the camera and assess your lighting from exactly in front of the subject as if you were shooting a full-face shot- you are facing the subject at a 90-degree angle to the camera/subject axis. If you want an extreme rim effect set the rim light unit so you have exact SPLIT lighting from your position. OR you can opt for a Rembrandt profile lighting if you place the light so there is that triangular highlight on the shadow or camera side of the face. When you perfect either of theses lightnings from that off-camera viewpoint you should have a perfect rim or Rembrandt profile lighting. When you return to the camera, you can make minor adjustments to refine the lighting- sometimes it's only a matter of asking the subject to make small incremental moves. It's always best to judge the final lighting through the viewfinder, however, using this off-camera assessment method saves going back and forth many times to perfect the lighting. With practice, you will quickly and instinctively establish the lighting you want.
When moving the rim light unit around you will need to adjust both the height and lateral position to achieve the effect you want. Usually, in a split, the light about the same level of the subject's head and the Rembrandt requires a bit more height. There are no standard measurements in height, you need to assess the lighting ON the subject's face because each person has a different facial structure-shape and length of the nose, the height of the cheekbones, etc. When assessing the lighting als obser the catch lights in the eyes and the nose shadow in the Rembrandt or modified butterfly style.
Here are some other important tips: Grids or barn doors are helpful because theses lightnings require placement of the rim light unit at 135 degrees or more to the camera/subject ax and flare can occur. With barn doors, you can carefully feather the light toward the camera to control specularity. With a grid, feathering is impractical so you will get a ki spotlight effect. To avoid flare, you may need to place the rim light further from the subject as well so you need to plan for some additional backup space for the light. As you move the light further away, it tens to become more contrasty so you may like that effect or employ a diffuser as well.
Exposure considerations: At that extreme angle of incidence the light will seem brighter than the same light at the same power and distance when used at a lesser angle. Sometimes kicker lights cause highlights to burn out even if the exposure reading and setting are correct. When using a rim or kicker in conjunction with other lights, keep that in mind- you may have to power down, diffuse or move the rim or kicker unit further away.
Use the deepest lens shade you can without vignetting I lie to keep a black GOBO ion a light stand or goose neck stand near the camera to use as an addition flare prevention device.
Yet another trick for you: I can sometimes produce a perfect rim light that surrounds the entire head in a profile shot. I place the light behind the subject, just inches away with unit aimed inward toward the camera. The subject acts as your gobo. You need a small unit and at that angle of incidence, you will have to watch your exposure carefully. In oyu image it seem you also use a second rim plight- that's OK too! You can intensify the lines editing and sharpening if you wish.
You can practice this with your mannequin head to get the feel of it and to find a few different folks to "torture" so you can learn the do this with various facial structures. I always promise to torture them and when they find out it's really fun, the pose patiently.
I hope this helps- good luck! Post some shots!!!
Dec 16, 2019 15:48:57 #
Thanks CO for your help.
Ed, as usual, nothing short of attention to detail. I can't thank you enough for your input and your contributions to UHH. I respect your guiding light (pun intended). I'm growing from your input and your thoroughness in every comment.
Unfortunately, I'll be sitting out for a little while so the pictures won't come as quickly as I would have hoped. I've broken another pyrex dome on my main Einstein light and will need to wait for a replacement.
Regards to you Ed & CO for helping.
Dec 16, 2019 16:10:05 #
Haydon wrote:
Thanks CO for your help. br br Ed, as usual, noth... (show quote)
Thanks for your kind words! Quit busting up your gear, man!
 You remind me of me- I have broken so many glass diffusers that I have taken to ordering spares and once I have a plentiful supply in stock, nothing gets damaged or broken! I may give the Pyrex ones to my wife for baking. I don't smoke so I have no need for ashtrays!
...and CO...keep up the good work, you stuff is looking better all the time!

If you want to reply, then register here. Registration is free and your account is created instantly, so you can post right away.