Photos washed out!
Nov 14, 2019 11:31:40 #

Adjust them in post. You just need to buy a program and learn some basic skills to process them to your liking. Personally I think you exposed them perfectly for processing, but they are slightly overexposed if you planned to use the straight out of the camera.
Exposure compensation is one thing you can adjust for the perfect exposure to use straight out of camera (sooc). For more vibrant colors, use EC at about -1/3 to -2/3 of a stop. If your subject is in shadow then use +2/3 to +1 full stop EC.
Exposure compensation is one thing you can adjust for the perfect exposure to use straight out of camera (sooc). For more vibrant colors, use EC at about -1/3 to -2/3 of a stop. If your subject is in shadow then use +2/3 to +1 full stop EC.
Nov 14, 2019 12:08:38 #

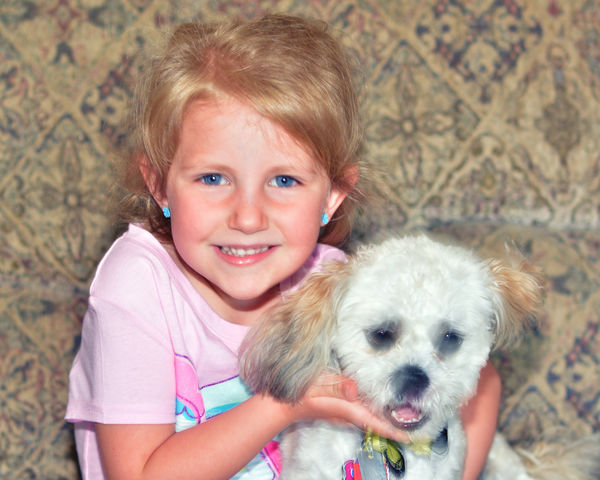
For the girl with the dog, the entire EXIF data is dumped to the attachment in a alpha sort order.
Note the following:
Camera - D7100
Lens - Sigma 50mm F1.4 EX DG HSM
Mode - Aperture priority
aperture - f/2.8
shutterspeed - 1/15
ISO - 100
Flash used - Yes
Flash Exposure Compensation - 0
Exposure Compensation - 0
Flash mode - fired, external
Reading the EXIF data is not a perfect science. It would seem an external flash was used. It would also seem the camera should have controlled both automatically the flash and the shutterspeed for a better image.
Possible ideas / confirmations
1) If in AUTO-ISO, would this free the camera to both raise the ISO and lengthen the shutter?
2) If 'external' is correct, what brand of flash and is the model one that the camera can control? Or, a model the camera will fire only at full-power?
3) Does the D7100 have an onboard pop-up flash? If yes, how do the results compare to using this external (?) flash?
Nov 14, 2019 12:11:22 #
amfoto1
Loc: San Jose, Calif. USA
Dziadzi wrote:
Fellow hoggers, I am at a loss as to why many of my photos appear to be washed out, i.e. lacks color, photos look pale. If you have any ideas as to why I am not getting vibrant photos, nor crisp pictures. Please feel free to critique. Thanks in advance. BTW, I shoot a Nikon D7100, with an assortment of lenses (depending on the venue).
As an after thought, does my issue have anything to do with "exposure compensation"?
As an after thought, does my issue have anything to do with "exposure compensation"?
Looking over this set of images I see a number of different things going on....
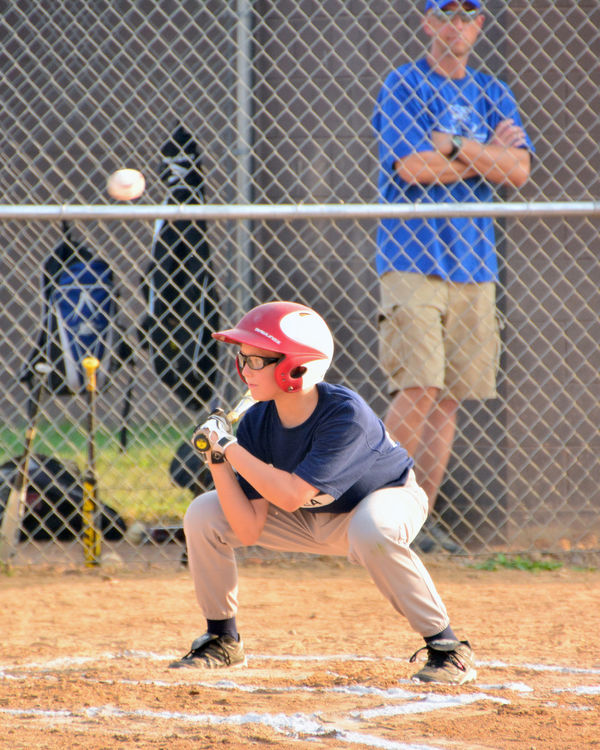
#1 image (batter)... Settings: ISO 800, f/6.3, 1/640, 270mm, "cloudy" white balance, shutter priority AE, spot metering, 0 exposure compensation, no flash.
I suspect the problem was using "spot metering". I can't tell if the image is cropped, but if not, the metering area probably was concentrated on the shaded area behind the fence, at the center of the image.
In fact, that area is very close to "18% gray". I'm not sure that "cloudy" WB was appropriate, either. "Auto" WB might have done better, cloudy probably "warmed" the image quite a bit.
At the highest magnification here on UHH, this image also appears a little soft. It might be due to camera shake, a lower quality "protection" filter, or maybe just the lens itself.
#2 image (girl with dog).... Settings: ISO 100, f/2.8, 1/15, 50mm, digital zoom??? 1.33 (35mm lens focal length 100mm), auto white balance, aperture priority AE, matrix metering, 0 exposure compensation, no flash???.
Here I can't help but wonder why you were using the digital zoom... I would NEVER use digital zoom. You can accomplish the exact same thing just cropping the image in post processing, if need be. That will be more controlled. All a digital zoom does is use only part of the camera's image sensor, reducing resolution.
This appears to be an indoor shot.... why such a low ISO? That forced the camera to use a very slow shutter speed, which I think has in turn caused some slight "shake blur" in the image.
Also, the image appears to be shot with flash... But the image EXIF data says it wasn't. That's weird. Was flash used or not? If it was, the camera isn't recognizing it and working with it correctly. Maybe the flash was set wrong. But that wouldn't explain no record of it in the EXIF.
EDIT: Another response says they see EXIF saying flash was used for this image. Maybe I overlooked it when I checked the EXIF (or mixed it up with another shot's EXIF).
That being the case.... 1/15 shutter speed is ridiculously slow. Especially with flash being used, a faster shutter speed would have been easily possible with one or two stop higher ISO and/or a stop larger lens aperture... This would have made for a sharper shot.
This image really is only slightly over-exposed.... not bad (easily fixable in post-processing), it could even be considered a deliberate "high key" effect. But there's no apparent reason for it, that I can see. So I'd have to guess that the light source, whatever that was, is simply too much for the relatively large aperture and very slow shutter speed, even at ISO 100.
It's pretty minor, but I'd have fixed the "redeye" in the dog's eyes, too. It's actually more of a color fringing around the specular highlight. Super easy to fix (I used a color replacement brush in Photoshop, for the edited image below. See the enlarged view.)
#3 image (baseball player)... Settings: ISO 2500, 1/180, f/6.7, 300mm, manually set white balance???, shutter priority AE, center weighted average metering, +.5 stop exposure compensation.
This image is pretty accurately exposed. It's a little "flat" or lower contrast, but that should be easily fixed in post processing.
Ahhhh! I just discovered ta very likely reason this image appears "flat"... It's Adobe RGB color space (all the other images are sRGB). In many browsers and a lot of other image viewing software, Adobe RGB will tend to look a bit flat. Reds and oranges, in particular, look "muddy". Not sure why you shot it and kept it in this color space... sRGB is better for many purposes.
The high ISO is starting to show some digital noise at the largest magnification here on UHH. However, there's not much you could have done about that with the gear you're using.... You were already using a dangerously slow shutter speed for sports... and the lens is nearly wide open (only 1/3 stop down). An f/4 or f/2.8 lens would be the solution, to allow a faster shutter speed. Using the image at smaller sizes is no problem... but if you were making a large print, some noise reduction in post processing might help.
I'm so sorry to see that the little leaguers there have to play on such a tilted field. That must be tough! (
 )
)BTW, are you aware that your camera works in vertical/portrait orientation, too? Try it some time. All four of these images would have been more or less improved by vertical orientation (or cropping that way).
#4 image (2 girls on porch)... Settings: ISO 800, 1/125, f/2.8, 75mm, auto white balance, shutter priority AE, matrix metering, 0 exposure compensation.
This image is pretty accurately exposed. The white painted porch makes for an overall light tonality scene. Skin tones are pretty good.
Color rendition seems pretty good, too.... appears to have been shot in shade or on a cloudy day (which is good).
Contrast and color saturation can be boosted slightly in post-processing, if wanted. But that has to be done carefully with portraiture such as this.
The biggest problem with this image is overall softness... probably due to the relatively slow shutter speed and camera shake. The shutter speed is just marginally fast enough for the focal length and would require careful technique... assuming no image stabilization. At first I though maybe it was a focus error... but nothing in the image is really sharp, at the highest magnification. Usually focus error leaves something sharp, though it might not be what was wanted in focus. Other possible reasons for the softness would be a poor quality filter or a problem with the lens itself.
Too bad we can't see the rest of their Halloween costumes, due to the horizontal/landscape orientation of the camera.
*********************
Something that jumps out at me is that you appear to change a lot of settings from shot to shot. This may be a mistake. For example, you might want to stick with one metering mode such as Matrix, at least until you get really good using it.... until you know precisely what to expect it to do in a wide variety of situations. Spot metering, in particular, is risky to use. The smaller the error being metered, the more careful you need to be that it's truly "medium tonality", unless you are going to dial in Exposure Compensation. You appear to have only done that in one of these images, and not very much (half a stop). Switching color space in your camera also can be confusing.... pick one or the other and stick with it. Personally I shoot everything Adobe RGB just in case I need that wider color space for some reason... However, part of my workflow is to nearly always change that to sRGB, as required for the vast majority of purposes. (I shoot RAW almost 100% of the time, so the originals are left unchanged.)
Be careful about white balance settings, too. You used auto for two images, a "cloudy" preset for one, and a manually set ("custom"?) for yet another. Personally I only use auto WB or custom WB. I never use any of the presets like "cloudy", because those are wrong far more often than they're right. It's probably the reason for the odd tint to your first image. A "custom" WB is best, when it's done right. But it's not always possible or practical to use... so I just use auto WB a lot of the time. (But, again, I shoot RAW, where WB is very easily changed after the fact.... JPEGs aren't as flexible in this respect.)
These images aren't really all that badly over-exposed... in fact two of them look very close to "correct". Is your computer monitor calibrated? If not, it's probably overly bright for accurate photo editing. Uncalibrated monitors that are way too bright are very common and cause people to adjust their images too dark. This may be why you (or others) think these images are very over-exposed, even when they aren't. The problems with uncalibrated monitors really shows up when you make a print and it turns out too dark. But it also effects what other people who are using calibrated monitors (like me) will see on screen. You can't worry about what people using uncalibrated monitors see... That's out of our control. All you can do is render the image as best possible yourself. If you don't have one, you might consider getting a basic calibration device such as a Datacolor Spyder or an X-Rite ColorMunki. If you do much printing, it will pay for itself over time in savings of wasted ink and paper. Even if you don't print much, it will save a lot of frustration!
By the way, it's an ongoing process... Re-calibration is needed periodically, because computer monitors gradually change brightness and color rendition, over time as they age with use. I calibrate mine monthly. Other people do it more or less often.
Monitor "quality" is another consideration... Most simply don't show full color rendition and almost none show the entire dynamic range of an image. They simply can't render 100% black or 100% white. On the monitor, details get blown out in highlights and are hidden in deep shadows... But they are actually there and would show in a print. High end, graphics monitors are pricey, but they show better color fidelity and wider dynamic range. (There's always some difference between a print on paper where you are viewing it by reflected light, versus an image on a monitor that's being viewed by backlit illumination.)
All four images are actually pretty "recoverable". I hope you don't mind, I downloaded them to see what could be done to improve them. Below are how they look after a few quick clicks and tweaks in Photoshop... along with some straightening and cropping. Adjustments such as these would be better done from a RAW file, than from JPGs such as these. RAW has a lot more "adjustability", if needed. (Be sure to click the link to see the larger versions. I've noticed that the thumbnails embedded in posts here on UHH tend to look a little over-saturated, although the larger versions look fine.)
Image #3 doesn't crop well due to the fairly high ISO and noise in the image. I did not apply any noise reduction (which would also cost some fine detail). The player's face is shaded by his hat, too. I dodged it a little in Photoshop.
I did not try to sharpen or otherwise correct for image softness.
Image #4 I cloned out the plate with food scraps on it. If it were my image, I'd also remove the black chair (or whatever it is) behind the porch rail. If I had one on file with the correct shading, I might add a Jack-O-Lantern pumpkin next to the porch post, beside the young lady on the right. (There's already one in the background). All this stuff would have been better and a lot more easily done before the image were made, setting up the shot. I also most likely would have shot this in vertical/portrait orientation, in order to see their entire costumes. (I can't see and don't know if shoes or steps or something else in the foreground would have spoiled the shot... So your horizontal/landscape crop might be better.)


Nov 14, 2019 12:34:11 #

If I read the EXIF right, the girl/dog photo was take 5 years ago. Am I right? Do you remember what you were doing back then? 1/15 second is a VERY slow speed for this.
Are you letting the camera set exposure or are you overriding it. If so, why?
Are you letting the camera set exposure or are you overriding it. If so, why?
Nov 14, 2019 12:43:43 #

aellman wrote:
Yeah, but there is some reason the camera is not exposing correctly. For the kinds of subjects shown, no exp compensation should be needed. The OP needs to look into the root cause of the problem, rather than having to repair it after the fact (which should be a last resort, not the first solution). A pass thru every camera setting would be a good head start. For example, maybe undesired exposure compensation is enabled now.
>Alan
>Alan
True. I didn’t run the photo thru my EXIF reader to see the camera settings. I just worked with what was there. As I previously mentioned and even with the EC set as it is, the overexposure can be corrected with shutter and aperture adjustments on the camera.
Nov 14, 2019 12:57:33 #
Listen closely. Do you hear horses or zebras?
Are you using a calibrated monitor to view these? I have to say that the monitor on which I view the internet is in no way calibrated, just a piece of cheap HP crap, and all but the girl/dog photo look at least acceptable to me. But with an off the shelf monitor the brightness may be way way too high.
Are you using a calibrated monitor to view these? I have to say that the monitor on which I view the internet is in no way calibrated, just a piece of cheap HP crap, and all but the girl/dog photo look at least acceptable to me. But with an off the shelf monitor the brightness may be way way too high.
Nov 14, 2019 13:15:58 #
Dziadzi wrote:
Fellow hoggers, I am at a loss as to why many of my photos appear to be washed out, i.e. lacks color, photos look pale. If you have any ideas as to why I am not getting vibrant photos, nor crisp pictures. Please feel free to critique. Thanks in advance. BTW, I shoot a Nikon D7100, with an assortment of lenses (depending on the venue).
As an after thought, does my issue have anything to do with "exposure compensation"?
As an after thought, does my issue have anything to do with "exposure compensation"?
Thanks, Stan!
Nov 14, 2019 13:17:35 #
RichardTaylor wrote:
(1) Are you using the histogram to check the exposure, when shooting?
(2) The girl and the dog photograph was shot at 1/15 second, and no flash (acording to the exif data). At this slow shutter speed it is very difficult to stop unwanted camera or subject motion. Also shooting at f2.8 doesn't give you a lot of dof to work with.
(2) The girl and the dog photograph was shot at 1/15 second, and no flash (acording to the exif data). At this slow shutter speed it is very difficult to stop unwanted camera or subject motion. Also shooting at f2.8 doesn't give you a lot of dof to work with.
I have no concept of what a histogram is, nor what it does. I will research the topic, thanks!
Nov 14, 2019 13:27:18 #
Gatorcoach wrote:
A couple of thoughts: Obvious but important questi... (show quote)
Historically, I have shot in RAW and JPEG, shoot mostly manual. As far as ISO, I use Auto ISO limited to 6400. Thanks for your feedback.
Nov 14, 2019 13:29:50 #
Bill P wrote:
Listen closely. Do you hear horses or zebras?
Are you using a calibrated monitor to view these? I have to say that the monitor on which I view the internet is in no way calibrated, just a piece of cheap HP crap, and all but the girl/dog photo look at least acceptable to me. But with an off the shelf monitor the brightness may be way way too high.
Are you using a calibrated monitor to view these? I have to say that the monitor on which I view the internet is in no way calibrated, just a piece of cheap HP crap, and all but the girl/dog photo look at least acceptable to me. But with an off the shelf monitor the brightness may be way way too high.
I only hear ringing in my ears, Bill.....lol. My monitor is a Dell, not a high resolution screen. Thanks for your input.
Nov 14, 2019 13:33:58 #
PHRubin wrote:
If I read the EXIF right, the girl/dog photo was take 5 years ago. Am I right? Do you remember what you were doing back then? 1/15 second is a VERY slow speed for this.
Are you letting the camera set exposure or are you overriding it. If so, why?
Are you letting the camera set exposure or are you overriding it. If so, why?
The submitted photos were taken over a long time span, I just wanted to show some that are over exposed. I normally shoot with a shutter at least 1/1000 outdoors, 1/640 indoors.........for fast action sports. I agree that 1/15 is too slow.
Nov 14, 2019 13:36:07 #

amfoto1 wrote:
Looking over this set of images I see a number of ... (show quote)
These all look a little over-saturated to my eye on my display, and the one image I actually opened up in software shows clipping (the two girls on the porch).
Image 1. The skin tones look off.
Image 2. The face looks harsh and the earrings look out of place.
Image 3. Looks fine.
Image 4. The reds in the sweatshirts are clipped.
Better exposures would have resulted in better images.
Nov 14, 2019 13:46:44 #
amfoto1 wrote:
Looking over this set of images I see a number of ... (show quote)
Thanks so much for all you have written and done, Amfoto1. These photos were taken at differetn times over a period of about 5 years. I normally shoot in RAW and Jpeg. It seems that I have a lot to research and learn. I appreciate your time and helpfulness!
Nov 14, 2019 13:55:24 #

Dziadzi wrote:
I have no concept of what a histogram is, nor what it does. I will research the topic, thanks!
I feel it is one of the better tools to help with getting the correct exposure.
Nowdays I use cameras that have a live histogram in the viewfinder.
Nov 14, 2019 14:12:43 #
CHG_CANON wrote:
For the girl with the dog, the entire EXIF data is... (show quote)
Thanks for your feedback. I appreciate your time and observations.
If you want to reply, then register here. Registration is free and your account is created instantly, so you can post right away.