Senior pictures
Sep 26, 2019 22:39:47 #
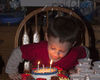
I just took school pictures of my grandkids and I am happy with the results and now I will be doing senior pictures for a granddaughter. I need advice on the lighting.
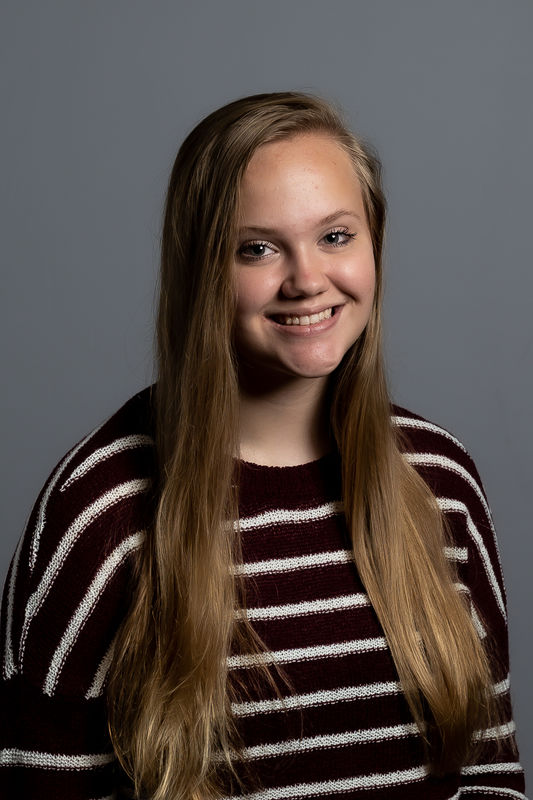
My original setup is a beauty dish camera right with a sock on it, slightly above eye level at a 45 degree angle and a white reflector camera left. This is shown in the first picture. For the second picture I tried the on camera flash bounced off the ceiling (reflector still in place).
I think my strobe was a little too bright, so I am rethinking the light setup for my senior. I only have 2 strobes, which is why I used a reflector on the left. Here are my questions;
1) Is the shadow area too dark?
2) What is the best use of my other strobe? Fill light, backlight, or hair light?
3) Should I use a large strip box instead of the beauty dish? I also have a large and small umbrella that I could use as a shoot through or as reflected light.
I will be posing my senior more creatively and I also want to do a more dramatic shot on a black background. I will post that separately.
Any advice is appreciated!
In addition, I’m planning some outdoor shots. Will I need my small octabox and strobe for outside pictures? If so, what settings for camera and strobe?
Beauty dish and reflector used.
(Download)
Flash bounced off ceiling. Background replaced in Photoshop
(Download)
Sep 27, 2019 01:35:26 #
The first is pretty good but I don't really care on the second. You have the right idea with the first shot.
A suggestion is to make the shot B&W in your photo editor. If the lighting looks good in B&W then it should be good in color.
Another suggestion for #1 is to use a black card. Use the same set up you used, but hang a black 2'x3' card on the shadow side. Try it a foot away from your model, and then another shot two or three feet away. This reduces reflected light on the shadow side without having to move your lights or background.
Suggesting different set ups is very difficult. There are usually too many variables to be fair.
Good luck.
Sep 27, 2019 07:59:13 #
In #2, I like the pose and expression of the girl, the halo around her from post processing takes away from the overall image. Even though the flash was bounced somehow the catch light shows up right in the center of the eye.
Sep 27, 2019 09:24:26 #
Heather Iles
Loc: UK, Somerset
Joe Blow wrote:
The first is pretty good but I don't really care o... (show quote)
Couldn't you help a little bit more as she is not the only one that struggles with lighting? Perhaps a critique and then I am sure more questions will follow.
Thank you for taking the time out to help other members.
Sep 27, 2019 19:35:18 #

Grandma G
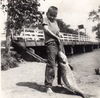
Please tell me more about the lighting setup you used. Draw a rough diagram and post it.
Your lighting and exposure are on the right track but it needs some refinements. There are a number of other issues that need your attention as to composition, posing, costume prep and eye direction.
If you can post the information in including the description of your lighting gear, distances from the subject, power settings and exposure data, I will supply you with a detailed critique and a good setup for your upcoming sessions.
Sep 28, 2019 01:38:51 #
Sep 28, 2019 01:40:42 #
E.L.. Shapiro wrote:
Grandma G br br Please tell me more about the lig... (show quote)
I took a picture of a rough sketch of my setup. Hope this will help you to help me. Thank you.

Sep 28, 2019 01:44:06 #
Sep 28, 2019 02:06:03 #
E.L.. Shapiro wrote:
Grandma G br br Please tell me more about the lig... (show quote)
I have a new Einstein and a used Alien Bee strobe. This is only the second time I have used them. I also have the Paul C Buff Cyber Commander and I must have pushed a wrong button on it because towards the end of the shoot, the Einstein would no longer flash. That's why I used an external flash and bounced it off the ceiling for the girl's picture. Later, I reset it and it works fine now. I was going to used the Alien Bee for a background light to make the background white, but I wasn't sure how to set it up. We wanted a gray background anyway for these basic pictures. I used to use speed lights for the background but I cannot sync them to the cyber commander because the connection on the Yongnua is not for a PC cord.
So, besides the 2 strobes, I have 2 umbrellas (Westcott 42" and 45"), a large strip box (14" x 60"), a beauty dish with a sock, a reflector with a grid, and a 35" octabox. I do have a ring light that I bought for macro photography if that could be used in this setup; but I don't know if it would work with the Paul C Buff equipment.
For this shoot, I used a 50mm f/1.4 lens, but I think I should have used the 85mm f/1.8 because I had to crop a lot. I have a Sigma 135mm f/1.8 that I plan to use outside along with the octabox and Einstein..
I've been watching youTube videos, but haven't found one that helps a lot yet. I look forward to your help in a good setup for my upcoming senior picture shoot.
Sep 28, 2019 02:14:20 #
Lens Cap wrote:
In #2, I like the pose and expression of the girl, the halo around her from post processing takes away from the overall image. Even though the flash was bounced somehow the catch light shows up right in the center of the eye.
I didn't notice that. Thanks for pointing that out. Catchlights should be off center like at 2 or 10 o'clock...right?
Sep 28, 2019 02:15:23 #
Heather Iles wrote:
Couldn't you help a little bit more as she is not the only one that struggles with lighting? Perhaps a critique and then I am sure more questions will follow.
Thank you for taking the time out to help other members.
Thank you for taking the time out to help other members.
I'm glad that I'm not alone in this boat!
Sep 28, 2019 02:33:07 #
Heather Iles
Loc: UK, Somerset
GrandmaG wrote:
I'm glad that I'm not alone in this boat!
I am pleased that you are not offended for me "butting in" on your thread and it has worked as Ed has come to your/ours rescue. Thank you Ed.
H
Sep 28, 2019 04:16:41 #
Correct, nice job on the second post of the girl!
GrandmaG wrote:
I didn't notice that. Thanks for pointing that out. Catchlights should be off center like at 2 or 10 o'clock...right?
Sep 28, 2019 07:55:14 #
Firstly, I want y'all to know that everyone is welcome to join in with all questions, threads, and posts in this section. An add-on question is not considered hijacking. I try to run the section like a workshop where we all participate. Folks are always welcome to offer their own critiques but they need to be constructive so if you like or dislike any particular image, please give you reasons and offer suggestions or remedies for any faults you observe. Point out the good stuff too!
Now let's get back to business for Grandma G's images!
Grandma G! Thanks for the diagram , it is extremely helpful and well done. The lighting setup you are using has excellent potential because it is simple. Work with one good light source and a reflector, for portraiture, is great method because you only need to move around one light and that is especially efficient and effective when you are going to photograph an entire class of senior students.
The beauty light is a good choice because it is a good compromise between an umbrella and a raw parabolic ligh source.
So...befor you go any further, I have some homework for you and others who are reading on. Google Joseph Zeltzmans Portrait lessons. Fine the side and download all the material- it's FREE. It is kinda old school but it is the best basic and most complete course in professional portraiture.
There is a great deal of material there but for now, I want you to study the basic masculine and feminine poses and the differences in composition between a head and shoulders and 3/4 length portrait and the basic views of the face- full face, 2/3 and profile. Once you understand those basics, you will better understand my critique. I also want you to study the modified butterfly or loop lighting that is outlined in the lessons. It has to do with observing the lighting on the subject's face and using the shadow from the nose and the catchlights in the eyes and landmarks while adjusting your light for each subject.
You basic lighting is good. What you need to do is feat the ligh so the edge of the beam strikes the face and enough light strikes the reflector to provides fill illumination.
You can establish a lighting ratio and achieve more contrast and a flattering somewhat dramatic lighting. You want rich but transparent shadows and good diffuse and specular highlights.
In your images, the composition is not head and shoulders or 3/4. but somewhere in between. See my edit for the correct composite where the eyes are about 1/3 down in the frame and there is enough body showing to give base to the head.
Center the eyes and give them direction. In a 2.3 view of the face, when the subject is gazing off-camera, you have to provide a target for them to look at and center the eyes.
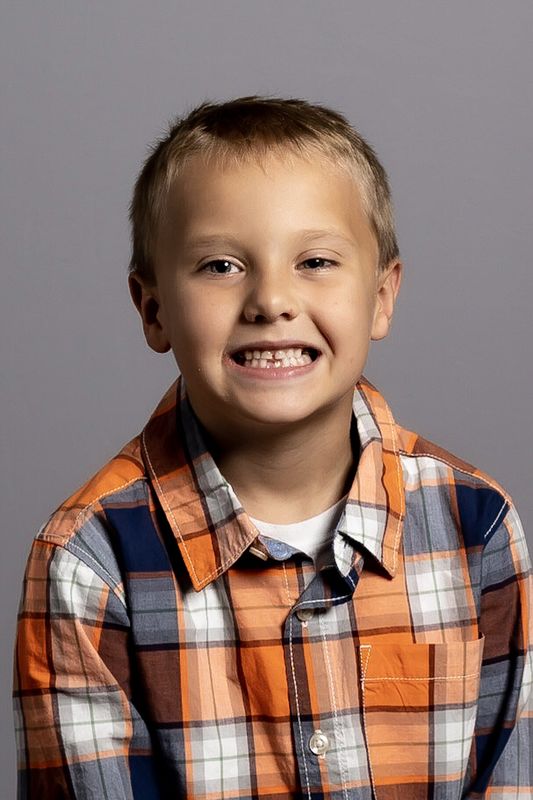
In the young boy, the smile seems forced and he is squinting so that one eye appears much smaller than the other. Try for more natural smiles- and also incle softer and more serious expressing in each shoot. If one eye is smaller than the othere, do a 2/3 face with the small eye further from the camera it looks like a natural perspective rather than asymmetrical eyes.
Posture- Make sure the posture is erect- it is actually more comfortable for the subject when the spine is at full extension. Check out the posing guide in the lessons as to how to seat the subject and place the feet and legs- Even if they don't show in a 3/4 or head and shoulder image, they influence the posture and the shoulder line.
You may want to consider the use of a painted multicolored background. If just enough spill form the main light strikes it, you may nor require a background light. I am not suggesting that you imitate a painting but theses background, if used correctly, can add just enough color and tonal mass to provide separation and dimension.
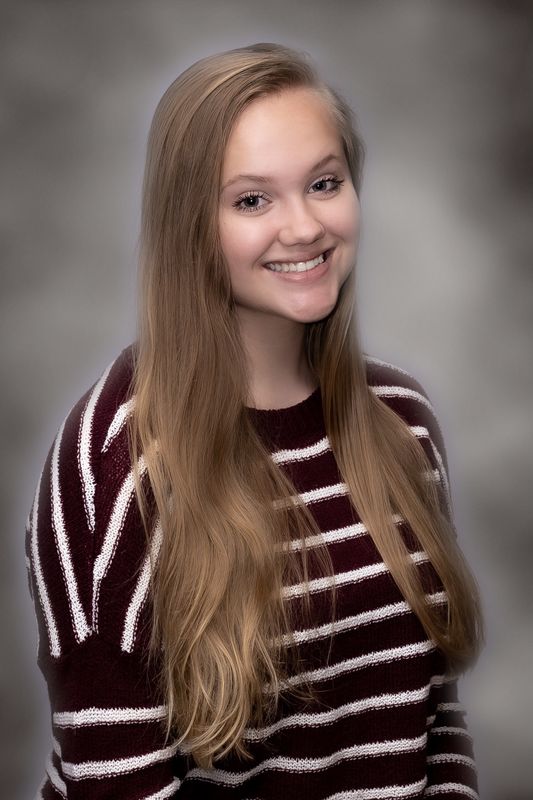
Dress code: Issue a letter to each senior suggesting that they wear darker sold colors and avoid bright colors, brash patterns, stripes, etc. Theses all becom distracting and lead the viewer's eye away from the face. Horizontal stripes add "weight"! You can also advise that they do there hair and other grooming tips.
If you can, grab one of the grandkids again and do a few more images and post them- we can do a follow-up.
Now let's get back to business for Grandma G's images!
Grandma G! Thanks for the diagram , it is extremely helpful and well done. The lighting setup you are using has excellent potential because it is simple. Work with one good light source and a reflector, for portraiture, is great method because you only need to move around one light and that is especially efficient and effective when you are going to photograph an entire class of senior students.
The beauty light is a good choice because it is a good compromise between an umbrella and a raw parabolic ligh source.
So...befor you go any further, I have some homework for you and others who are reading on. Google Joseph Zeltzmans Portrait lessons. Fine the side and download all the material- it's FREE. It is kinda old school but it is the best basic and most complete course in professional portraiture.
There is a great deal of material there but for now, I want you to study the basic masculine and feminine poses and the differences in composition between a head and shoulders and 3/4 length portrait and the basic views of the face- full face, 2/3 and profile. Once you understand those basics, you will better understand my critique. I also want you to study the modified butterfly or loop lighting that is outlined in the lessons. It has to do with observing the lighting on the subject's face and using the shadow from the nose and the catchlights in the eyes and landmarks while adjusting your light for each subject.
You basic lighting is good. What you need to do is feat the ligh so the edge of the beam strikes the face and enough light strikes the reflector to provides fill illumination.
You can establish a lighting ratio and achieve more contrast and a flattering somewhat dramatic lighting. You want rich but transparent shadows and good diffuse and specular highlights.
In your images, the composition is not head and shoulders or 3/4. but somewhere in between. See my edit for the correct composite where the eyes are about 1/3 down in the frame and there is enough body showing to give base to the head.
Center the eyes and give them direction. In a 2.3 view of the face, when the subject is gazing off-camera, you have to provide a target for them to look at and center the eyes.
In the young boy, the smile seems forced and he is squinting so that one eye appears much smaller than the other. Try for more natural smiles- and also incle softer and more serious expressing in each shoot. If one eye is smaller than the othere, do a 2/3 face with the small eye further from the camera it looks like a natural perspective rather than asymmetrical eyes.
Posture- Make sure the posture is erect- it is actually more comfortable for the subject when the spine is at full extension. Check out the posing guide in the lessons as to how to seat the subject and place the feet and legs- Even if they don't show in a 3/4 or head and shoulder image, they influence the posture and the shoulder line.
You may want to consider the use of a painted multicolored background. If just enough spill form the main light strikes it, you may nor require a background light. I am not suggesting that you imitate a painting but theses background, if used correctly, can add just enough color and tonal mass to provide separation and dimension.
Dress code: Issue a letter to each senior suggesting that they wear darker sold colors and avoid bright colors, brash patterns, stripes, etc. Theses all becom distracting and lead the viewer's eye away from the face. Horizontal stripes add "weight"! You can also advise that they do there hair and other grooming tips.
If you can, grab one of the grandkids again and do a few more images and post them- we can do a follow-up.
Sep 28, 2019 09:18:01 #
E.L.. Shapiro wrote:
Firstly, I want y'all to know that everyone is wel... (show quote)
Wow!! I do have a lot of homework to do. I will be gone all day today but will get started with that course tomorrow.
You are right about that forced smile on the boy. I couldn’t get him to ease off and he cannot open the other eye wider. It has been like that since he was born. My daughter wanted a face forward view. However, I will grab him and practice using your suggestions. Also, my daughter wanted her boys in those awful shirts!! I did advise my senior to wear solid colors and nothing sleeveless. Senior pictures these days are more like a modeling shoot. That is not my goal nor the goal of the mom of this senior. We just want some good studio portraits and a few outside shots around her school.
I will get back to you tomorrow!
If you want to reply, then register here. Registration is free and your account is created instantly, so you can post right away.